Plugins give those of us who aren't CSS or PHP programmers the ability to add advanced features and further customize our sites – without having to know a word of code. In fact, using a plugin on WordPress is as easy as installing it. You can use a plugin to turn your website into an ecommerce site; to add photo galleries and portfolios; to integrate web forms and social networks; and much more.
In this article, we're going to introduce you to some free plugins you can use for your site and teach you how to install them.
We'll learn more about:
-
Locating free plugins in WordPress
-
Installing and activate plugins
-
Manually installing a plugin
-
Finding web forms to include on your site (as well as cover the different types of web forms)
-
Locating ecommerce plugins to turn your website into an online store
-
Using BuddyPress
-
Using social network plugins
Locating Free Plugins
Although we're going to introduce you to some free plugins in this article, we also want to teach you how to find them yourself. That way you can make use of the best plugins for your site.
To find free plugins, go to your dashboard, then to Plugins>Add New. You'll then see the Install Plugins page.
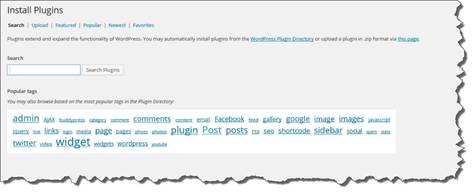
You have several choices as to how you search for plugins. You can type a term in the search box, or you can search by the featured, popular, newest, and favorite plugins. You can click on any of those links that the top of the page under Install Plugins.
We searched for a Portfolio plugin by using the search box.
Here's the results:
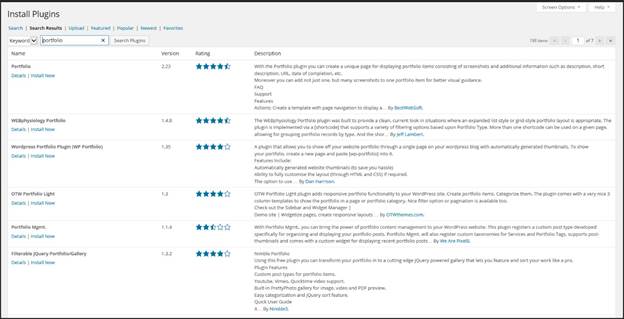
This tells us the name of the plugin, the version, the rating (as rated by other WordPress users), and a brief description.
Installing Plugins
After you find the plugin you want to use, click Install Now below the name of the plugin (as shown in the snapshot above).
You will then see this message from the webpage.

If you want to install the plugin, click OK.
When the plugin is successfully installed, you'll see this message:
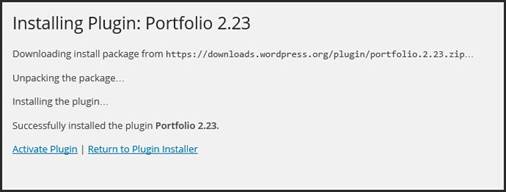
Click the Activate Plugin link.
You will now see the plugin you installed listed with your other plugins.
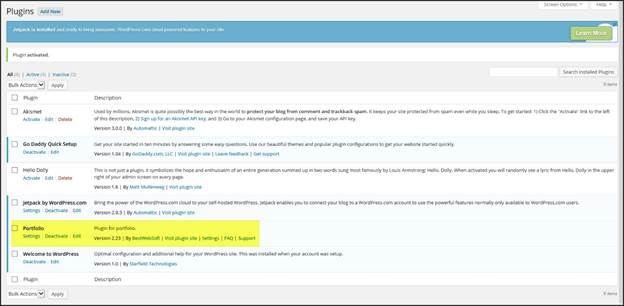
The plugin now appears on your dashboard. Click on it to customize your portfolio.

Manually Installing a Plugin
If you purchase a plugin or get a plugin from another source other than your WordPress dashboard, you'll have to install that plugin manually.
Here's how to do it.
First, download the plugin to your computer. Typically, the file you download will be a Zip file.
If it is a Zip file, unzip it so you can access the files.
Go to your FTP application and connect to your server.
Find the wp-content folder and open it, then find the plugins directory. Upload the plugin to this folder.
You've installed the plugin, now you just have to activate it.
To do this, go back to your dashboard. Go to Plugins>Plugins.
You'll see the Installing Plugin page. Click the Activate link.
Creating Web Forms with Plugins
Web forms give the visitors to your site a way to contact you and share information. There are several types of web forms you can include in your website, and you can use them for all sorts of purposes. It's just a matter of finding the plugin that matches your needs and will provide the web form you want.
Listed below are just a few of the types of web forms you can put on your site using a plugin:
-
Order forms so that customers can place orders with you through your site.
-
Email contact forms. These are popular on Contact Us pages.
-
Surveys where you can ask customers to review your products or leave testimonials.
-
Lead generation forms to collect information about your visitors.
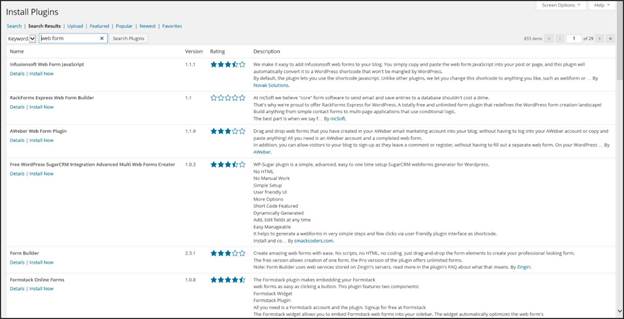
Below is a list of the search results for web form plugins using the Plugin Search feature on the dashboard.
Ecommerce Plugins
Ecommerce plugins allow you to turn your website into an online store. You can use ecommerce plugins to:
-
Create product listings
-
Display images of products
-
Display prices of each product
-
Track inventory
-
Accept payments through PayPal, Google Checkout, etc.
-
Add sales tax and shipping costs
There are free ecommerce plugins that you can use by searching for them from your dashboard. However, there are also some commercial (paid) plugins as well. You will have to decide what plugin meets the needs of your business and site.
Below is a list of the search results for ecommerce plugins using the Plugin Search feature on the dashboard.
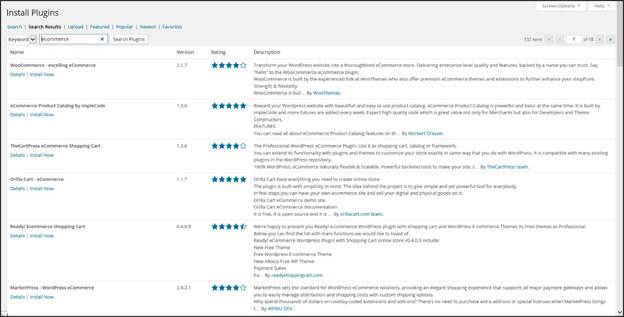
Some plugins, such as WooCommerce are free to install, but charge for extensions.
BuddyPress is a plugin that lets you create a type of social community on your website. Instead of just being visitors to your website, your visitors become members. As members, they have access to members-only features that includes connecting with other members of your community. They can also create profiles where they can hare photos, videos, and links to other websites.
Although installing BuddyPress is optional, it can be a nice feature to give your visitors. It can also make them want to keep returning to your site. In fact, it's what your visitors want because it gives them a way to interact. It's a form of social media. And let's face it. Social media is more than just popular these days; it's part of our culture.
Here are some of the features that BuddyPress offers your visitors:
-
Member avatars
-
Extended member profiles
-
Member and site activity streams that show their activity on your site.
-
Member groups. Your members can gather in groups that are based on interests or topics.
-
Forums where members can participate in discussions with other members.
-
Activity wires where members can leave comments and messages for other members, as well as groups.
-
Member, blog, and group directories.
-
Member status updates.
If you want to see if BuddyPress is something you would want to include on your site, you can test drive it at http://testbp.org. If you decide you want to use it, you can download and install it for free from your WordPress dashboard.
Social Network Plugins
You can also install plugins to integrate your social media profiles with your website. We're going to cover the two most popular social media networks (Facebook and Twitter) below and recommend plugins to integrate them with your website.
Using a plugin, you can integrate Twitter with your website by connecting your site to your Twitter account. That way whenever you add a new post to your website, it's broadcast to your followers on Twitter.
The recommended plugin for this is Twitter Tools. You can find it for free on the Plugin Directory page. Just use the search box, and search for it by name.
Once you've installed and activated it, go to your dashboard and go to Settings>Twitter Tools.
You'll then see the Twitter Tools Options page.
Now just follow the easy directions on the page to connect your site to your Twitter account. This includes registering your website on Twitter's application registration page. Once you register with Twitter, you'll receive a consumer key, a consumer secret key, an access key, and an access token secret key that you will insert in the fields on the Twitter Tools Options page.
After you're finished with that, the Twitter Tools Options page changes. You'll be asked to configure settings for your website:
-
Enable Option to Create a Tweet When You Publish a New Post on Your Blog. This way, new posts are broadcast on Twitter.
-
Prefix for New Blog Posts on Twitter. You get to set how post titles are posted on Twitter. Your prefix can be whatever you want. An example is: Latest Post:
-
Create a New Blog Post from Each of Your Tweets. Your tweets will become blog posts.
-
Create Tweets from Your Sidebar allows you to update Twitter from your website.
You can also use a plugin for Facebook that will update your Facebook page whenever you publish a new post. You can download the plugin Wordbooker for free directly from your WordPress dashboard.
It also includes other features to help you integrate Facebook with your WordPress website, including:
-
Facebook Like. A Like button will be inserted with every blog post on your site.
-
Include Faces. When a reader likes a post, their photo from Facebook displays on your post.
-
Import Comments from Facebook. Comments left on Facebook about a post are imported into WordPress.
-
Push Comments to Facebook. Comments left on a post (on your website) or pushed, or published, in the comment area of your Facebook page.
-
Facebook Share. There will be a small button with every post on your site that allows visitors to share your posts on their own Facebook page.
An Introduction to CSS and HTML
CSS, or a Cascading Style Sheet, allows you to apply styles to your pages. A Cascading Style Sheet is basically a direction for WordPress that tells it how and where things are to appear. It tells WordPress what type of font to apply, what colors to use, as well as other styles. Your CSS stylesheet will always be named style.css in your directory.
In this section, we're going to introduce you to CSS, as well as HTML. This will help you if you want to further customize your website.
We will discover:
-
The definition of a style
-
CSS code format
-
The definitions of ID, class, and tag selectors
-
An introduction to CSS properties and values
-
Changing the background of a theme using CSS
-
Using an image for the background with CSS
Interested in learning more? Why not take an online Creating WordPress Websites course?
-
Common CSS properties and values
-
An introduction to HTML and HTML attributes
About Style
But what is a style? A style refers to either an HTML style or a style definition in a Cascading Style Sheet. Of , in this section, we're going to strictly talk about CSS style.
Style definitions contain information about the text font, white space surrounding the text, the color and size of the text, and other attributes. You can apply a style to a range of text. The style that applies to a range of text is defined by the HTML tag(s) that contain text. A style can also be defined by Class or ID attributes inside the tags.
Here's an example of a style. You can use a style to change the appearance of all text on your website that is tagged H1. H1 is a header that's used at the beginning of a section. It's larger than the text that comes after it. Think of a headline, and you understand header text. However, a style can also be applied to all text in tags with a particular ID attribute.
Please don't fret if all this sounds confusing right now. Throughout the rest of this section, we're going to talk about Cascading Style Sheets and teach you how to create and use them. In just a few pages from now, it'll seem a lot easier and less confusing.
CSS Code Format
CSS may seem like pig Latin to you at this point, but that's okay. Learning to understand the format of CSS code can make learning and using CSS easier for you. That said, let's take a brief look at the format used for CSS in hopes that we can "decode" the code for you. While it's not important that you learn how to write CSS code to create a website from scratch, it can be helpful to at least understand the basics.
The typical format for styles in a stylesheet is:
selector {declaration}
The selector portion tells what elements will be styled within the declaration. Look at this example:

In the above snapshot, body, td, and th are the selectors. Selectors are always separated by commas. This tells us that the body, td, and th will be styled in the declaration.
The declaration is contained within curly braces { }. Declarations are separated by semi colons. Using the snapshot above as an example again, we see the font family, font size, and color are established. These are the styles (declarations of style) that are being applied to the selector portion (body, td, th). You can also apply class and ID using the selector portion, then the declaration.
ID, Class, and Tag Selectors
ID selectors only apply to one element on your page or website. In other words, you might use an ID selector to underline a sentence.
The class selector is used to create styles that can be applied on your page as many times as you like. They're ideal for formatting elements of a page, such as photo captions.
Tag selectors alter the rules of HTML tags. You can use them to alter the position, appearance, etc. of HTML tags. In CSS, Div tags create sections on a page. They replace HTML tables.
Properties and Values in CSS
CSS properties are assigned to the CSS selector name. They are listed in the declaration. You must also assign values to the properties that further define the style for the selector you're working on.
Here's an example:
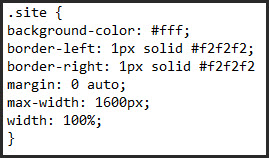
In the snapshot above, .site is our selector. This tells us the properties and values apply to the site.
The properties and the values for those properties are listed inside the brackets.
We can see the background color, the border thickness and color, the margins, and the width of the site.
An example of a property is background-color.
An example of a value is #fff.
A colon must follow every property.
A semicolon must follow every value.
Listed in the table below are some common CSS properties and values.
|
Property |
Value |
Example |
|
background-color |
Color of the background |
.site {background-color: black} |
|
background |
Background image |
header {background: url (images/header.jpg) no-repeat;} |
|
color |
Color of text |
h1 {color: blue} |
|
font-family |
body {font-family: ‘Lucida Grande', Verdana, Arial, Sans-Serif;} |
|
|
font-size |
Size of text |
h1 {font-size: 18px; } |
|
text-align |
Aligns text left, center, right, or justified |
.site {text-align: left;} |
Changing the Background Using CSS
To change the background color of your website using CSS, go to the stylesheet.
The background for the body of your website looks like this:
body {
background: #f1f1f1;
}
Of , the hexadecimal color of your background may be different. To change the color, however, change the hexadecimal value.
Here is how to modify the stylesheet:
Go to the dashboard in WordPress, then go to Appearance>Editor.
Select the theme you want to change from the Select Theme to Edit dropdown menu.
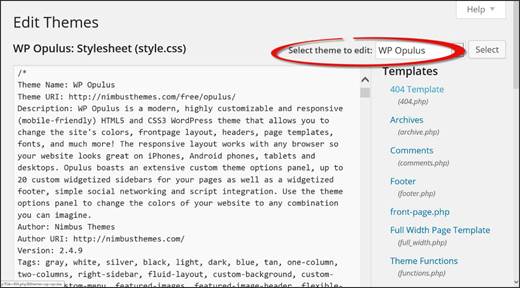
Now go to the list of templates on the right. Choose your stylesheet.
Scroll down in the stylesheet until you find the CSS selector body.
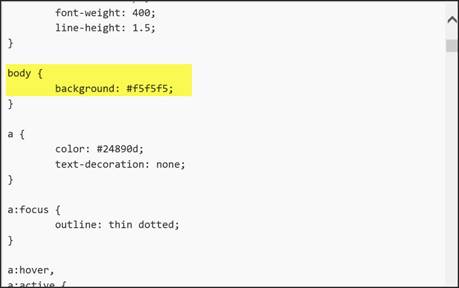
Edit the value for background.
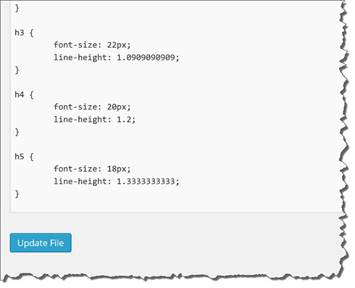
Click the Update File button at the bottom of the page.
NOTE: You would also click Update File if you updated PHP in a template.
Using an Image for the Background
If you want to use an image for the background, first upload the image to images folder in your theme directory, then modify the CSS.
The CSS value looks something like this:
background: url(images/yourimage.jpg)
Properties and Values for Background Images
Below you'll find a table with properties and values for background images.
|
Property |
Definition |
Value |
|
background-position |
Starting point of the background image |
bottom center bottom right left center right center center center |
|
background-repeat |
Defines if your image repeats or tiles |
background-repeat: repeat-y; (x and y are coordinates) |
|
background-attachment |
Defines if the images is fixed or scrolls with the window |
background-attachment: scroll; |
Font Properties and Values
Listed below are some CSS font properties and values.
|
Property |
Example Values |
CSS |
|
font-size |
px, %, em |
body {font-size: 14px; } |
|
font-weight |
bold, bolder, normal |
body {font-weight: normal} |
|
font family |
Georgia, Times, serif |
body {font-family: Georgia; serif; } |
Border Properties and Values
You can also add border to pages and your website using CSS properties and values like the ones listed below.
|
Property |
Example Values |
CSS |
|
border-size |
px, em |
body {border-size: 1px; } |
|
border-style |
solid, dotted, dashed |
body {border-style: solid} |
|
border-color |
Hex value |
body {border-color: #000000 |
Note: px equals pixels. Em is the width equal to a point size. % is percentage measurement. 50% equals 8 pixels.
Positioning a Header Image with CSS
If your website doesn't contain a header image, below is the CSS code to add it:

Introduction to HTML
HTML stands for Hyper Text Markup Language. Quite simply, it is the programming language used for web pages. HTML is written between tags that look like this: < >. You can look at the code for any web page and pick out the HTML by finding the tags. You can use HTML to design layouts, add images, link to files and other websites, add text, format text, and the list goes on.
To help familiarize you with it, we've included a list of the common tags used in HTML. This way, the next time you look at your HTML's code view, it won't seem so foreign. In addition, once you learn a little HTML, you can use it to edit HTML in your theme.
|
HTML Tag |
Definition |
|
<p> |
Paragraph. </p> is end paragraph |
|
<br> |
Line break |
|
<b> |
Bold face |
|
<i> |
Italics |
|
<center> |
Center text. </center> ends center text |
|
<li> |
Ordered list |
|
<h1>, <h2>, <h3>, etc. |
Headings. The numbers represent different sizes |
|
<em> |
Emphasized text |
|
<strong> |
Strong text |
|
<a href="http://www.example.com/">This is a Link</a> |
Link to another web page |
|
<a href="http://www.example.com/"><img src="URL" alt=""></a> |
Alternate text for an image |
|
<a href="mailto:webmaster@example.com">Send e-mail</a> |
Embed an email link |
|
<table border="1"> |
Table border |
|
<tr> |
Table row |
|
<th> |
Table header |
|
<td> |
Table data (text) |
|
</table> |
End of table |
|
<blockquote> |
Text quoted from another source |
Listed above is not all the tags you can use in an HTML document, but they are some of the most common.
That said, a basic HTML document is organized by the Head and the Body.
Take a look at the example below to see what we mean. You can pick these elements out in any HTML page you look at.
|
<html> <body> </html> |
You should be able to determine the function of some of the HTML code using the table above and get a feel for how an HTML page is constructed.
HTML Attributes
Attributes are used to further define tags. For example, if you type in a paragraph tag, but want the whole paragraph in bold face, the bold face would be an HTML attribute. You can have name, Class, ID, align, and title attributes. Attributes allow you to modify tags so that you can completely customize a website. Without them, all websites would look the same.
Here's a list of some of the most commonly used attributes:
|
Attribute |
Options |
What It does |
|
align |
right, left, center |
Horizontally aligns elements within tags |
|
valign |
top, middle, bottom |
Vertically aligns elements within tags |
|
bgcolor |
numeric, hexidecimal, RGB values |
Creates a background color |
|
background |
URL to the image |
Places a background image |
|
id |
User Defined |
Names an element for use with Cascading Style Sheets. |
|
class |
User Defined |
Classifies an element for use with Cascading Style Sheets. |
|
width |
Numeric Value |
Specifies the width of tables, images, or table cells. |
|
height |
Numeric Value |
Specifies the height of tables, images, or table cells. |
|
title |
User Defined |
Title |


