Before you can start creating your WordPress site, you must first acquire a domain and hosting for your site so that WordPress can be installed on your server. These are all necessary steps in order to create a WordPress site, but they are not difficult or time consuming to complete.
In this article, we're going to cover:
-
How to find and purchase a domain
-
How to select a hosting plan
-
Finding the WordPress feature that your host offers
Exploring the World of Domains
For those of you who have never purchased a domain before – or perhaps never created a website – we're going to start at the very beginning and explain everything, including all that you need to know about domains.
A domain is simply an address on the Internet. It is how people who are looking for your website will find you. In fact, it is much like the physical address that you have for your residence, such as 123 Main Street.
All domains start out with "www". This stands for "worldwide web" or the Internet.
The www is followed by the name of your website. Think of it as your house number and address. Your domain can be named anything you want, as long as it isn't already taken by someone else. We'll discover how to check if a domain is available in just a few minutes.
After the name of your domain is the domain extension. Dot com (.com) is one of the most familiar domain extensions, as is .net and .org.
When put all together (with the .com extension as an example), your website address looks like this: www.domainname.com.
This becomes your address on the Internet. People can find you by using search engines, clicking on advertisements that you place, or by typing your address into the address bar in a browser (such as Internet Explorer).
Choosing and Finding a Domain
Domain names must be registered. The process of registering a domain name starts with purchasing it. You can purchase your domain name through a domain registrar such as GoDaddy.com. This can cost anywhere from $10 to $30, depending how many years you want to register the domain (1, 2, or more), as well as the extension that you choose.
Just keep in mind that you do not purchase a domain once, then forget about it. You will need to re-register (and pay) for the domain based on how many years you pay for when register. If you register the domain for a year, you will have to pay again in another year in order to keep the domain. If you register it for two years, you will have to pay again in two years, etc.
However, before you register (or purchase) your domain, you must select the domain name. If you own a business, the domain name might very well be the name of your business. You may also choose to use keywords for your domain name, such as www.pinkdogcollars.com. If you want, you can make a list of possible domains you would like, or you can go straight to a registrar to see if the domain you want is available. If it is, you can register it. If it is not, you can come up with variations until you find one that is available.
We're going to use Godaddy.com to search for a domain to show you how it is done.
Enter the domain name you want in the field below that we've circled in red.
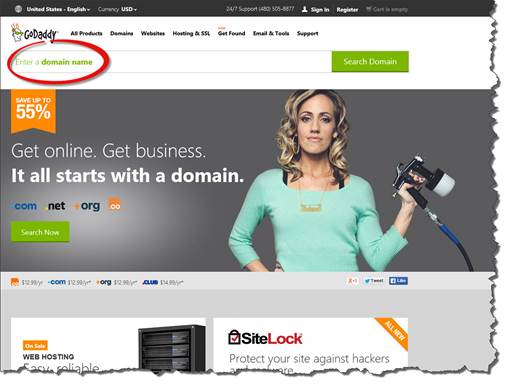
Click the Search Domain button.
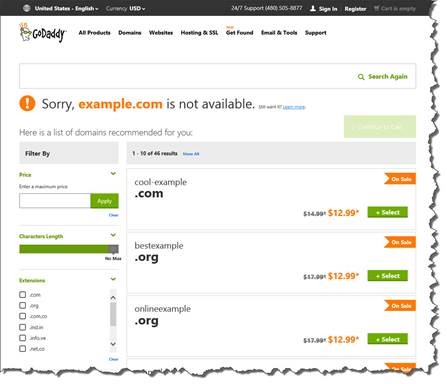
As you can see in the snapshot above, example.com is not available. GoDaddy now gives us other choices.
1. We can search for a new domain.
2. We can look at some of the suggestions for similar domain names that are available. If we see one we like, we can search for it.
3. We can search for other extensions using the domain name.
Once you find the domain name that you want (and that's available), you can register it. You will need a valid email address and credit or debit card to register a domain.
If you don't want to use GoDaddy to register your domain, you can use another registrar. Just Google "I-CANN accredited domain registrars". However, GoDaddy tends to be one of the lowest cost registrars, as well as the most efficient.
Finding a Hosting Plan
Once you register your domain, you need to find a hosting plan. In other words, you already have an address, now you need to be able to build your home.
A hosting plan must also be purchased. You can pay for hosting monthly or annually. Hosting can start as low as a few bucks a month, but can go higher depending on your needs.
Before you can purchase a hosting plan, you will need to find a web host. A web host is a business or individual that will provide you with space on their web server and bandwidth for transferring files. Your web host will give you space on their server to store your files that comprise your website. This is hard drive space. They will give you the bandwidth to upload your files to their server.
For a WordPress site, you will not need much hard drive space (3-5GB should be plenty). In addition, 10-50GB of bandwidth should be enough.
Your web host should also provide:
-
A domain email address with web mail access. This is an email address using your domain name, such as info@example.com.
-
FTP access so that you can transfer files from your computer to your hosting account. You can also transfer files from your hosting account to your computer.
-
Website statistics that show you information about the traffic (or visitors) to your website.
-
MySQL database. MySQL is the database that WordPress uses to store data. You should have version 5.0 or greater.
-
PHP, which is a programming language that WordPress uses. You should have PHP version 5.2.4 or higher.
NOTE: Some domain registrars also offer hosting services. GoDaddy is one of those registrars.
Once you've selected and purchased your hosting plan, you are ready to install WordPress on your server.
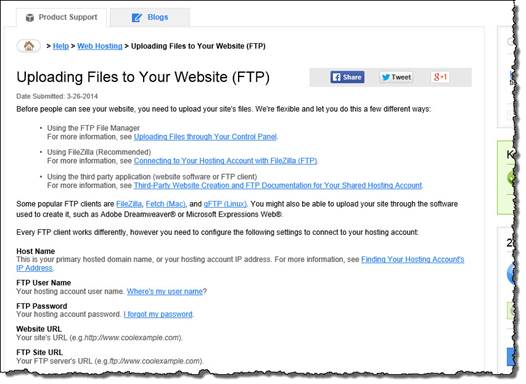
Setting up FTP Access
Once you have your web host, and you've paid for your hosting package, you'll want to set up your FTP access. You can look through your host's FAQ files to find out how to do that. Typically, your web host provides this information to you. It is comprised of your domain name, your username, password, and an FTP address.
Below are the instructions GoDaddy provides, as well as the information you will need.
Installing WordPress
Once you have registered your domain and purchased a hosting plan, you are ready to install WordPress on your server and upload your files. We will walk you through each step so you know exactly what to do. The good news is that once you are done installing WordPress, all the leg work is finished. We can then move on to creating your website.
In this section, we'll discuss:
-
How to install WordPress
-
The MySQL database
-
Uploading WordPress files to your site
-
Installing WordPress on your database
Installing WordPress on Your Server
WordPress uses a PHP/MySQL platform to publish and display your site. It is because of this system that you don't need to know HTML or CSS to use it. You don't even need to know a lot about PHP or MySQL. We're going to discuss what you do need to know in this section.
All the content that you add to your WordPress site is stored in your MySQL database. When someone visits your site, a request is sent to your server to display the site and the content. The PHP programming receives the request. When it receives the request, it requests the information from your MySQL database, then displays the information to your visitor in their web browser.
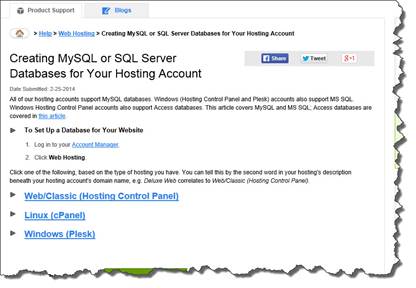
Each web host has different ways for you to access, set up, and manage your MySQL database. Again, you should be able to find the instructions in your host's Help files or FAQ. Here are the instructions from GoDaddy:
Below are the instructions for HostGator, another popular web hosting company:
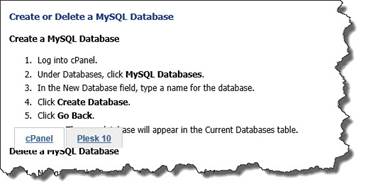
As you can see, the beginning steps are going to be basically the same.
Next, choose which type of hosting you have. Since cPanel (Linux) is one of the most popular hosting interfaces, we are going to cover that in the section. If you have another interface, follow your host's instructions. As you can see in the snapshots above, they are made readily available.
For the cPanel interface, locate the MySQL Databases icon.
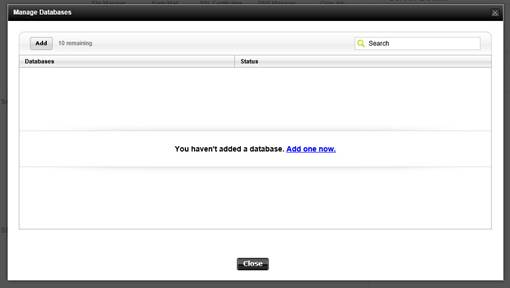
Add a new database. In GoDaddy, click Add or Add One Now.
NOTE: We are showing you screenshots from GoDaddy because it's one of the most widely used.
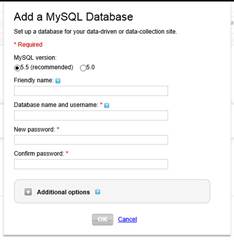
Add a name for the database, as well as a username and password. The username and password are what you will use to access the database.
Click OK.
It may take a few minutes while your database is set up, as shown below.
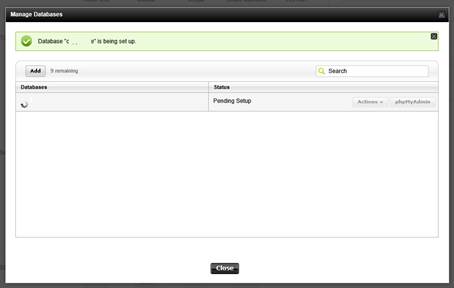
Your host will notify you when the database setup is complete.
Uploading WordPress Files to the Server
Now that you have a database set up, it's time to upload the WordPress files that you downloaded.
You are going to upload the WordPress files that you downloaded to your server's directory. The directory is where all the files and folders you upload to your site are located.
Upload the WordPress files to your server using the FTP client. You want to upload the files that are inside of your WordPress folder, not the folder itself.
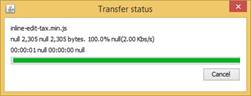
NOTE: Most FTP clients have a way for you to upload multiple files at once so that you don't have to upload the files one at a time.
It may quite a few minutes for all files to upload.
Connecting WordPress to the MySQL Database
Now that you've created your database and uploaded the WordPress files, it's time to connect the files to the database.
Let's learn how to do that.
In your browser window, type in the following URL, replacing "yourdomain.com" with your domain name and extension.

Before we move forward with the next step, let's take a look at the URL above so you understand exactly what it is telling the browser to go on your server.
1. First, you have your domain and extension. That is telling the browser to go to your domain.
2. After the extension, you see /wp-admin. This is telling the browser to go to the wp-admin folder on your server.
3. After the folder, we see /install.php, which is telling the browser to go to the install.php file inside the wp-admin folder.
Click Enter to direct your browser to your site. You will then see this message:
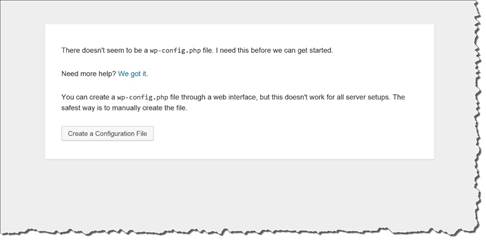
Click on the Create a Configuration File button.
You will then see the welcome page for WordPress, as shown below.
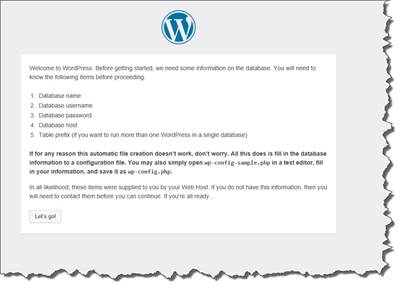
Next, click the Let's Go button located at the bottom of the page (shown above).
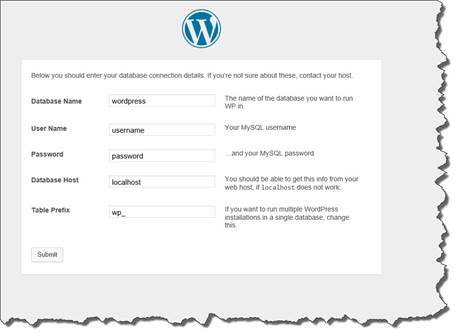
Type in the name of your database, your username, and password. You selected all these earlier when you created your database.
For Database Host, leave this field to read "localhost." Some hosting providers will have different hots set for MySQL, but 99% of the time "localhost" will work. If not, contact your hosting provider to find out the name of the database host.
For Table Prefix, leave it at wp_.
Click the Submit button.
When you do, you will see a message that says:
"All right, Sparky! You've made it through this part of the installation. WordPress can now communicate with your database. If you're ready, time now to run the install!"
Click on the Run the Install button. This will run the install script.
You will see another welcome page that welcomes you to the five-minute WordPress installation process, as shown below.
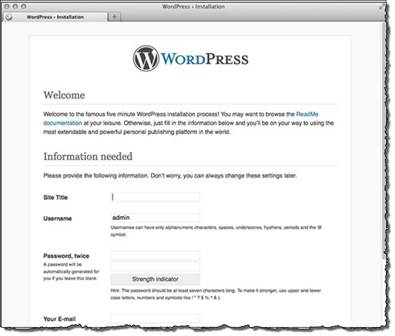
Now enter the following information:
1. Enter a site title. This will be the title for your site.
2. Enter your username that you use to login to WordPress. The default username is admin. You can leave it that way if you want.
3. Type in your password twice. Type the password that you want to use, then type it again to confirm it. You can enter in any password that you want; however, make sure you write it down because this will be your WordPress password.
4. Your email address. This will be where administrative information about your site is sent.
5. Check the box if you want to allow search engines to index your site. This is so your site can appear in search results.
When you are finished, click the Install WordPress button.
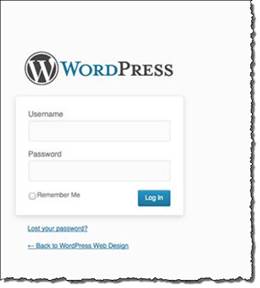
WordPress will then be installed. It will display the login information to access the WordPress Dashboard. You'll want to write this information down.
Click on the Log In button to login to WordPress.
NOTE: If you have trouble connecting to your database, contact your hosting provider for assistance. Because of the large number of hosting providers, it's impossible to troubleshoot all possible problems in this section.