Publisher is a page layout program to help you create complex and professional looking documents. That is why they give you so many tools that help you insert and arrange artwork and images. But let's face it. The most important part of any document is the text. The pictures, pie-charts, and ClipArt are only supposed to highlight and enhance it.
The way that Publisher handles text is what separates it from simple word processing programs like Microsoft Word. That isn't to say that Word isn't complex or that you can't create impressive, visually interesting documents with it. You can. But because Publisher is typically used to deliver professional quality documents to commercial printers, it offers slightly more sophisticated tools for typesetting. For instance, tracking and kerning options are more complex in Publisher than in Word.
That is basically what a text box is: an object. But instead of containing artwork or images, it contains text. You can resize these objects, move them, delete them, and even stack them on top of each other.

You should already be familiar with the Drawing Tools Format tab. Just as we learned earlier, from there you can change the border of your box, add a fill and 3-D effects, and wrap other text around it.
So in this section, we're going to focus on the options in the Text Box Tools tab.
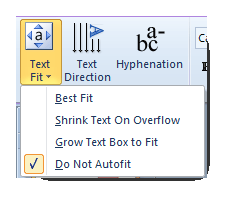
- Best Fit--This option allows Publisher to determine how to fit the text. It takes into account the size of the text box and tries to guess what your intentions were. For instance, if you were to draw a large text box, type something into it, and then choose this button, the text would expand to fill the entire text box. If you were to then type even more text into the box, the text would shrink until all of it could fit inside.
- Shrink Text On Overflow--This option is almost the same as best fit, except its focus is on shrinking the text so it stays inside the text box. Unlike the Best Fit button, it will only expand text back to the original font size when overflow text is deleted.
- Grow Text Box to Fit--Instead of shrinking the text to fit inside the box, this button makes the box bigger to fit all of the text. The size of the text itself never changes.
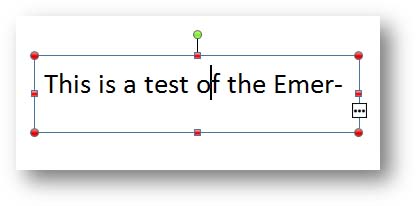
- Do Not Autofit--This option does not adjust either the text or its box. Overflow text, that is text that doesn't fit inside of the box, is simply unseen. Instead, red buttons will appear in the border around the text box, telling you that overflow text exists. An ellipses also appeared in a box near the bottom right hand corner of the text box that you can click on in order to "thread" the text to another text box, which we'll talk more about later in this article. You can also drag the box to a bigger size by yourself in order to fit all of the text. The example below shows a text box with overflow text inside of it.
 With it, you can choose whether you want the text to go from right to left or from up to down. Below is an example:
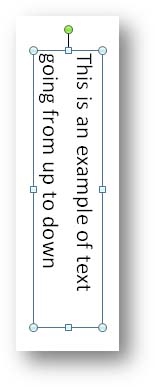
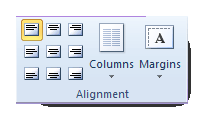
You can use the nine buttons on the right to change the text alignment within the selected text box. The options in the first line include (reading from left to right): left margin flush, centered text, and right margin flush. In the next row, the same options are available for text that is centered vertically within the box, and the final row shows text situated against the bottom margin of the text box.
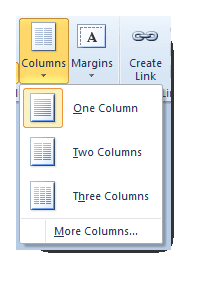
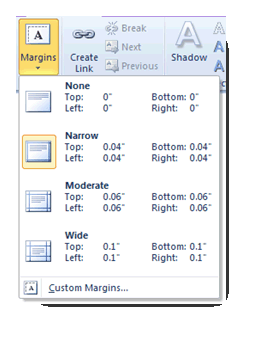
The Margins button refers ONLY to the margins of the text box. That is, the white space between the edge of text to the border of the text box. It is NOT the same as your page margins, which we talked about in an earlier article.
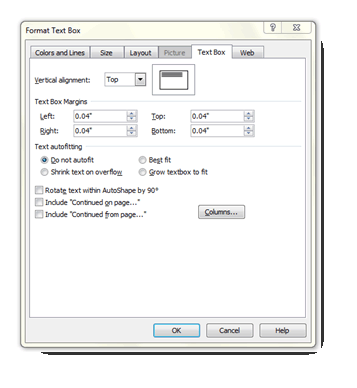
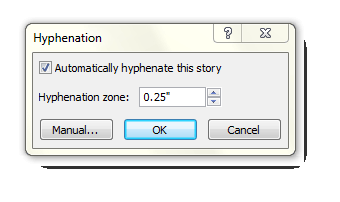
Here you can enter your own values and click OK when finished.
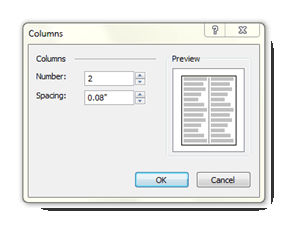
You should also note, though, that all of the functions we talked about earlier are also available from within this window. We can select a vertical alignment, an autofit setting, launch the columns window, and more. You can also choose a tab along the top to configure the fill color or border, or the size and layout.
Format Text
To type text into a text box, click on the box to activate it. Once activated, the cursor will appear, and you can start typing.
Formatting the text you type is nearly identical to Microsoft Word except there are two ways to access the tools. In Publisher, you can go to either the Home tab, or the Text Box Tools Format tab. From either of these locations you can change all of the attributes of your text, from the font style, to character size, to color.
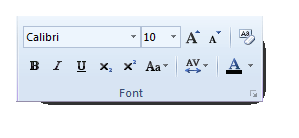
The box above that says "Calibri" is where you will go to change the font. You have access to every font installed on your computer, but you should be aware that not all fonts can be embedded into the document. ( Suffice it to say, that fonts are subject to intellectual property laws that may prevent you from using for commercial purposes.)
Calibri is a type of font. But when you click that box, a drop down window opens, allowing scrolling through and even previewing each of the fonts installed on your computer. Select the style you want.
To the right of the font style box, is the font size box. You can click the box and type in a custom value, or use the arrow button to the right to select a preset. The smaller the number, the smaller the font, and vice versa. Alternatively, you can click the  button to increase the font size by one value, and the
  button to decrease the font by one value.
The  button clears all character level formatting from the text box.
You are undoubtedly familiar with the bold, italics, and underline commands, so we'll move on to the two buttons to the right. The  buttons adds a superscript character--that is a character appears above the baseline. The
  button adds a subscript character--or one that appears below the baseline. Both of these characters are usually significantly smaller than the normal font size. E=MC2 is an example of when you would use a subscript character.
We already examined the ways in which you can align your text, but let's now look at the other paragraph level formatting options.
Unlike character level formatting, most of the paragraph formatting options can only be found on the Home tab in the Paragraph group.
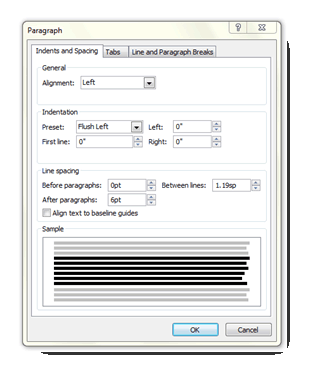
Here we can select an alignment, a line spacing value, automatically insert space between paragraphs and more. You can also change the automatic indentation. Click OK when finished.
Tracking and Kerning
Tracking refers to the amount of space between all of the letters of a selection of text. It is usually done to text to change the overall appearance and make it easier to read.
Kerning refers to the amount of space between two individual letters and is mostly commonly adjusted in headlines. Why? Because some combinations of letters may look awkward together, such as AW or VA, and may affect the flow of the eye over the text.
 , you will be presented with a series of quick options, as illustrated below.

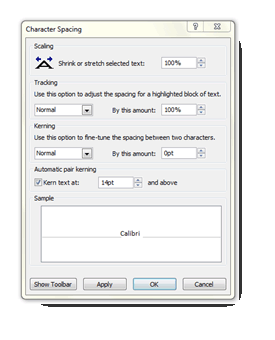
From here you can shrink or stretch the selected text, or change the tracking options. You can also fine-tune the spacing between two characters with the Kerning options. A preview appears in the Sample box. When you are satisfied with your selections, click Apply, then OK.
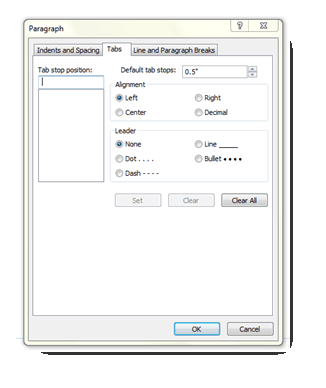
Set Tabs
Tabs are not quite the same as indents. You probably remember setting the tab stops on your typewriter, and then using the tab key to do everything from indenting the first sentence of a paragraph to creating bullet points or numbered lists. Those days are long gone. The truth is, you could use a word processor for years without ever using the tab key. You don't really need it anymore. The word processor automatically indents the first sentence, and the bullet list and numbered list buttons allow you to easily indent those.
Use Styles
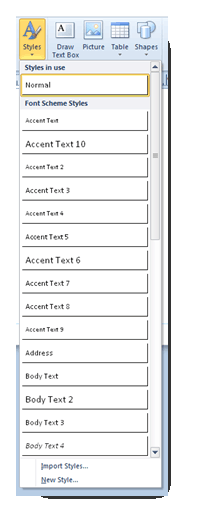
Styles are simply character and paragraph attributes you can apply easily to your text. We encourage anyone working with electronic text to use styles. They usually work across platforms, and make it easy to create things like tables of contents.
What's more, you can change the attributes of a style, and every block of text that style was applied to will automatically adjust to reflect those changes.
Styles can be created for headlines, subheadlines, body text, sample text, and more.
 Click it to see the available styles or to create your own.
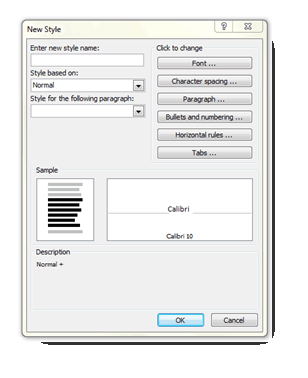
Here you can enter a name for the style, select the font, character spacing, paragraph format, and more. Click OK when finished.
To modify any style, you can click the Style button, then right click on any style, and select Modify. Then enter your new values and click OK.
Text Flow and Connection of Text Boxes
We mentioned overflow text earlier. That is the text that simply doesn't fit inside of a single text box. We also told you that text boxes that have unseen overflow text will have red buttons in the border and a bold ellipses in a box in the lower right edge of the text box. Clicking that ellipses "loads" the cursor with the overflow text. When a cursor is loaded like that, it turns into what looks like a coffee cup with some sparkly, magical substance spilling out of it.
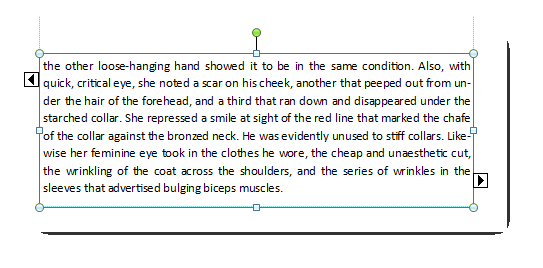
Clicking on the left arrow will take you to the text box earlier in the thread, and the arrow on the right will take you to a text box later in the thread. It should be noted, though, that either of these arrows might be absent if there are no text boxes before it or after it. For example, if it is the first text box in the chain, the left arrow will be absent. If it's the last text box in the chain, the right arrow will be absent.
Deleting a Text Box
Deleting a text box is as easy as selecting the box, right clicking on it, and choosing Delete Object, or Cut.