Starting a Program
Programs could be defined as tools. They are the things that allow you to create documents, edit pictures, create spreadsheets, add numbers, play a certain game, and on and on. Documents are created by programs. Files are also.
When you want to open a program, you start out by going to the Start menu. The Start menu will make opening your frequently used programs easier by pinning them right there in front of your eyes. You can simply click on a program's icon (if it appears) in the Start menu to open it.
If you don't see the icon for the program you want to use, click All Programs in the Start menu and locate your program. Just click its name when you find it.
You can also open programs by clicking the icon on your desktop or in the taskbar. You can also search for it in the search box.
Opening a Document
All documents -- or files -- are opened the same way in Windows 7.
Simply click the word File in the program's Menu Bar. The Menu Bar is that bar with words across it. It's typically located below the title bar -- or the bar at the very top of the window.
If you don't see the Menu Bar, press Alt to see it.
In the snapshot below, you can see the word File in the Menu Bar.

A drop down menu will appear when you click on File. Select Open.
Keep in mind that you can also open a file without opening a certain program first. Windows 7 assigns default programs to open certain types of files. For example, MS Word is the default program (when it's installed) that opens all .doc files.
To open a file without opening a program first, either double click the file's icon or right click on the icon, then select Open.
Saving a Document
To save a document, click on File on the Menu Bar and select Save from the dropdown menu. When you save a file using the Save command, it will save the file using the existing file name. If you're saving a new file or want to change the name of the file, click Save As instead.
Selecting a Program to Open a File
Perhaps you may have a file that you want to open in a certain program. For example, maybe you don't want a word processing document to open in MS Word. Perhaps you want it to open in WordPad instead.
Let's learn how to do that.
Right click on the file. Select Open With from the menu that appears.
You'll then see the window below.
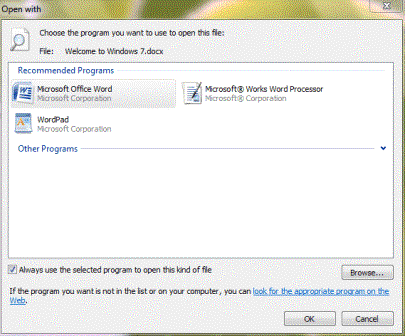
First, Windows 7 will show you the recommended programs to open this file. You can select one of these programs if you want or you can click the Browse button to select a program.
Next, make sure the box is checked next to Always Use the Selected Program To Open This Kind Of File if you want to use this program as the default program to open this file type.
Click OK.
Cutting, Copying, and Pasting
Can you imagine using a computer without the cut/copy and paste option? It's a safe bet to say that you've used it quite frequently in the past, and it's made your life a lot easier. Perhaps you've copied a web link to put in an email, or copied bits of text that you liked. Either way, using the computer to gather or share information wouldn't be nearly as easy if you couldn't cut/copy, then paste.
The good news is that cut/copy and paste hasn't changed in Windows 7. You can still do it, and there's not some new complicated process. However, let's just review just in case some of you are newbies to Windows or need a reminder.
The first thing you have to do before you cut/copy anything is to select what you want to cut and copy. By select, we don't mean point it out and say "that's what I want!" We mean that you have to highlight whatever it is that you want to cut or copy.
To select text or a link, place the mouse cursor at the beginning of the text you want to select. Hold the mouse button down and drag it over the text until you reach the end of your selection. Release the mouse button. The text should now be highlighted.
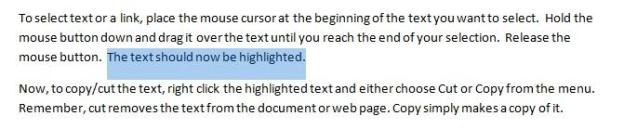
Look at the snapshot above to see highlighted text.
Now, to copy/cut the text, right click the highlighted text and either choose Cut or Copy from the menu. Remember, cut removes the text from the document or web page. Copy simply makes a copy of it.
Next, go to the document or file where you want to paste the information. Click in the document where you want the text that you've cut or copied to go. Right click, then select Paste from the menu. Ta-da! That's all there is to it!
Finding and Using the Character Map
You can use Character Map to insert symbols and foreign characters into documents. Character Map has been available with previous versions of Windows, but if you've never had the chance to use it before, you may not have known it existed. Don't worry! It's easy to use, and it can be fun, too, just to play around with all the neat symbols.
To locate the Character Map, go to the Start menu, click All Programs, then select Accessories. From the Accessories list, choose System Tools>Character Map. We've included a snapshot of the Character Map below.
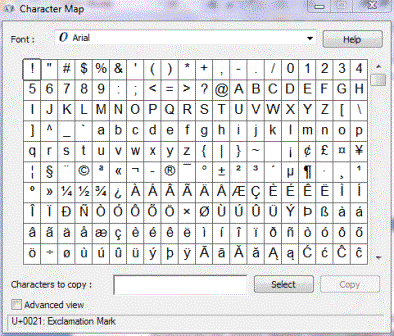
Look through the Character Map box and find the symbol you want. You can also select different fonts and look through those boxes.
When you find the symbol that you want to use, click on it. It will then appear in the Characters to Copy box in the lower part of the window. To copy the symbol (so you can place it into your document), click Select, then Copy.
Now you can go to your document, click on the place where you want the symbol, then paste it in. Does it get any easier?
The Calculator
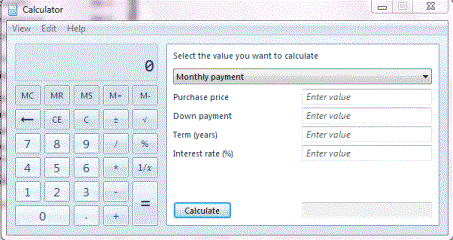
The one complaint that's always existed with the Microsoft calculator was that it looked like one of those $1 calculators you'd find at some discount store. It was elementary at best. The good news is that the look and feel of the calculator has improved in Windows 7. Microsoft has given the calculator a new layout, then added four modes: standard, scientific, programmer, and statistics. They've also added data conversion and templates for calculating gas mileage, your mortgage, and leases. The changes were much-needed and cool!
Let's open the calculator by going to the Start Menu>All Programs>Accessories>Calculator.

Once you have your calculator open, go to the Menu Bar and click View.
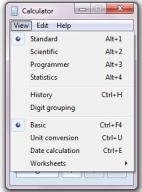
The menu pictured above will appear over your calculator. You can now switch between the four modes.
Everything about the calculator is self explanatory, but there's one thing you may not have seen before -- and we haven't mentioned. That's the worksheets. You'll see the Worksheets option above. You select worksheets if you want to calculate your mortgage, lease, etc.
Click on the Worksheets option, then select Mortgage. Your calculator window will expand, like in the snapshot below. You'll be asked to fill out the worksheet to the right of the calculator so that the information can be calculated for you.
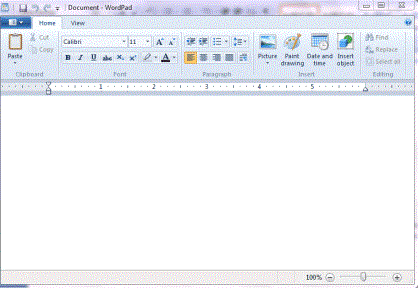
WordPad
WordPad is never going to be able to replace or compete with fancy word processing programs such as MS Word, but it can be the perfect answer for you if all you need is to write simple letters, create basic reports (without multiple columns or tables), and other very basic word processing tasks.
To locate WordPad, go to the Start Menu>All Programs>Accessories>WordPad.
Finding Lost or Misplaced Files, Folders, and Programs
Locating a Missing Program, File, or Folder
Once you've had your computer for any length of time, finding something on it can be a chore! You accumulate so many files, folders, and programs that you forget where something is or, worst of all, know where something is but can't find it when you need it the most.
You can now think of your computer as Google. We both know that Google can return a million results in just a matter of seconds (on any topic). But now your computer can too because Microsoft has finally learned how to index.
Just to see how amazing it is, go to the search box in the Start menu. Type in Fast. Just see how fast results appear. It's purely amazing -- and it's about time! The search box can find documents, pictures, music, videos, and everything else, including files in your recycling bin.
Finding a File Inside a Folder
If you have your computer organized in the least, then you use the structured system provided by Microsoft to store your documents, files, music, and pictures. It makes it a lot easier to find what you need when you need it.
For example, all your documents are in the Documents library. All documents relating to tax information, for example, are in a folder called Tax Information.
And remember, to create a new folder, right click on a blank area in the window and select New Folder.
But as organized as you may be, there's no easy to answer to organizing files inside a folder. In fact, trying to find a file inside a folder can be a chore in itself if there are more than a few dozen.
You'll be happy to know that Microsoft knows this, and they've given you an easy answer. The search box inside every folder's window applies only to that folder. This means that you can open your folder called Tax Information, type information in the search box, and Windows will pull up relevant files from the Tax information folder only. Just start entering words or phrases from the file you need. Windows filters results as you type.
Here's another way to search for files. You can sort by any of the column headers in the folder window. These headers are: name, date modified, type, size, authors, and tags. Just click on the column header.

Arrange and Group Files
As well as organizing your folders by name, date modified, and so on, you can also arrange and group your files. Let's learn what we mean by that.
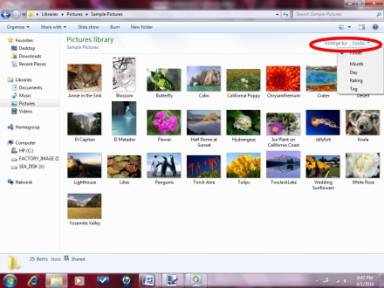
Arranging your files was formerly known as stacking in Vista. It simply means you "stack" them according to specified criteria, specifically month, day, rating, or tag.
To arrange your files, open the window where they exist. In the right hand corner, you'll see Arrange By. Select your criteria from the menu. (As pictured below in the Picture library.) It will put all files that match the criteria into a "stack" where one is on top of the other.
Grouping also puts similar items together, but it spreads them out rather than stacking them. To group your files, right click on a blank area inside the window and select Grouping, then your criteria.
*You can also right click to sort and arrange files.
Find Lost Photos
Windows 7 indexes everything in your computer so it's easier to find. However, what you have to remember is that Windows indexes words. Since photos don't contain words, it can make it a little harder for Windows to index. More than that, it can make it harder for you to find them.
That said, it's better that we teach you how to save your pictures to your computer rather than how to find them. The goal is to associate as many words with your pictures as possible. You do this by assigning tags to them. Tags are what keywords are to search engines. They're words that uniquely identify your individual photos. You can use the same tag for more than one photo, but the sum of the tags you use for each respective photo will make it unique -- and easier for Windows to index. Whenever you copy a picture to your computer, Windows will ask you to tag it. If you have a lot of photos or have difficulty finding things you need, don't skip over this process.
You'll also want to make sure you assign unique names to your photos. It may be easier to label all pictures from your recent vacation "Vacation photos 2010," but that's not going to make it easier to find individual photos. Give them names that will help you recognize them. To rename a photo, right click on it and select Rename.
Find Other Computers on the Network
A network, by definition, is a group of computers that are connected and can share certain things. these things might be printers, files, and so on. When you're part of a network, there may be instances when you need to find a certain computer within the network to get a file or access a printer. Finding other computers that share your network is easy.
To find computers in the network, open any folder and look in the Navigation Pane under Network. This will show every computer connected to yours in the network. If you want to grab files from a certain computer or use the printer, just double click the computer name. It doesn't get any simpler.
Find Information on the Internet
When you want to find things on your computer, you use the search box in the Windows Start menu. When you want to find things online, you have to connect to the Internet using your browser.
To find information on the Internet, open your Internet Explorer window. You can click on the icon in the taskbar. It looks like this:  .
.
When Internet Explorer opens, use the search box on the right hand side (pictured below) and type in what you want to find. The search engine will show you the results.

Figure 1. Internet search box
Save a Search
Saving a search applies to searches that you do on your computer. (If you'd want to save a search that you made on the Internet, you'd bookmark and add it to Favorites.) To save a search that you've made on your computer, click the Save Search button in the margin of the search results window. This is shown in the next picture. A dialogue box will then open and ask you to name the search. Once you do that, your search will be saved in the Favorites section of the Navigation Pane.
*If your results don't open in a window, click See More Results below the results shown in the Start menu.