Another way to ask Excel "what if" is by using the Goal Seek and Solver tools.
Goal Seek determines what value needs to be in an input cell to achieve a desired result in a formula cell. Solver determines what values need to be in multiple input cells to achieve a desired result. We are going to learn to use both the Goal Seek and Solver tools in this article.
Using Goal Seek
When creating scenarios, we simply asked Excel to change the values in our worksheet to see how that would affect our numbers � or totals. When we use Goal seek, we will ask Excel to change the value of a cell in order to reach a certain goal.
Once again, our worksheet is shown below.

Using Goal Seek, we might ask Excel what value we would have to change C4 to in order to reach a grand total of 326 in sales. Note that right now our grand total is 305.
To use Goal Seek, go to the Data tab. Click the What-If Analysis button, then choose Goal Seek from the dropdown menu.
You will then see the Goal Seek dialogue box.
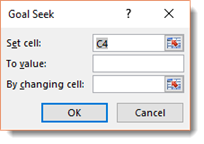
The first thing we are going to do is input what cell we want to set a value for � or a goal. If we look at our worksheet, we want the cell that has the grand total. That cell is J6. We can simply click in the Set Cell field in the dialogue box, then click J6 in our worksheet. Keep in mind that the cell you choose must be a formula cell.
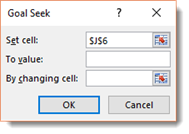
Next, we enter the value that we want to set that cell to. We are going to set it to 326. This is our desired result.
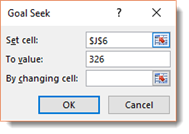
Now we are going to click in the By Changing Cell field and click the cell in our worksheet which we want to change to reach the goal. We clicked on cell C4 in our worksheet.
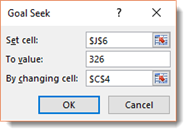
Click OK.
We can now see that the total has been adjusted to 326.
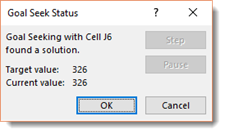
If we look at our worksheet, the number of sales has been adjusted in cell C4 to make it so we reach our goal of 326.
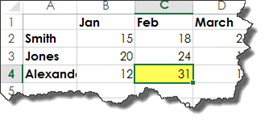
Click OK if you want to keep the numbers.
You can always click Undo to undo it.
A Goal Seek Example
Goal Seek is simple to use, but it is also such a helpful tool that you want to make sure you know how to use it. Let's do another example using Goal Seek to make sure the purpose of the tool is understood, as well as the steps you take to use it.
If you are following along in Excel, undo the last example by clicking the Undo button in the Quick Access toolbar.
For this example, we need Q1's sales total to reach 300. Our salesman Jones promises us that he can make us reach that goal just with his February sales. What we need to figure out is how much he needs to sell in February.
To do this, go to the Data tab, and click the What-If dropdown arrow. Choose Goal Seek.
Since our goal is to reach 300 for Q1, we click on cell E6 for the Set Cell field. This is a formula cell. For the Set Cell field, you must click on a formula cell.
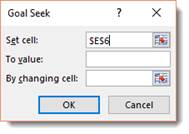
Our goal for Q1 is 300. This is the value we want to reach, so we input 300 in the To Value field.
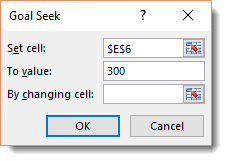
Jones said he could reach this goal in February, so we are going to click on Jones' February sales for the By Changing Cell field. This is the input cell where the value will have to change in order to achieve the desired result (300).
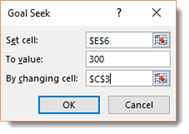
Click OK.
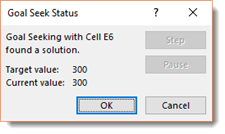
As you can see in the Goal Seek Status box above, our goal has been met.
If we look at our worksheet, we can see that Jones needs to sell 178 in February in order to meet the goal.
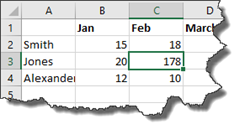
Click the Undo button in the Quick Access Toolbar to return to the actual values.
When Goal Seek Cannot Find a Solution
There is no guarantee that Excel will be able to find a solution to display in your input cell. Sometimes a solution just will not exist. If this happens, you will be notified in the Goal Seek Status dialogue box.
However, just because Goal Seek can't find a solution does not mean you believe that to be true. In fact, you may be certain a solution does exist. If that is the case, you can try doing the following things:
1. Change the value of the By Changing Cell field in the Goal Seek dialogue box. Change it to a value that is closer to the solution.
2. You can also adjust the Maximum iterations under the Formulas tab of the Excel Options dialogue box. You can reach this dialogue box by going to the File tab, then clicking Options. Click Formulas on the left. Iterations are calculations. By increasing this number, Excel can try more possible solutions.
3. Make sure that the formula cell depends upon the changing cell.
Activating the Solver Add-In
With Goal Seek, you can only set the value of one cell, as well as change the value of one cell. It is a very simple tool to use, and it provides simple results. If you want to complicate things a little bit, you will need to use the Solver tool. However, the Solver tool is an add-in to Excel 2016. To use it, you must first activate it.
To activate the Solver tool, go to the File tab. Click Options on the left.
You will then see the Excel Options dialogue box, as pictured below.
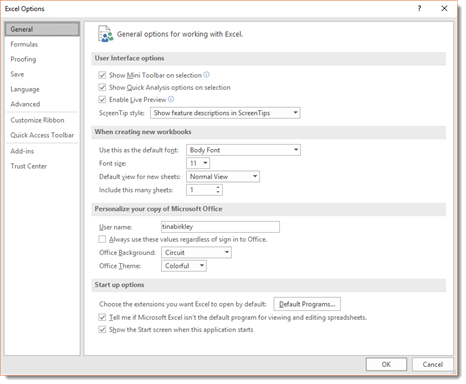
Click Add-ins on the left hand side.
Go to the bottom of the dialogue box.
Under Manage, select Excel Add-ins, then click the Go button as highlighted below.
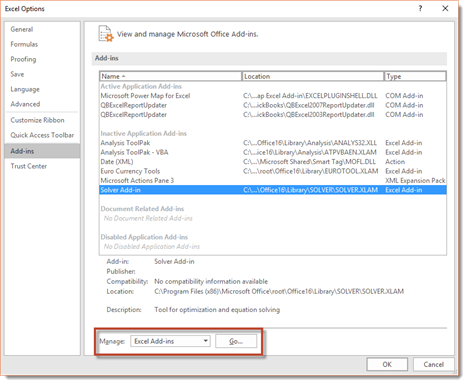
You will then see the Add-ins dialogue box.
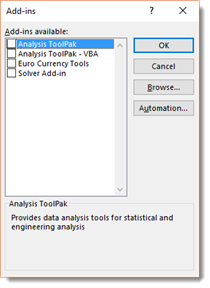
Put a checkmark beside the Solver Add-in, then click the OK button.
If you now go to the Data tab, you will see Solver in the Analyze group.

Using the Solver Add-In
To use the Solver tool, go to the Data tab, then click on the Solver button.
You will then see the Solver Parameters dialogue box.
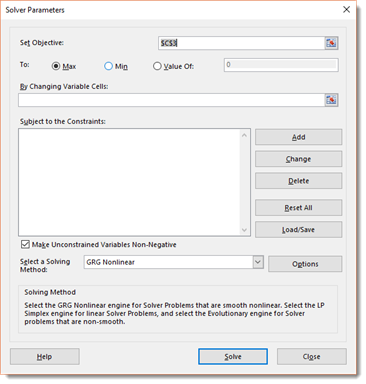
This dialogue box is the Solver tool. It is the dialogue box you will see each time you click on the Solver button.
That said, you can use the Solver tool to complete a what-if. We are going to teach you how to do this over the two remaining sections of this article.
Using the Solver Tool to Complete a What-If
When we used the Goal Seek tool, we had Excel change the number of sales for the employee named Smith in the month of February in order to reach a total of 326 sales. You can see in the snapshot of our worksheet below that Smith was the only one who would be required to make a lot more sales in order for us to reach our goal.

If we wanted to spread the sales out evenly among the employees � or even evenly across the different months � we would use the Solver tool.
Go to the Data tab and open the Solver tool.
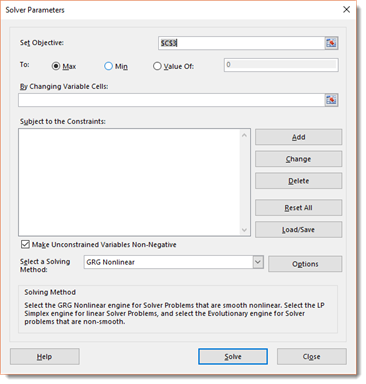
In the Set Objective field, we still want to add the cell that contains our objective. This is our total cell where the total sales are listed. It will always be a formula cell.
We are going to click on that cell in our worksheet so it appears in the Solver tool.
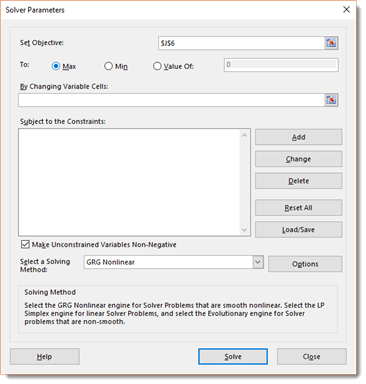
We can then set that value to Maximum, which is the biggest value it can possibly be; Minimum, which is the minimum value it can possibly be; or Value Of, which is an actual value.
We are going to select Value Of, then enter our actual value of 326.
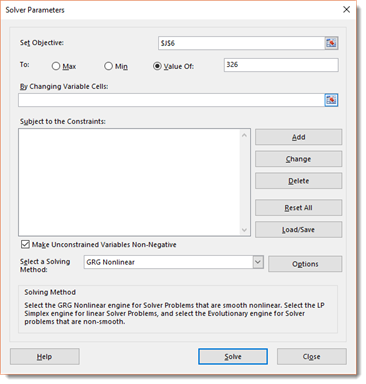
Next, we can select a range of changing cells. Remember, in Goal Seek we could only change the value of one cell to meet our goal.
For this example, we are going to select the sales for all employees in the month of February. Remember, you can just click and drag over the cells in your worksheet, and the range will appear in the dialogue box.
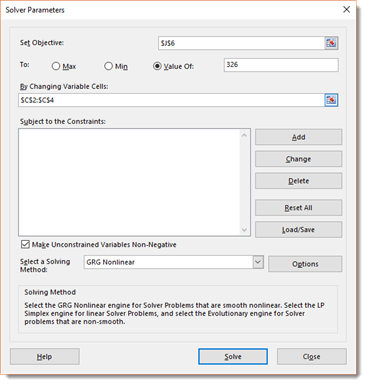
Next, we can add constraints. However, we are not going to do that right now. We will learn how to add constraints later in this article.
Now we can select a solving method. There are three different solving methods.
The three solving methods are:
1. GRG Nonlinear
2. Simplex LP
3. Evolutionary.
You can click the Options button for further options for these solving methods.
Below the dropdown menu for these methods is an explanation for each of these methods:

If you are unsure which one to use, it is usually best to select the GRG Nonlinear engine.
For now, we are going to choose GRG Nonlinear.
Click the Solve button.
As you can see, the Solver tool has produced a solution.
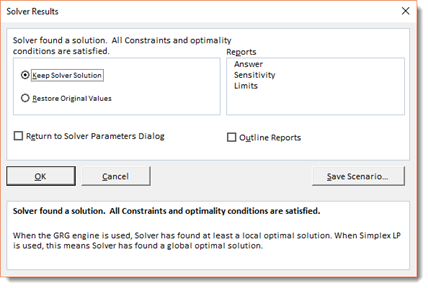
We can look in our worksheet and see how the values in our changing cells have been changed.
If we were happy with the Solver results, we would click OK.
However, we have a problem. Our values in the worksheet now have multiple decimal places.

Smith can't sell 24.804 units of anything. We need whole numbers.
To fix this, we must add a constraint.
Click Cancel in the Solver Results window, then reopen the Solver tool by going to the Data tab.
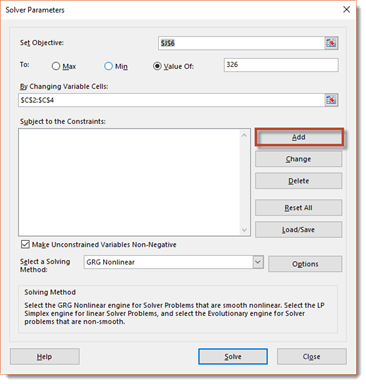
Click the Add button to the right of the Constraint section in the Solver dialogue box.
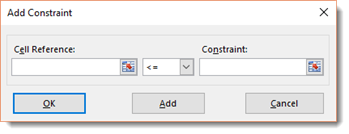
You will then see the Add Constraint dialogue box.
For the Cell Reference field, we are going to select our changing cells again (these are input cells), then select "int" for Integer in the dropdown menu.
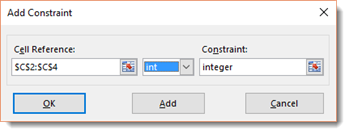
Click the OK button.
We can now see the Solver dialogue box again.
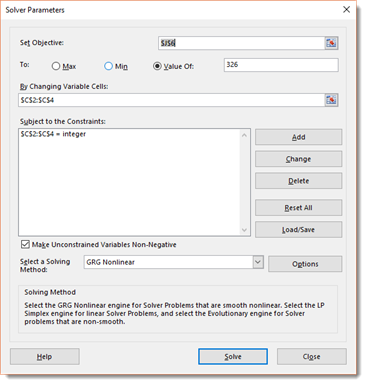
Now click the Solve button again.
Once again, we see the Solver Results dialogue box.
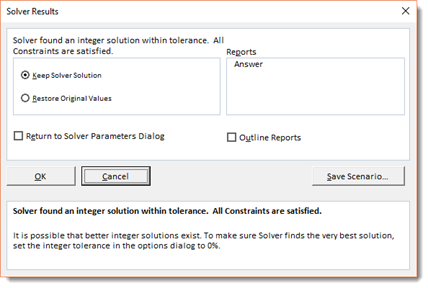
Let's take a look at our worksheet.

As you can see above, our numbers are now integers, and the Solver tool has met our goal of 326.
We want to keep the Solver solution. However, if you do not want to lose your original values, it is best to save the Solver solution as a scenario.
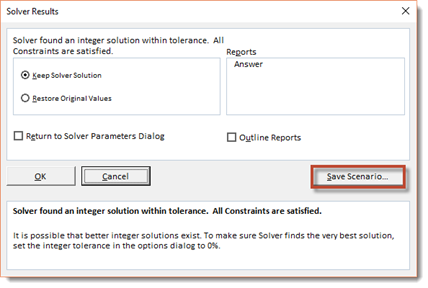
Click the Save Scenario button in the Solver Results dialogue box.
You will then see the Save Scenario dialogue box, as pictured below.
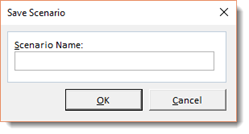
Enter a name for the Scenario, then click the OK button.
You are then taken back to the Solver Results dialogue box.
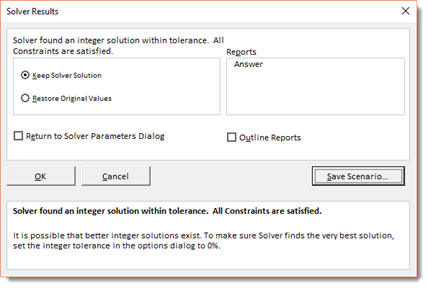
Check "Restore Original Values."
Click the OK button.
Adding Constraints
In the last section, we added a constraint in order to get the solution that was practical for us. We used the integer constraint.
Let's learn to add other types of constraints.
To do this, open the Solver dialogue box again. You will see ours shows the same settings from the last section.
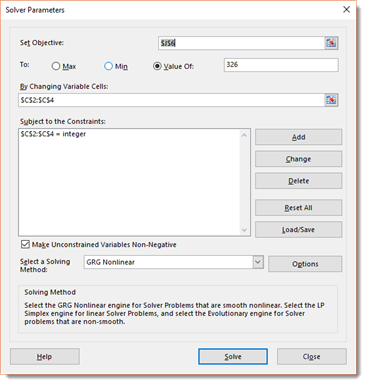
Click the Add button to the right of constraints.
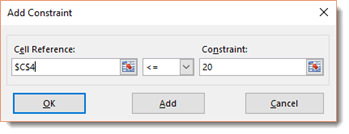
This time, we are going to use the Less Than or Equal to Constraint.
We are going to say that when Solver produces results, that cell C4, which is for the employee named Alexander, must have a value that is less than or equal to 20, as we have inputted below. Let's say we want to do this because Alexander has a small territory, and it is just not possible for him to get more than 20 sales.
Click the OK button.
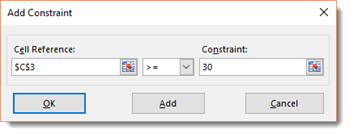
Here is another type of constraint we might add. We are going to say that cell C3 (Jones) must be greater than or equal to 30. Let's say Jones has a large territory.
Click the OK button.
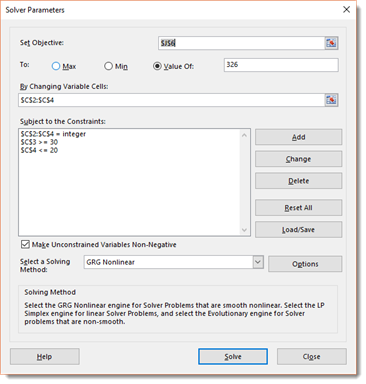
As you can see in the snapshot above, our new constraints are now added.
You can add multiple constraints; however, adding too many might mean Solver can't produce a solution. It can also cause Solver to crash.
Click the Solve button.
You will see the Solver Results dialogue box when Solver finds a solution.
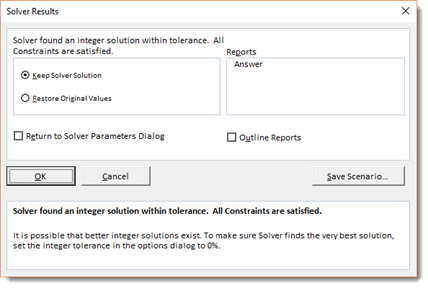
Again, we are going to save the solution as a scenario, then put a check beside Restore Original Values.
Click OK to exit Solver.
Solver Options
Just as with Goal Seek, Solver will not always find a solution. However, that does not mean you believe a solution can't be found. In addition, sometimes a solution can be found by changing some of the Solver options.
To see the Solver Options, click the Options button in the Solver Parameters dialogue box. We have highlighted it below.
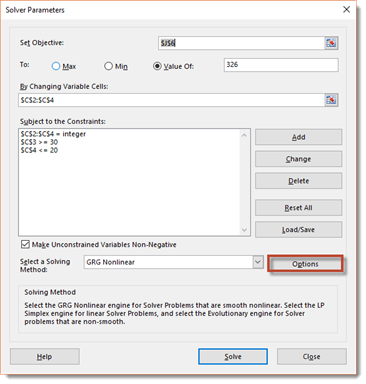
You will then see the Solver Options dialogue box.
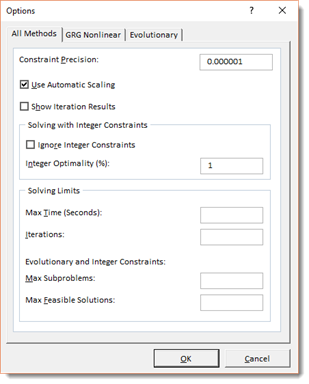
Let's discuss the options available.
1. Constraint Precision. This allows you to specify how close the Constraint formulas and Cell Reference must be in order to satisfy a constraint. Less precision means the problem may be solved quicker.
2. Use Automatic Scaling. You should use this if the problem has large differences in magnitude.
3. Show Iteration Results. You can see the results of each iteration Solver performs.
4. Ignore Integer Constraints. Solver will ignore constraints that require a cell to be an integer.
5. Max Time. You can specify the time Solver spends on a problem.
6. Iterations. You can enter the maximum number of iterations Solver can perform.
7. Max Subproblems. For complex problems, you can tell Solver the maximum number of subproblems to be explored.


