When shopping for a program that can do this for you, there are several that offer you the features and benefits that you need. However, for the home user who wants a complex program that's easy to use, and one that delivers all the aspects that you need to successfully mange your money, there simply isn't any better software than Quicken Deluxe 2010. That's not a review; it's just the truth.
Quicken software gives you the power to do more than just log your finances and manage your bills. It can also be used to increase the amount of money that you currently put into savings. If you're like the majority of the population and find yourself living paycheck to paycheck, you can use Quicken to track where your money is spent, then change your spending habits to allow more for savings. Quicken will show you, at a glance, where your money is going so you can better spend � and better save.
What's more, it will also help you plan for the future by helping you manage investments. You can plan for the future and even track your investments so you can establish a clear cut path to retirement.
Unlike other software programs that are so complicated to use, Quicken is fairly easy once you learn how to use it. It won't take you six months to be able to become an advanced user.
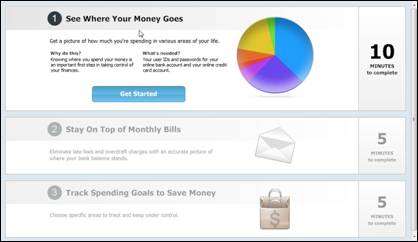
After you get setup complete, each time you open Quicken you'll see all of your finances at-a-glance on the Home page. It will show your spending, savings, and upcoming bills. You won't have to dig through the software to find this information.
Quicken Deluxe 2010 also offers a simpler navigation. The resources that you use most often will be right in front of you. This will make it easier to access your bills, bank accounts, investments, net worth, and other planning tools.
Also, transactions are automatically placed in the correct category for you. This is different from previous versions.
Best of all, Quicken Deluxe 2010 is easier to use. When you first open your Quicken software, you'll see the splash window pictured below.
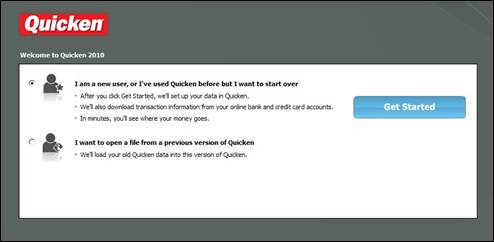
If you're a new user, you can select that option and be taken right to the setup window. However, if you've used a previous version of Quicken, you can instantly transfer all your information into Quicken Deluxe 2010 by pushing the Get Started button. From the moment you start the software, it's ready to meet your needs quickly and easily. It doesn't get any better than that!
Before we begin showing you how to use the software, we want to show you around the Quicken window.
Below is a snapshot of the Quicken window you see when you first open the program.
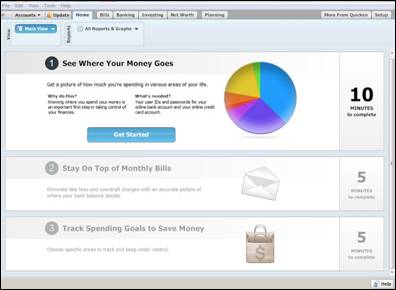
At the top, you will see the Menu bar with the menu items listed horizontally across the screen:

This is the Standard menu. However, you can also view the Classics menu by going to View>Classics Menu in the Menu bar. The Classics menu looks like this:

Below the Menu bar, you will see the tabs.

You will use these tabs to easily complete tasks. In the picture above, we have all tabs showing. Go to View>Tabs to Show to select what tabs you want to view. Put a checkmark beside the ones that you want showing.
To the far right in the tabs area, you'll see the Setup tab. Click on it to open the Setup window in the workspace. We've pictured it below for your convenience.
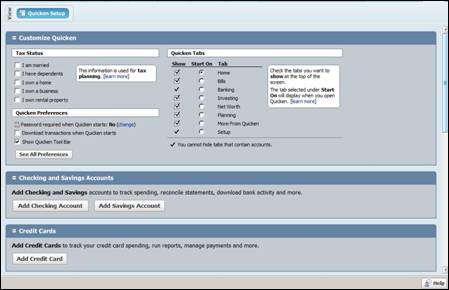
In this window, you will customize Quicken and set it up so that it is ready to be put to work for you. It's very important that you take the time to go through each section in the Setup tab and enter any necessary information. Doing this will make the Quicken software efficient and beneficial to you. If you want to get the most use out of Quicken, this is very important.
Let's go ahead and walk through the Setup window.
In the first section, you are asked about tax information.
Select all that apply:
- If you're married
- If you have dependents
- If you own a home
- If you own a business
- If you own rental property
we're going to be married with dependents. We own a home and rental property.
If you're following along using Quicken Deluxe 2010, you can select the choices that apply to you.
Below the Tax Status section, you can set your preferences for Quicken. If you want, you can require a password so no one else can access your financial data. The default setting is NO � or no password.
You can also choose if you want your transactions downloaded when Quicken starts, and if you want the Quicken Toolbar to be displayed. By default, the Quicken Toolbar is not displayed. You can check this box to see it or go to View>Show Toolbar at any time as you use Quicken.
To the right of the Tax Status category, you can select which tabs you want showing. We learned how to do this in the last section by using the Menu bar, but you can also go ahead and set that here if you want.
Next, you can use the Setup window to set up your bank accounts in Quicken.
In the Setup window, you can also:
- Add credit cards
- Set bill reminders
- Set income and transfer reminders to that you can keep track of paychecks and money transfers
- Track property and debt (such as car loans or mortgages)
- Add investment and retirement accounts so you can track your portfolio
- Track your cash spending to see where your money goes
The Quicken toolbars allow you to access features that you use the most often. It's helpful to use them because it saves you the time of having to use the Menu bar to get to the features that you want.
That said, the same tool bar is shown for every tab that you use. To view the tool bar, go to View>Show Tool Bar.
Let's view the toolbar for the Home tab and window.
The toolbar is located below the Menu bar and above the tabs.

Let's explore the different buttons (features) in the tool bar.
 These arrows allow you to go back to the previous window you had open or forward to the next.
  You can use this to run and review reports and graphs.
  This links you to Quicken services.
 This is a link to Quicken.com.
 By clicking on this button, you will be able to view the calendar.
 You can click on this button to get instant updates. Click the down arrow beside the icon to make a selection:
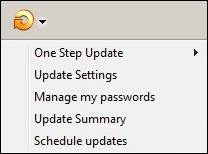
You can choose One Step Update to update all of your accounts.
You can Update Settings for your updates.
You can manage your passwords for accounts by clicking Manage Passwords.
You can get an Update Summary, which is a summary of all your updates.
Or you can Schedule Updates using this button.
To the right of the tool bar, you'll see a search box that you can use to find information that you need within your Quicken program.
It's pictured below.

You'll better understand how to use this tool bar feature as you learn more about Quicken.
It goes without saying that you will want to customize your tool bar so that you can access the features that you use the most.
Let's say that you want to add, remove, or change the order of the buttons on the tool bar. This is easily enough done by following these steps:
Right click your mouse anywhere on the tool bar.
Select Customize Tool Bar.
The following dialogue box will appear:

On the left where it says Add to Toolbar, select the things you want to add.
Next, click the Add button. The things you add will then appear in the Current Toolbar Order section.
To remove an item from the tool bar, go to the Current Toolbar Order section, highlight the items you want to remove, then click the Remove button.
To reorder the icons on the tool bar, select an item in the Current Toolbar order, then click the Move Up or Move Down button.
If you want to edit the icons that are used for different features in the tool bar, click the Edit Icons button.
You'll see this dialogue box:
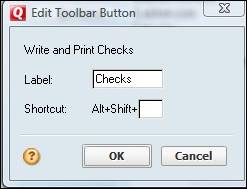
Enter a letter from A-Z and click OK. This creates a shortcut to the feature you've selected.
When you run reports, you can save any of these reports to the tool bar so that you can easily access them again in the future.
To add a report to the tool bar, go to the Customize Toolbar dialogue box that we just used. We'll picture it again below so you are familiar with what we mean.
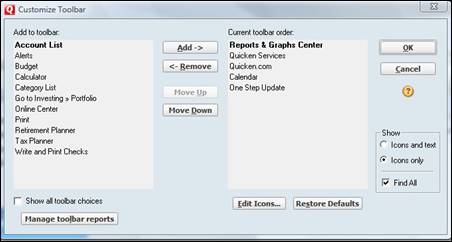
Click the Manage Toolbar Reports button at the bottom left hand side of the dialogue box.
You will be shown this dialogue box:
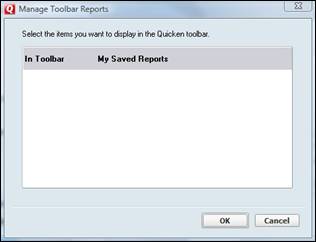
Since we haven't yet created any reports, none are shown in the white area. However, once you've created reports, all your saved reports will be shown here. Select the report that you want to add to your tool bar and click OK.
We've already learned how to do a lot of the things that you can do to better tailor your Quicken window to your needs. We want to mention that you can use the View menu on the Menu bar to customize the way your window looks. Naturally, you're going to want to be as quick and efficient as possible when you use Quicken.
Using the View menu, you can:
Choose what, if any, tabs to display.
If you want to view the Standard Menu bar or the Classics Menu bar.
And you can also decide if you want the Accounts window to appear or show as minimized. You'll see the Accounts tab to the left side of the window. This will be where all your accounts appear. If you need to access that information frequently, you may want to choose to show the Accounts tab and window or even dock it so that it permanently shows whenever you open Quicken.
The Action Bar is located below the tabs. The Home page action bar is shown below:
Select Customize This View.
The following window will be displayed:
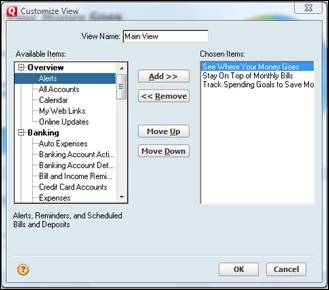
You can now add and remove items that want to appear (or don't want to appear) on your Home page.