Quicken provides some categories to you for you to use. We'll teach you how to add your own later, but for now let's take a look at the ones provided by Quicken.
To view the built-in categories, go to Tools>Category List.
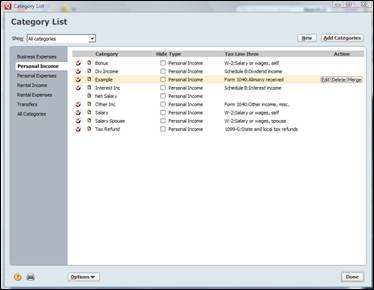
You'll see this window:
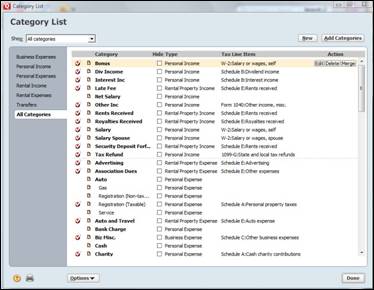
As you can see, it lists the different types of personal income you can add. It includes bonuses, tax refunds, and your spouse's salary. Each time you'd enter a transaction, you would assign it one of these categories (or one that you create). This will help you to track your various sources of income.
You can do the same with personal expenses, rental income, etc.
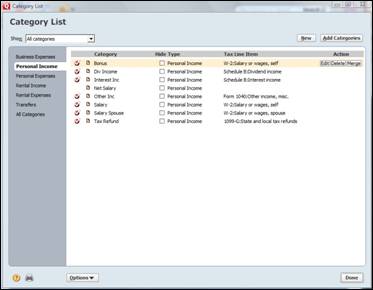
You can also add other Quicken built-in categories to the list that you see. If you want to add another Quicken built-in category to the category list, click the Add Categories button.
You'll see the following window:
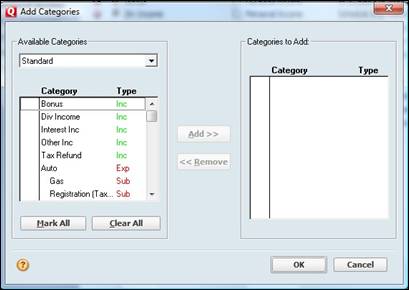
To add a new category to Quicken, you'll use the Category List window shown above.
Click the New button in the upper right hand corner. You'll see the following dialogue box:
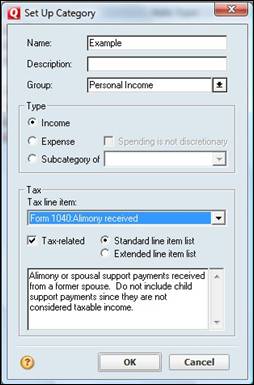
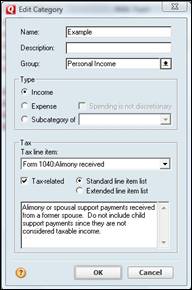
We've already filled this out, but let's go over it together. The first thing you'll need to do is add a name for this category. This is the name that will appear in your category list.
Next, you can add a description if you want.
Decide what group this category will belong to. The groups are on the left side of the Category List window. We've chosen Personal Income.
Select the type of category. Is it income, an expense, or will this be a subcategory? We've chosen Income since this is for the Personal Income group of categories. We'll talk about sub categories in just a minute.
We've chosen to add Alimony as a category.
Click OK.
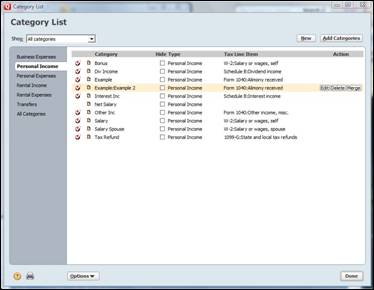
As you can see in the snapshot, our new category now appears in the list.
To add a new subcategory, we're going to follow the same steps. Just remember that a subcategory appears below its parent category.
Go ahead and click on New.
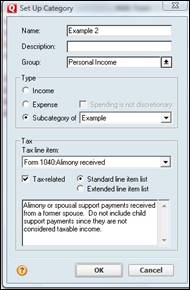
Create a name, description, and group for the subcategory just as you did for the category.
Under type, click Subcategory and choose the category that this new subcategory will be listed under. We've chosen our new category Example.
Click OK.
Edit and Delete Categories
Editing and deleting categories is easy. Pull up the Category List window again (as pictured in the next snapshot).
Select the category that you want to edit or delete. To the right of the category, you will see the Edit and Delete buttons.
For this example, let's delete our example category.
The following warning box will appear to let you know that once you delete a category, it's gone for good.
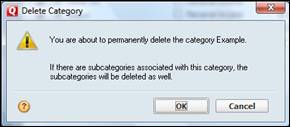
Click OK if you want to delete the category, or cancel if you have selected the wrong category or have changed your mind. We're going to click Cancel simply because we now want to show you how to edit a category.
To edit a category, select the category that you want to edit. Again, we're using our Example category.
Click the Edit button to the right of the category.
You'll see the same box that we saw when we added the category.
Now you can edit the information and click OK.
NOTE: You can edit categories you've created, and you can also edit Quicken's built-in categories.
Entering Data
Transferring Money Between Accounts
Transferring money between accounts simply means taking money out of one account and putting it another. One account's balance will increase while the other decreases. However, your net worth will remain the same.
When you transfer money between accounts, Quicken records the transaction in the account you transferred money from as well as the account you transfer money to.
To begin to transfer funds, go to the account that you want to transfer money from. In our example, we're going to transfer money from checking and into savings.
When you see the account register for the account you want to transfer money from, click the Account Actions button on the right hand side of the screen, directly above the account register. It looks like this:

Select Transfer Money from the drop down menu.
You'll then see this dialogue box:
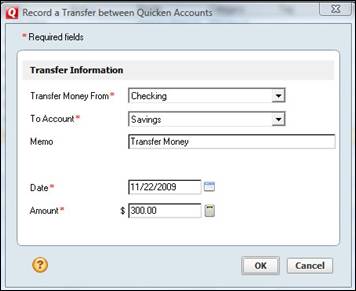
� The first thing Quicken asks you is where you want to Transfer Money From. We've selected our checking account.
� Next, you have to specify what account you want to transfer money into in the To Account Field. We've chosen savings.
� Put today's date in the Date field.
� Enter the amount in the Amount field.
Click OK.
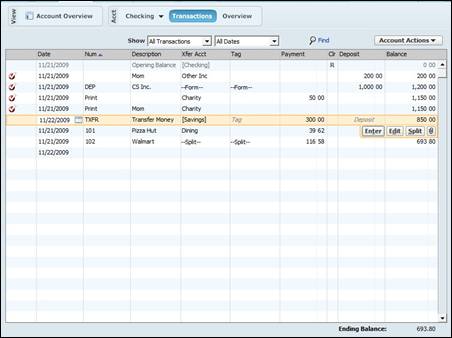
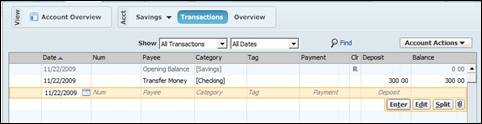
As you can see in the next snapshot, our checking account register shows the transfer from checking and into savings.
Now, if we look at our savings account register, it will also automatically show the transfer.

If you want, you can add tags to both account registers to help you better track your money.
At first glance, it may sound like voiding and deleting transactions are the same thing, but they're not. Whenever you delete a transaction, you erase it from your account register completely. It's no longer there. You can't see it. And you can never get it back.
When you void a transaction; however, the transaction still shows in your account register, but it doesn't affect the balance in that account. It's there for looks only, so to speak, as a reminder that the transaction existed and you voided it. This is helpful for voided checks, etc.
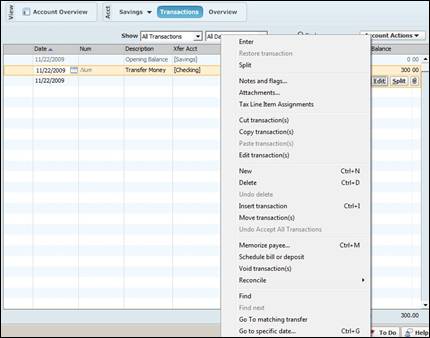
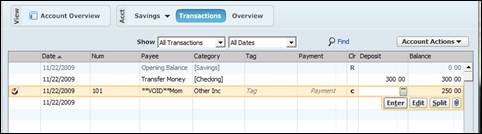
To void a transaction, select the transaction you want to void. Press Cntrl+click if you want to void more than one. Then, press the Edit button and select Void Transaction(s) as shown in the next snapshot.
The transaction shows as voided.
To delete a transaction, one again select the transaction that you want to delete. Click the Edit button again, but this time select Delete.
Click Yes.
The transaction is then deleted from your account register.
To edit a transaction, simply click in the field that you want to edit.
Do you need to find a transaction from six months ago, but don't want to spend hours sifting through account registers? The good news is that you don't have to. There are several ways to find and replace transactions in Quicken. We're going to start out by teaching you how to find transactions. We'll teach you how to find and replace in just a few minutes.
Let's say you want to find a transaction in your savings account. Simply click on the Edit button in your account register, then select Find.
You'll see this dialogue box:
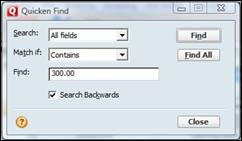
Using this box, you can search by field (category, tag, etc). Then you can specify the types of match you want Quicken to show you. For example, you could select "starts with." When you enter your search terms in the Find field, Quicken will reveal all matches that start with the words or numbers you have entered. You could enter the word "Joe. " Quicken will pull up all transactions that begin with the word "Joe" including Joel, Joelene, etc. You get the picture.
If you want Quicken to search from the most recent transaction backward, make sure the Search Backwards box is checked. If it's not checked, Quicken will start its search from the beginning of your account register.
Now, click Find or Find All. If you click Find, Quicken will find one match at a time. Find All, however, will prompt Quicken to reveal all matches that it finds.
We're going to click Find All.
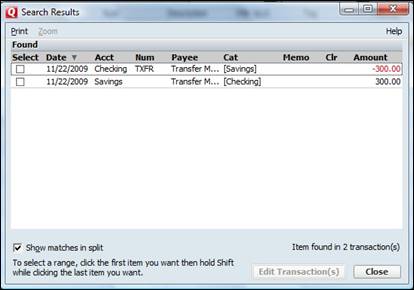
In the snapshot above, you can see that Quicken showed us all results. We can now locate the transaction we wanted and edit, delete, or void it � whichever we need to do.
You can also use the Global Search Box located to the right of the Tool Bar to locate transactions. And, of course, you're free to sift through endless account registers if you want.
But what if you want to find a transaction and replace it with other information. For example, let's say you want to change the "vacation" tag in your account register to "Cancun."
It's easy to do.
Go to the Menu bar. Go to Edit>Find & Replace/Find/Replace.
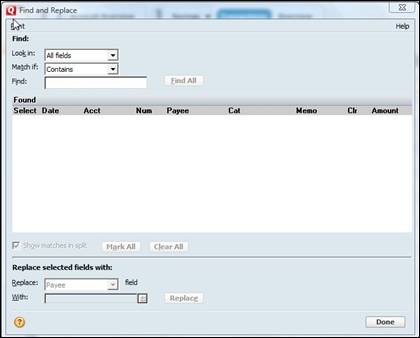
Just like when we used Find, specify the fields you want to search, the type of matches you want returned, and the search terms you want to use. Click Find All.
Now, select the results that contain information that you want to replace. If you want to select all results, click the Mark All button.
After you do that, you're ready to replace the information.
In the Replace Selected Fields With section at the bottom of this window, specify what you field you want to replace as well as what you want to replace it with. Click the Replace button.
If we were replacing the "vacation" tag with "Cancun" we would have searched for "vacation" tags. Next, we would have selected the results.
The next thing we would have done is selected "tag" in the replace field and typed Cancun in the With field, then clicked Replace.
Changing a transaction category is almost too easy. To change a transaction category, simply click on the category field in the transaction that you want to change, and select a new category.
Quicken 2010 also gives you a way to schedule upcoming bills and deposits. This is a helpful tool to help keep you ahead on your finances and accurately track your cash flow.
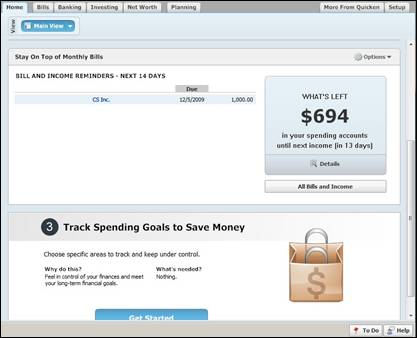
To schedule bills and deposits, click the Home tab. If you scroll down the Home page, you'll see the bills and income reminders section. Click on the Bills and Income button on the right.
You'll see this window appear:
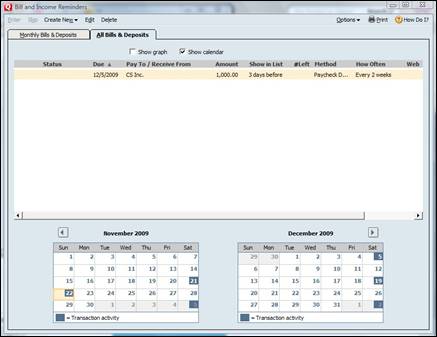
This window shows you a list of all your scheduled bills and deposits. Right now, using our example, we only have our paycheck scheduled for deposit. However, we can also add other bills and deposits.
To do this, click Create New>Scheduled Bill or Deposit in the Bills and Income Reminders menu bar. The following dialogue box will appear.
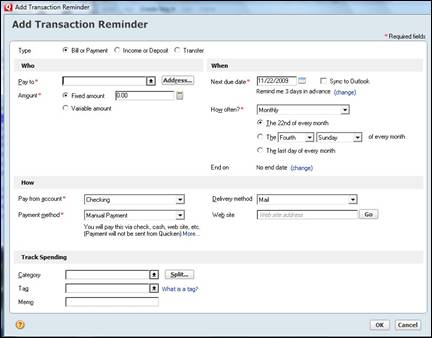
In the Type section, select if it's a bill or payment, income or deposit, or a transfer.
Next, go to the Who section and enter information about this payment.
Specify who it will be paid to if it's a bill. If it's income, specify who the money will be received from. Include the amount. You can add a fixed or variable amount.
Enter the date the payment will be received or made, as well as how often. You can also specify an end date if the payments will end after a certain amount of time.
In the How section, select the account you want to use, how you will receive/make payment, and the payment method.
Lastly, in the Track Spending Section, you can assign categories and a tag to help you track your spending.
Everything in this dialogue box should be self explanatory. It should be very easy for you to fill out.
When you're finished click OK.
Quicken will now take you back to the Scheduled Bills and Income Window. In the snapshot below, you'll see we added a bill to the list.
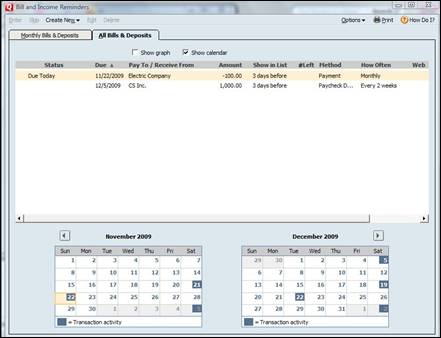
Any items that you add as bills or income will appear in your To Do list three days before the scheduled transaction date. Remember, you can access your To Do  list at the bottom right hand side of the Quicken window.
If you need to be reminded when you need to order more checks or what an account gets below a specified amount, you can set Quicken to do this for you. Quicken software alerts you about financial events that you want to be reminded about. It can also keep you up to date on the latest investment news.
To set up alerts on Quicken:
Go to Tools>Alert Center (View and Setup), then click the Setup tab in the dialogue box.
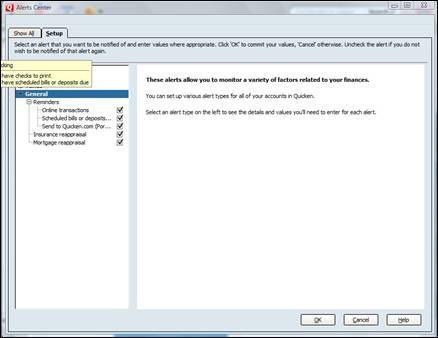
Now you can review all the alerts by clicking a category. We've clicked Banking. If you have to, click the + sign next to a category to expand the category and see all the possible alerts.
Click the box next to any alert that you want to set up to put a check mark in it. A check mark in a box means the alert is turned on.
Some alerts require you to enter more information. Since we've selected Account Min. Balance, we have to enter a minimum amount. When our account reaches this amount, we'll be sent an alert.
Simply click on a field to enter information, as shown in the next snapshot.

Now, select how you want Quicken to notify you. It can either be a test alert in your alert list or by a pop up dialog box. We've chosen the pop up.
You can also specify how long you want this alert to remain in your alert list.
- One day
- One week
- One month
- One quarter
- A year
We've chosen one month.
Click OK.
Your alert is set and will appear in your alert list.