To set up a credit card account in QuickBooks 2013:
Go to Lists>Chart of Accounts.
Press CTRL+N. The Add New Account window will open.
Choose the Credit Card option, then click Continue.
Give the account a name in the Account Name box.
Now, enter the card number.
Next, click the Save and Close button. You'll be taken back to the Chart of Accounts window. The credit card account you just created will appear there.
If you want to work with a credit card account to add debits or credits, you're going to use the Chart of Accounts window again. Go to List>Chart of Accounts.
Double-click on the credit card account that you want to work with. You'll see the Credit Card Register. This is what you'll use to record transactions.
You can also record transactions by going to Banking>Enter Credit Card Charges. The Enter Credit Card Charges window will open.
![]()
To record a transaction this way:
- Use the Credit Card drop-down menu to select the appropriate credit card.
- Select either Purchase/Charge or Refund/Credit.
- Enter the name of the establishment where the card was used in the Purchased From field.
- Enter the date the transaction took place.
- You can also fill in a reference number. Use the number found on the credit card statement.
- Next, fill in the amount of the charge.
- For general expenses, use the General tab. If the item was purchased for inventory or a customer, use the Items tab.
Click Save & Close when you're finished.
Don't use credit card accounts to record transactions for debit cards. Debit cards are nothing more than plastic checks, so use your checking account for this.
If you made an error entering a credit card charge and need to go back and change it, you can easily edit it with QuickBooks 2013.
Simply go to Lists>Chart of Accounts, then double-click the credit card account you want to edit.
Now, select the transaction that needs to be removed or changed.
You can choose to void, delete, or edit the transaction.
Printing checks isn't like printing documents or spreadsheets. You have to make sure your printer is set to print them before you begin. In other words, it takes a little preparation. In addition, you need to tell QuickBooks what to put on your checks, from your company name, to the logo, etc.
Let's start by setting up the printer.
Go to File> Printer Setup. The dialog box below will appear on your screen.
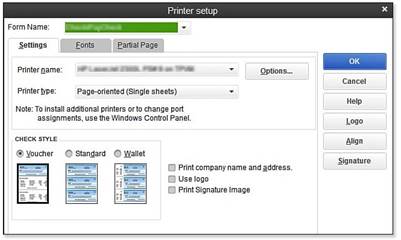
The Settings tab should be showing. If not, click on it.
- Select Check/PayCheck from the drop-down list next to Form Name.
- Find your printer in the Printer Name drop-down list.
- You'll also have to select the printer type from the Printer Type option.
- Now, select your check style. Let's cover those together. Voucher checks are just as wide as regular checks, but they're longer. This is because QuickBooks will also print information on the checking account you're using, as well as the items and expense information from the bottom of the Write Checks window. Standard checks fit in legal envelopes. Wallet checks are checks that will fit into a wallet.
- If you need to, click the Options button and adjust your printer options. This is for specifying the number of copies, the quality of the print, etc.
Now click on the Fonts tab. This is next to the Settings tab. Choose the font, font style, and size that you want to use on the check.
Click OK when you're finished with the fonts.
Next, click the Partial Page tab. Select a Partial Page Printing style. This allows you to print partial pages to save paper (for the environmentally friendly).
If you want, you can click on the Logo button. A dialog box will appear. Click File, then find the graphic you want to use. Click OK. Graphics must be in BMP format -- or bitmap.
If you want to add a signature, click the Signature button, click File, and upload a signature file. Again, this must be a BMP file.
When you're finished, click OK.
If you've filled out a check and you want to print just that check, there's an easy way to do it.
In the Write Checks window, click the Print button.
QuickBooks will then show you a dialog box that shows you the check number to be printed. Make sure it's the right number. If not, change it.
Click OK.
The Print Check dialog box will now appear.
These are the settings you just entered when you set up your printer. You can change them if you want to print this check, but these original settings are now your default settings. The next time you print a check, the information in this box will revert to the information you originally entered.
Click Print. That's all there is to it!
If you want to print several checks at once, we're going to tell you how to do it.
Let's say you've just created a bunch of checks and want to print them.
On the last check that you create, click Save, then click the arrow that's below the Print icon. Select Batch.
You can also do this: Click Save & Close after you finish creating the last check, then go to File>Print Forms>Checks.
The Select Checks to Print dialog box then opens. All unprinted checks will be selected. You can deselect any checks you don't want to print.
Click OK. The Print Checks window then opens.
QuickBooks will ask you if the checks printed correctly after they've finished printing. If they printed okay, click OK.

Now you can sign the printed checks.
If a check doesn't print properly, you'll have to reprint it. If this happens, select the checks that need to be reprinted in the Print Checks-Confirmation window.
Click OK, then go to File>Print Forms>Checks.
You can also print the check register. To do so, start by going to Banking>Use Register, then click the Print icon. You may have to choose the proper bank account from a drop-down list if you have more than one account. Click Ok.
Go to File>Print Register. You can also click the print button at the top of the register. You'll see the dialog box displayed below.
Enter the dates you want to print in the Date Range boxes.
If you want the register to display the Items and Expense tab information when printed, check Print Splits Details.
Click Ok. Now click the Print button.
There's no doubt that payroll is one of your biggest headaches, especially if you're doing it yourself. Just messing with withholdings, writing the checks, and trying to decipher payroll taxes can take up so much time -- and all of your patience.
Because it's so complicated, you may want to hire an outside source to take care of your payroll. That way, you don't have to worry about Uncle Sam coming back on you later. However, if you don't want to pay for payroll services, and you insist on doing it yourself, we'll show you how to use QuickBooks to do your payroll.
Before we begin, it should be noted that payroll through QuickBooks does not come with the software that you purchased. It's an addition and, yes, you're going to be asked to pay for it. How much it costs will depend on what you need. You can buy a basic payroll package for a few hundred bucks per year. If you want everything that you'll need to do your payroll with QuickBooks, it's going to be more -- somewhere between $700 and $1000.
Plus, it will be critical (no matter what payroll package you buy) that you update your QuickBooks software all the time and, when a new version comes out -- pay to upgrade. If all this is something you're willing to do, let's get started.
To get started with QuickBooks payroll services, we need to use QuickBooks to get online. To do this, go to Employees>Payroll Service Options>Order Payroll Service. QuickBooks connects to the Internet for you. You'll see a web form pop up that will ask you to sign in and start setting up the service. Just follow the onscreen instructions. However, you will need your year-to-date payroll information for employees. You'll also need state withholding rates.
Once you're signed up, it's time to schedule your payroll. We'll learn how to do all of it in this lesson.
There are setup tasks you'll need to do in QuickBooks before you can start using payroll. You'll need to add accounts to your chart of accounts, create payroll items, such as salary, wages, etc., and identify payroll taxes and deductions.
You have two choices to set up these elements. You can do them manually, or you can use the Payroll Setup Wizard.
For the purpose of this course, we're going to use the wizard, because it's the quickest and easiest way for you to do it.
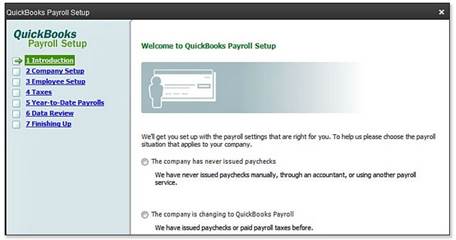
To use the wizard, go to Employees>Payroll Setup.
The wizard then opens. All the tasks you'll have to complete to set up payroll are listed in the left pane. Note that there is a Finish Later button that you can use if you do some of the setup and want to come back later to finish it.
Click Company Setup on the left. You're going to first be asked to enter compensation, which means payroll items such as salary, hourly wages, bonuses, etc. Once you've finished, the wizard will ask about other payroll types.
These types include:
- Types of compensation, as we just discussed.
- Benefits. This includes insurance, pension, etc. If you select a benefit, you'll be asked to configure employee/employer contribution rates.
- Paid Time Off. This includes sick leaves and vacations. You can also set up how QuickBooks calculates vacation and sick time.
- Additions and deductions. Workers compensation, auto reimbursement, garnishments, union dues, etc.
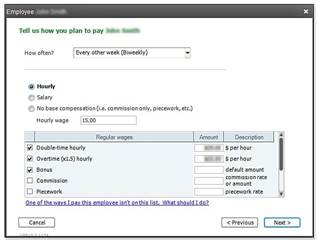
You should have already entered employees into the Employee list earlier in this course. If you didn't add them then, you'll be able to now.

You'll move through windows where you'll be able to add information about the employee, the pay structure, and tax status. You'll also be able to specify taxes and benefits for individual employees.
Once you've entered information for all your employees, the wizard then shows you a list of your employees. If you're missing information for any of the employees, the wizard will let you know.
You'll set up payroll taxes in the Taxes section of the wizard. You'll fill in information for federal, state, and local taxes. These are also payroll items. Once you finish a section, the wizard shows you all taxes for that section. If there's something wrong, QuickBooks will notify you in the Description column. Click Edit if you need to make changes.
Next is the Year-to-Date Payrolls section. In this section of the wizard, you'll enter payroll information for the current year. For example, if you start using QuickBooks in June, you'll have to enter historical payroll data from January through June.
QuickBooks asks you if you've issued payroll in the current year. If you answer Yes, you'll see the Payroll Summary window.
You'll be asked to enter:
- Paychecks (monthly totals for each employee)