Setting up customers begins with creating a customer list.
To create your customer list, go to Customers>Customer Center.
Click on the New Customer and Job button, then New Customer.
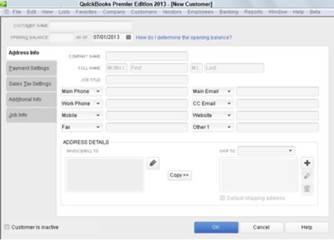
Now, type in the customer's name. You can enter the company name here if you want, or you can put something else to help you identify the customer.
Enter the company name.
You can also enter the name of your contact if you want.
Enter the billing address.
Enter the shipping address.
If you want to add more information about the customer, click on the Additional Info tab.
You can also click on the Payment Settings tab to enter more information, such as account numbers that must be included with payments.
If you want, click on the Job Info tab to enter information about a job for the customer.
You can also enter in sales tax information.
Click OK or Next to save the customer.
You can use the Customer Type field when you create a customer list to categorize your customers. For example, you may use a customer type list to separate retail and wholesale customers.
Click the Customers button on the Home page to go to the Customer Center. Double click to select a customer from your customer list.
You will then see the Edit Customer dialog box. Click on the Additional Info tab, then select a type from the drop-down list. You can also select Add New from the drop-down list to add a type.
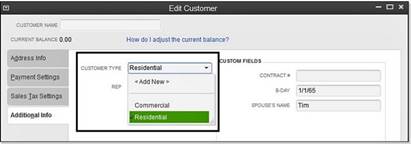
Click OK when you are finished.
If you want to add messages to customers on the bottom of their invoices, such as thanking them for their business, you can create a customer message list by going to Lists>Customer and Vendor Profile List>Customer Message List.
The Customer Center is where you will find all your customers, and jobs for those customers. It's also where you will find detailed information about your customers and jobs, as well as where you can go to create, edit, and get reports about customers and jobs.
Click the Customers button on the top Icon bar to get to the Customer Center.
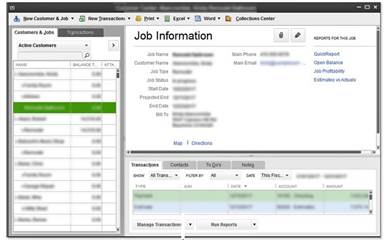
You will see a pane on the left side of the Customer Center window. It has two tabs: Customers & Jobs and Transactions. There's always a customer selected in the Customer & Jobs list. If you don't select one, the first one is selected by default.
That brings us to the pane on the right side. There you will see information about the customer or job.
If you click the Transactions tab in the left pane, you will see all customer transactions. These include invoices, receipts, etc. They are listed by transaction type. If you select a transaction, you will see the details of the transaction in the right pane.
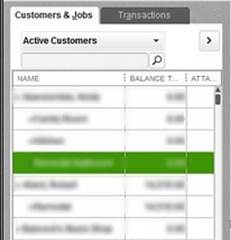
By default, the Customers & Jobs list has three columns: Name, Balance Total, and Attach (for attached documents). You can add more columns if you want by right clicking anywhere in the list, then choosing Customize Columns.
Select a label in the left column, then click Add to add a column. Alternatively, you can remove a column by clicking on its label in the right side column, then clicking Remove.
Click OK when you are finished.
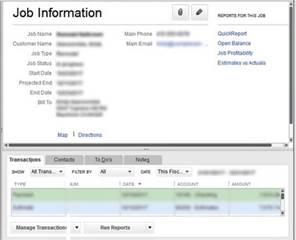
All the information you've entered for your customers is stored in the Customer Information pane. This is the pane you see on the right in the Customer Center when you click on the Customers & Jobs tab in the left pane.

You will see basic contact information, links to maps, directions, and key reports in the top half of this pane. In the bottom half, you will see four tabs. They are transaction details, contact information, "To Do's," and notes. You can use the Manage <tab name> button that's located at the bottom of the window to add, delete, or edit any information on any of these tabs.
Click the To Do's tab, then click on the Manage To Do's button. Then select Create New to create a reminder specifically for the customer selected. You can choose the date for the reminder (the due date), as well as categorize it. Your to-do note then appears on your calendar.
If you want to edit a customer record, first locate and double click the customer in the Customers & Jobs list. This will open the customer record. Now you can change the information or add more information.
QuickBooks allows you to track invoices you create by either jobs or customers. (We'll learn to create invoices later in this course.) If you are doing the same job for the same customer on a repeated basis, you may want to create jobs for that customer to make it easier to invoice and to track.
To set up jobs for customers, you must first create a customer list like you just learned to do. Right-click on the listing of the customer, then select Add Job.
The New Job window opens.
Follow these steps:
- Add the job name.
- Identify the customer.
- If you want, you can put down a contact and other information for the customer and the job.
- Put in the job's billing address.
- Put in the shipping address.
- If you want to add more information, click on the Additional Info tab. Categorize the job.
- Click on the Payment Settings tab. Set a credit limit for the customer, if applicable.
- Enter the amount that the customer owes in unpaid invoices in the Opening Balance box.
QuickBooks recommends that you don't do this, but if you want to set up QuickBooks correctly, it's a good idea.
- In the As Of box, enter today's date.
- If you want to add more information about the job, do so by clicking on the Job Info tab.
Save the job by clicking OK.
To edit a job, double click the listing in the Customers & Jobs list.
You can add custom fields to the Customer, Vendor, Employee and Item records. This is helpful if QuickBooks doesn't provide a field for information that you want to track.
To add a custom field, open one of the names list. We're going to choose Customers.
Double click on the name of the customer.
You are then in edit mode.
Go to the Additional Info tab.
Here is how to add vendors to QuickBooks 2013:
Go to Vendors>Vendor Center. The Vendor Center is shown below.
Click the New Vendor button.
Now, you can enter information about the vendor by using the tabs on the left. The information you will need to enter under each tab is listed below � under the name of the tab.
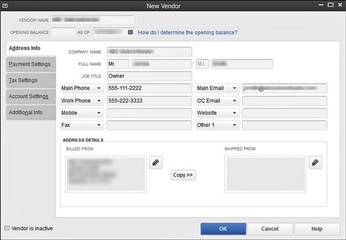
- Enter the vendor's name. If you want, you can also add a contact name.
- Enter the address where you are to mail checks.
- You can also enter the vendor's telephone and fax number, as well as email address.
- Specify what you want to print on the check in the Print on Check As box. QuickBooks 2013 assumes it's the company's name. If it's different, add it here.
Fill out the information requested including:
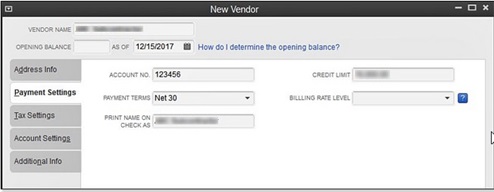
- If you have an account number, add this in the account number text box.
- Select the payment terms you have with the vendor from the drop-down list.
- You can also enter a credit limit with that vendor, if you have one.
Tax Settings
- Vendor Tax ID. Enter the vendor's social security number or EIN, if the vendor receives a Form 1099.
- 1099 Status. Select the check box for Vendor Eligible for 1099, if appropriate.
You can go ahead and prefill expense accounts. When you select accounts for a vendor, they will automatically appear when you write a check for the vendor.
Select a category for the vendor by clicking Type and choosing an option from the drop-down list.
Click OK when you are finished.
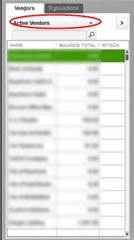
Your list of vendors is located in the Vendor Center. In addition, information about vendor transactions is listed there, too. You can open the Vendor Center by going to Vendors>Vendor Center. There you will see your Vendors list. You can also get access to reports.
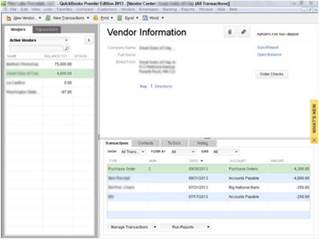
Just as with the Customer Center, there are two panes in the Vendor Center.

The left pane has two tabs: Vendors (your vendor list) and Transactions.
When you are in the Vendors tab, you will see the information for the selected vendor in the right pane.
If you click the Transactions tab, you can see all transactions for vendors, and all transaction types.
The Vendors List has three columns: Name, Balance Total, and Attach. You can use the scroll bar to get to any vendor you want to view. If you want, you can also use the drop-down list at the top of the Vendors tab to display: All Vendors, Active Vendors, Vendors With Opening Balances, Custom Filter.
You can use the custom filter to only show vendors that meet criteria that you establish.
If you want to add more columns to the Vendors list, right-click anywhere in the pane, then select Customize Columns. The Customize Columns dialog box then opens.
Choose a column label from the left, then click Add to add a column.
To delete a column, choose a column label from the right, then click Remove.
All the information you have entered about your vendors, as well as purchase transactions, are located in the Vendor Information pane.
On the bottom half of the pane, you will see four tabs: Transactions, Contacts, To Do's, and Notes.

Just as with the Customer Information pane, use the Manage <tab name> button to add, delete, or edit any of the tabs.
Under the Transaction tab, you can filter the information you see. There are filters displayed above the columns. Use these to enter the criteria for the filter.
You can use the To-Do tab to set reminders for yourself relating to vendors. These to-do items are placed on your calendar. You add to-do items in the Vendor Center the same way that you did in the Customer Center that we discussed in the last lesson.
To edit a vendor's information, double-click on the vendor in the Vendors List. It then puts the record in edit mode. You can edit the information you already have, and add new information.
You can add custom fields to the Customer, Vendor, Employee and Item records. This is helpful if QuickBooks doesn't provide a field for information that you want to track.
To add a custom field, open one of the names lists. We're going to choose Vendors.
Double-click on the name of the vendor.
You are then in edit mode.
Go to the Additional Info tab.