QuickBooks 2013 is one of the most impressive upgrades to the QuickBooks program to date. For that reason, we want to take a minute to show you around this latest version � and also to tell you what's new in QuickBooks 2013.
If you've never used QuickBooks before, this tour will help to make the program easier to use once you know where everything is. However, if you've used previous versions, you're really going to be impressed by the improvements you'll discover.
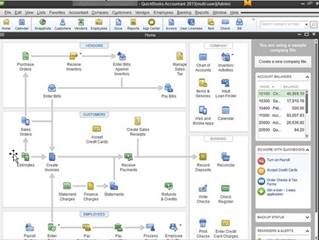
The Home page of QuickBooks 2013 is shown below.
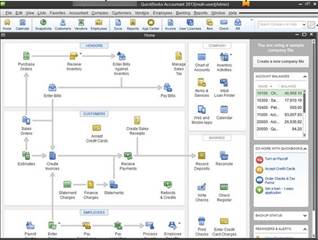
The Home page contains links and icons you'll use to access the features you need. As you can see, it's also divided into sections to make it easier to find those icons and see how the icons fit into the workflow.
The Title Bar is located at the very top of every page in QuickBooks 2013. It tells you the name of the file you're working in, the version of QuickBooks, and the user.
The Title Bar is circled in red below.

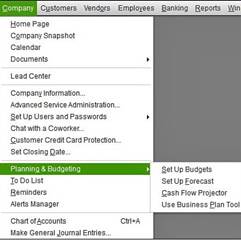
The menu bar is where you'll find the tasks, reports, and forms available in QuickBooks 2013.

If you've never used QuickBooks before, you can take a few minutes to look at the menus, then the submenus that you see when you click on a menu, as shown below.
The top icon bar is pictured below. It gives you quick access to tasks and reports that you use often. You can also customize it, selecting the color (default black with white icons or colored icons with a light colored background as shown), and adding or removing shortcuts.

In QuickBooks 2013, you can either have the icon bar placed at the top below the menu bar, or you can have it on the left side of the Home page. The choice is yours.
Here's how to make the Icon bar appear at the top of the page. Go to View on the Menu bar, then Top Icon Bar. (View>Top Icon Bar).
Now to change the color, go to Edit>Preferences>Desktop View. Click the My Preferences tab in the dialog box. Put a checkmark next to Switch to Colored Icons/Light Background on the Top Icon Bar, to switch to the colored icons.
Click OK.
Customize the Top Icon Bar
To customize the top icon bar, click the two arrows on the right side of the icon bar, as circled in red below.

Select Customize Icon Bar.
You'll now see this dialog box:

You can now add or delete icons from the icon bar and change the display options. Click OK when you're finished.
Customize the Left Icon Bar
To view the left icon bar, go to View>Left Icon Bar. Once you can see the left icon bar, go down to My Shortcuts in the icon bar. It's toward the middle.
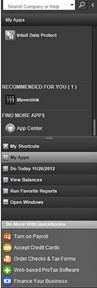
Click on My Shortcuts.
Now click Customize Shortcuts.
You'll now see the dialog box to customize the left icon bar just as you did the top icon bar.
QuickBooks Centers refers to different windows in the QuickBooks program. Each different window displays information about specific areas of your company. Most of the centers in QuickBooks have icons in the icon bar to help you get to them quickly and easily. For example, the icon for the Vendor Center is circled below in red.

The QuickBooks centers include the:
- Customer Center
- Vendor Center
- Employee Center
- Report Center
- Online Banking Center
- Doc Center
- App Center
- Lead Center
Let's learn a little more about each of these centers and what information they contain about your company.
The Customer Center
The Customer Center contains everything you need to know about your customers. It's where you'll find your customer list. We'll learn about lists in the next few lessons of this course. It also contains all the information you'll ever need to know about each customer that you have. You can change options in the drop-down list to see specific information about your customers that you want to view. In addition, you can perform tasks using the buttons at the top of the Customer Center window. We'll learn more about working with your customers' information later in this course as well.
The Vendor Center
The Vendor Center contains all the information about the companies and people you buy from. You can also enter transactions related to your vendors.
The Employee Center
The Employee Center contains information on your employees, your payroll liabilities, and your payroll items.
The Report Center
The Report Center can be opened from the icon bar and is where you'll be able to access and run reports. There are three views for you to choose from in the Report Center: carousel view, list view, and grid view. Each view contains the major category of reports in the left pane. Please note that when you open the Report Center for the first time, the grid view will be displayed. You'll see a visual display of the reports available for each category.
The Online Banking Center
You go to the Online Banking Center to download and enter transactions directly from your credit card or bank accounts. You don't have to manually enter transactions if you use this center.
Doc Center
The Doc Center contains documents and files from your computer that you attach to specific transactions or records in QuickBooks. You access the Doc Center through the Customer Center.
You can use the Doc Center to access attached files or scanned images. To attach a file or image to a transaction; however, you can simply click Attach File when the transaction window is open. The Attach icon looks like a paperclip. For example, you can attach a purchase order to an invoice.
The App Center
The App Center gives you access to Intuit Workplace Apps. The apps are web-based applications that you can download to help make using QuickBooks even more beneficial to your company. There may be additional fees.
The Lead Center
The Lead Center doesn't have a button on the icon bar. You access the Lead Center through the Customer Center. This is where you can keep information about leads � or prospects who aren't yet customers. You can enter in prospects and keep track of them using the Lead Center.
The Calendar Center
The Calendar Center keeps a calendar of your important transactions and reminders.
Typically, we'd cover the new aspects of a software program in the first lesson of the course. However, there are so many improvements to QuickBooks 2013, the updates to the program are just as important to learn as being able to navigate through it. They will help you start to see all you can do with this accounting program.
QuickBooks 2013 was designed to be easier to learn than the previous versions. A modern design increases efficiency and ease-of-use, although the familiar QuickBooks tasks are still front and center for prior users.
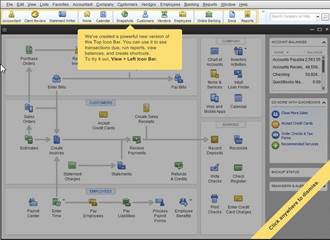
"What's New" Overlay Tips
QuickBooks provides overlay tips when you first open QuickBooks. Overlay tips are in orange and let you know what's new in QuickBooks 2013. The tips can be minimized or dismissed with just a click of your mouse.
The Transaction Ribbon Toolbar
You'll notice a simplified layout for invoices, estimates, sales orders, and other forms. Actions that were hidden in previous versions, or which required several mouse clicks, are now easier to access.This toolbar makes it faster and easier to complete tasks.

Icon Bar Placement
As we already discussed earlier in this lesson, you can now view the icon bar at the top or on the left side of your page. You can also customize the color.
Assign a Flag Color
If you have multiple data files for your company, you can differentiate them from each other by assigning a company flag color. To add a flag color, go to the menu bar. Go to Edit>Preferences>Desktop View. Click the My Preferences tab. Next, go to the Company Flag Color drop-down list and select the color you want.
You can see an orange flag in the title bar below:
Time and Expenses Preference
Some companies invoice customers using a method called "Time & Expense" or "Cost Plus" invoicing. With these, the costs to the customer accumulate and the details are provided on the invoice. You can use the new Time and Expenses preference settings to assign all costs or all time as billable to the customer. You can also override the setting on a single transaction line if you want.
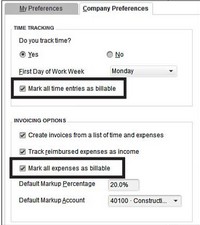
We'll talk more about this later in the course.
Improvements to the Customer, Vendor, and Employee Centers
In QuickBooks 2013, you can consolidate and organize more information in these centers. You can now assign multiple contacts to a customer or vendor, plus you can assign To Dos to customers as well. Also, you can track Facebook pages or Twitter accounts for customers, vendors, and employees.
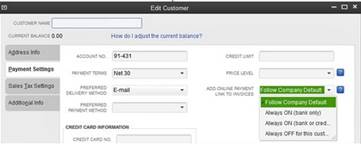
Assign Customers a Default Method of Payment
Now you can choose what type of payment you'll accept from your customer. You can choose from online check only, or check and credit card. In addition, you can choose not to provide an online method of payment link on your invoices for certain customers.
Print Vendor Bill
Some companies require that a manager approve all bills before they are entered. You can now provide a copy of a bill that was paid by one company to another for their record keeping.
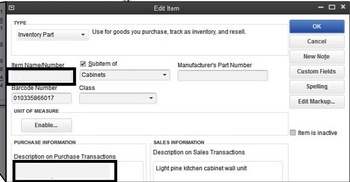
Item-Based Reports: Reporting Preferences
If you use the Item Name field for a product number, you'll discover that including the description with or without the item name field gives you better reports with less data entry.
Hide Zero Quantity Items
You can now hide zero-quantity items from you inventory reports. This is available with Maintenance Release 3 or later.

Available Quantity on Inventory Reorder Reports
You can now opt to include or exclude available quantity from being considered in items to be reordered.

Collapse Summary Report Line Details
Summary reports can now show the amount of detail needed. There's no need to export them to Excel to customize.
Increased Item Group Limit
Now you can enter more items into a single item group.