QuickBooks 2013 allows you to track your inventory. However, before you can do that, you must do a few things. First, you must tell QuickBooks that you want it to track your inventory. Then, you must create an item list, if you haven't already done so. You must include on this list anything that you might put on an invoice. All items that you order and sell MUST be on this list.
To tell QuickBooks that you want it to track your inventory, go to Edit>Preferences. You'll then see the Preferences dialog box. Click on Items and Inventory on the left side of the window. Now, check to make sure that the Inventory and Purchase Orders Are Active box is marked. Also, make sure the Warn if Not Enough Quality on Hand and Warn if Duplicate Purchase Numbers are checked, as well.
As for the item list, if you need to now add items to it, go to Lists>Item list. Click the Item button, then select New. You can refer back to earlier in this course to learn how to do this if you need to.
An inventory item is simply a product that you manufacture, assemble, or purchase to sell to a customer. Inventory can also be items that you store or use that are resold to customers. However, if you store low-value parts to do a job (such as a plumber who might store pipes, valves etc., you may want to track those as non-inventory items.
To create an inventory item, go to the Item list (Lists>Item List) and open the Item List window. Press CTRL+N to add a new item.
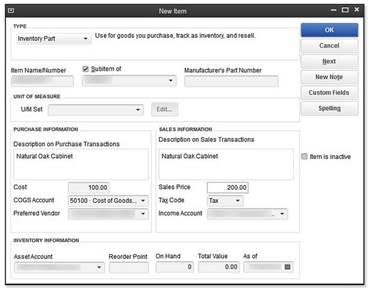
Choose Inventory Part from the Type drop-down menu, then enter the following information:
- Enter the item name. This is the name you'll use to reference the item in the software.
- Enter the manufacturer's part number. This will need to be included on purchase orders when you reorder inventory.
- You don't need to enter anything for Description on Purchase Transactions, or a cost if you don't want to. These fields will be filled in when you create a purchase order.
- Enter a sales price. This is the price to your customers.
- Choose a tax code.
- Select the proper accounts for COGS (Cost of Goods Sold) and Income accounts.
- Enter a number in the Reorder Point field. This should reflect the minimum amount of the product that you want to keep in stock.
- Do NOT enter information into the On Hand or Total Value fields. QuickBooks will track these for you.
Press OK when you're finished.
QuickBooks will keep track of your inventory for you, letting you know how many of each item you have on hand. However, even though it's not fun, you'll also want to do a physical inventory every so often to make sure that the number of items QuickBooks says you have on hand matches the number of items you actually have in stock.
To do this, you can print a physical inventory worksheet by going to Reports>Inventory>Physical Inventory Worksheet. This lists your items in alphabetical order along with the quantity you have on hand. There's also a column in the worksheet that's set up so you can fill in your physical count.
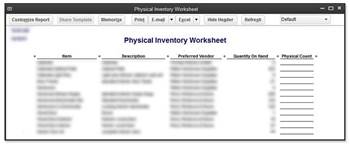
To print the worksheet, click the Print button to bring up the Print Reports window.
Of course, once you print out the worksheet, you don't want QuickBooks to "freeze" until you get the physical count finished. In other words, if two more of an item are sold after you print the worksheet � but before you do a physical count � it can mess up the physical count.
Unfortunately, QuickBooks doesn't give you a way to freeze anything. However, you can make sure that sales transactions are handled differently until you finish your count.
Here are the ways you can do this:
- Print an extra copy of each invoice. Save the copies in a folder. Don't pick or pack the inventory for the invoices until after the physical count is completed.
- Don't enter invoices until after the physical count is over. However, if the count takes a while, this is not a good idea.
- If inventory arrives while you're counting, don't unpack it until after you're finished.
- Don't receive inventory in QuickBooks until after the count is finished.
You may have to make adjustments to your inventory in QuickBooks after the physical count is complete. You'll discover that most of the time, the items you have on hand are actually less than QuickBooks figures. This is called shrinkage -- or unexplained, missing inventory.
To adjust the count in QuickBooks, go to Vendors>Inventory Activities>Adjust Quantity/Value on Hand.
A window then opens.
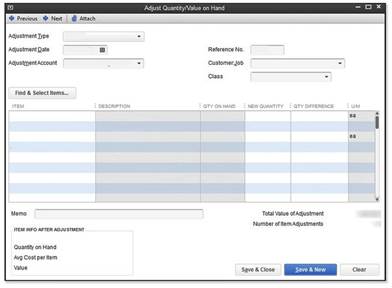
Here's how to fill out this window:
- Select Quantity from the Adjustment Type drop-down menu.
- Enter the date.
- Go to the Adjustment Account field and enter the inventory adjustment account in the chart of accounts.
- You can use a reference number to track adjustments if you want.
- Next, click the Find & Select Items button. A new window opens.
- Now you can tell QuickBooks which items need to be adjusted. Put a check mark by the items, then click Add Selected Items.
- Click the Add Selected Items button.
- Now you can adjust the quantity in the Adjust Quantity/Value on Hand window.
Defined, a purchase order is simply a document requesting to purchase items from someone else. By creating purchase orders, you know what you've ordered and when it's coming in. There's never any doubt. You can use QuickBooks to create purchase orders and make it even easier.
To create a purchase order:
Go to Vendors>Create Purchase Orders.
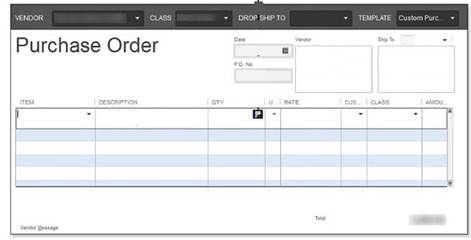
Select a vendor from the drop-down list.
You can select a rep, an expected date (the date you expect to receive your products), and an FOB.
Now, as we've done before with other aspects of QuickBooks, go to the item column and start entering items. These items should already be in your items list, but if not, QuickBooks will ask if you want to set up these items.
It's optional if you want to fill in a Vendor Message, but you do need to fill in Memo field. Put something in here that will allow you to identify the purchase order because this is what will appear in the Open Purchase Orders dialog box when you go to look for it.
If you want to print the PO, check the To be Printed box. Print the PO by going to the top of the window and clicking Print. You can also click the downward arrow beside Print and choose Print Batch if you want to print several POs at once.
When you finish, click Save and New if you want to create other purchase orders, or Save and Close to close this window.
To view your open purchase orders, go to Reports>Purchases>Open Purchase Orders.
Once you receive items that you ordered from a purchase order, you need to record them as you learned to do earlier in this lesson, so they're added to your item list. QuickBooks will let you know that a PO exists for the vendor for which you're entering items. It will ask you if you want to receive against a PO.
If you want to be sure that QuickBooks is keeping track of all of your transactions accurately, you should enter your bank accounts into the program, even if you don't use online banking. That said, you should also record every dime that goes in or out of your bank accounts. In this section, we're going to focus on managing your bank accounts using QuickBooks. You should have already set up your bank accounts when you set up QuickBooks.
There will be times you'll receive money from sources who aren't customers. That means there will not be an invoice or a sales receipt. This kind of money could be in the form of a rebate check, a refund from a vendor, capital from an owner or partner, or a loan.
Entering these types of deposits is easy to do. You're simply going to use the register from the appropriate bank account.
Go to Banking>Use Register, then select the bank account.
The account register window then opens, and a transaction line will be highlighted for you to enter the transaction. In this case, the transaction is a deposit.
Now, let's enter the deposit.
- First, change the date of the transaction, if necessary, to reflect the actual date of deposit.
- Press tab and go to the Number field.
- If a check number appears, delete it. You can also just wait until you enter an amount in the Deposit column because, at that point, QuickBooks will delete the check number for you.
- Next, press tab to move over the next three columns, until you get to the Deposit column. Enter the amount of the deposit.
- Now, go to the Account field and assign the deposit to an account.
- It's a good idea to put an explanation of the deposit in the Memo field.
When you're finished, click the Record button.
If you're depositing your own money or money from owners/partners into the business, then that money should be posted from a capital account � or an equity account. However, if you're depositing money from a loan, you should post it from a liability account from the loan. If it's a refund from a vendor, you can post it from the expense account that was used to pay the vendor. Use common sense when choosing what account to assign a deposit. You can always ask an accountant for help as well.
There will be times when you want to transfer funds from one bank account to another. It's very common to do. You use the Transfer Funds Between Accounts window in QuickBooks to do this.
Go to Banking>Transfer Funds.
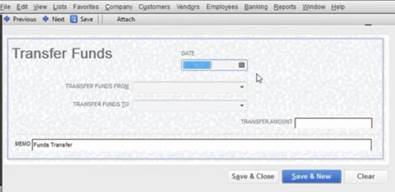
Now, fill out the fields in the dialog box. You'll be asked for the date, the bank account you want to transfer funds from, and the balance of that account. Then, you'll be asked for the bank account you want to transfer funds to and the balance of that account. Finally, you'll be asked for the transfer amount.
Click Save & Close when you're finished.
We don't want it to happen. We'd rather it didn't happen. But sooner or later, it's going to. You're going to get a check from a customer returned by your bank, and it's going to be marked NSF, or non-sufficient funds. You probably know by now that this means your customer didn't have the money in the bank to cover your check, but just in case, it was worth mentioning. If you've already entered the deposit into QuickBooks, you're going to want a way to change that. We're going to include the steps you need to take below.
Go to your checkbook register. Record the fee that your bank charged you for the bad check.
Now, since the deposit into your checking account didn't clear, you're going to have to record that adjustment as well.
If you use accrual-based accounting for taxes, you may want to use a bad-debt expense account to categorize the expense of a bad check. Otherwise, reduce your income in your sales income account to reflect the bad check.
Then, try to collect on the check again. You may want to call the customer and see if this can't be handled quickly and without much fanfare.
Most businesses keep petty cash on hand to cover things like lunch for employees or last minute office supplies. You'll want to set up a petty cash account in your chart of accounts, if one isn't already there.
Here's how to create one:
- When you create a petty cash account in your chart of accounts, the account type should be Bank.
- If you number accounts, you should use a number for your petty cash account that places it near your other bank accounts.
- The opening balance of a petty cash account should be left at zero when you set it up. You can record the balance when you make the first deposit.
When you put money into petty cash, most of the time you'll transfer the money from your bank account (or write a check). Here's how you do it.
Make sure you've created the name Petty Cash in your Other Names list. You can open this by going to Lists in the menu bar.
Now write a check from a bank account, then post it to the petty cash account.
To record expenses paid for by petty cash, open the Write Checks window. Select the petty cash account as the account. It's easier to use the Write Checks window to do this, as opposed to the petty cash register, because you can tie the expense to a customer or class if you need to.
If you have invoices out to customers and receive payments for them, documenting those deposits in your QuickBooks checkbook can be a little more detailed than the process we used earlier in this lesson. That doesn't mean it's difficult; however, because we're going to walk you through step by step.
Naturally, you'll start off by recording the customer's payment. You do that by going to Customers>Receive Payments or Customers>Enter Sales Receipt as we talked about earlier in this course. When you do that (or if you've already done it), QuickBooks will make a note that you have undeposited funds. Now, let's learn how to deposit them.
Go to Banking>Make Deposits. A dialog box will appear that tells you that you have undeposited funds. It will list the checks you've received, but haven't yet deposited. Put a check mark beside the ones you want to deposit. Click Ok.
Next, pick the checking account that you want to use to record deposits. Go to the Deposit To field to do this.
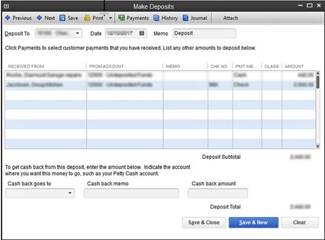
Go to the Date text box and enter the date that you will deposit this money into your bank account.
Go ahead and add any other deposits you want to add to this bank account that doesn't come from customers.
If you want to add a memo about this deposit, you can do that as well.
If you want cash back from the deposit, go to the Cash Back Goes To field, select the account, create a memo, then enter in how much you want to get back.
Click Save and Close when you're finished to close out the window. If you have more deposits, click Save and New.
You've already set up one account in QuickBooks, but let's say you want to set up another bank account after you've gone through the interview process.
To do this, go to Lists>Chart of Accounts. Click on the Account button, then select New. Now you can fill in the name of the account, a description, and the As Of information (or the date you opened the account). Make the opening balance zero for new accounts so that you can enter your first deposit.