The money that customers pay you must be recorded in QuickBooks, either when you create the invoice, or when they actually pay you. In this article, you're going to learn how to enter those payments into QuickBooks, deposit the money into the bank, track the amount that is owed, and even add finance charges.
You record a sales receipt whenever a customer pays in FULL for the products or services delivered at the time they are purchased. A sales receipt changes your cash balance. Invoices change your accounts receivable balance.
To create a sales receipt:
Go to Customers>Enter Sales Receipt.
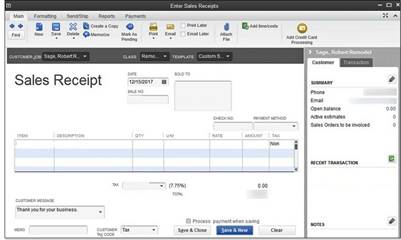
Now, select the customer and the job, if you want. This is the same as with invoices.
Enter the date in the Date field.
Enter a sale number. This is optional, but handy.
Adjust the Sold To address if it needs to be adjusted.
Enter the check number if the customer is paying by check. If they pay by cash, leave it empty.
Enter the payment method.
Describe the items, the same as you did with invoices.
You can add a customer message if you want. You created a list for these earlier.
Add the sales tax information.
If you want, add a memo.
If you don't want to print the receipt, make sure the "To Be Printed" box is empty.
When you are ready to print the receipt, click Print.
As with invoices, select the type of sales receipt form you are going to use, then click Print.
Your customers aren't always going to pay up front. You know that as well as we do. Because of this, you will need to record another type of payment. This type is the money that your customers pay you to pay off what they owe -- or simply to pay down what they owe.
To do this, you must first have invoices created for that customer. If you use credit memos to reduce what they owe on invoices, you will also need to create credit memos for each customer. But from there, it's very easy.
Go to the Receive Payments window. Go to Customers>Receive Payments.
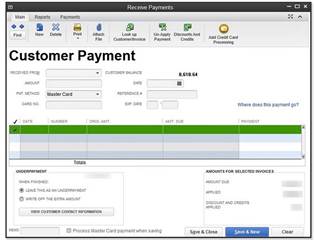
Now, record the customer payment and the invoices that were paid. All the fields in this window should be familiar to you by now, so doing this should be a piece of cake.
If you record a sales receipt or payment on an invoice, QuickBooks takes that amount and adds it to a list of undeposited funds. However, QuickBooks also gives you an easy way to remedy that by allowing you to deposit that money into your bank account.
Here's how to do it:
Go to the Home page and click the Record Deposits icon.
Go to Banking>Make Deposits.
Choose the payments you want to deposit by putting a check mark in front of it.
Click OK.
- Next, choose which bank account you want to use to deposit the money by using the Deposit To drop-down list.
- Enter in the deposit date.
- You can add a memo if you want.
- Enter a cash back amount if you want some of the deposit to go somewhere else. To do this, click the arrow in the Cash Back Goes To box and select an option.
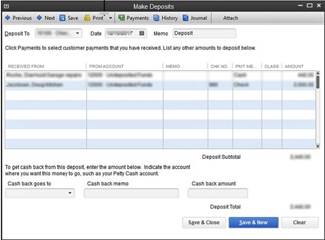
Record your deposit. To do so, click the Save and Close button or the Save and New button if you want to make more deposits.
The simplest way to track what your customers owe you is by going to Customer>Customer Center. Just select the customer from the Customer and Jobs tab on the left side of the window.
The Collections Center is within the Customer Center. It helps you keep track of past due and almost past due balances. To use it, go the Customer Center. Now click the Collections Center button at the top of the window. It will open to the overdue tab. You can now see the overdue invoices. Double click the invoice to see the details
You can also get accounts receivable reports. These reports include A/R Aging, A/R Aging Summary, and A/R Aging Detail.
These are all available through the Customers & Receivables report menu.
Before we discuss adding finance charges, it's important that you apply payments or credit memos to unpaid invoices before adding finance charges. That way, the finance charges are accurate.
To add finance charges:
- Go to Edit>Preferences, then click Finance Charge icon on the left. Next, click the Company Preferences tab.
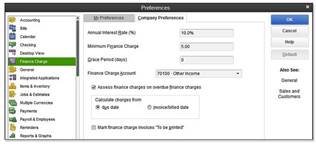
- Enter the interest rate you want to use.
- If a minimum finance charge exists, enter it.
- Enter the grace period you give. The grace period is the period after the invoice is due before you start to add finance charges.
- Now, pick the account you want to use to track finance charges. There's a drop-down list next to the Activate Finance Charge Account. You can select Income or Other Income Account.
- Decide if you want to charge finance charges on finance charges. This means if you add a finance charge to an invoice that was unpaid after 30 days, and it's still not paid after 60 days, do you want to simply add another finance charge to the principal amount owed (the original amount of the invoice) or do you want to add finance charges to the original amount owed AND the finance charges that were already added.
- Select if QuickBooks should calculate finance charges from the invoice due date or the invoice date.
- Decide if you want to print the finance charge invoice. This is the same as printing invoices and sales receipts, so you should know how to do that by now.
Next, click OK, then go to Customers>Access Finance Charges.
Go to the Assessment Date box. Enter the date that you are adding the finance charge.
Then, select which customers you want to assess a finance charge to by leaving the check mark next to the customer's name. By default, QuickBooks put check marks next to all customers.
It's about paying bills using QuickBooks 2013. The problem is, who likes paying bills? Nobody! But that's okay. We understand and, for that reason, will make this lesson as easy as possible, so you can get through it quickly.
Let's get back to that and teach you the accounts payable way.
This way involves two steps. Now, remember, just because we're waiting to pay our bills doesn't mean we just want to shove them aside and ignore them. We're still going to want to record them, and that's the first step. The second step will be in paying them.
To record a bill, go to Vendors>Enter Bills.
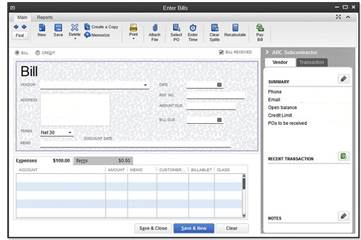
Choose the vendor that you want to pay. Your vendors should already be in your vendor list, but -- if not -- QuickBooks will ask you to use Quick Add or Set Up to add them. If you have a purchase order open (which we'll talk about later in this course) for that vendor, QuickBooks will ask you if you want to apply this bill to a purchase order.
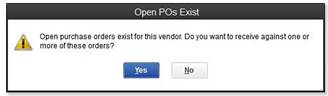
If you choose to do that, the Open Purchase Orders dialog box will open.
Select the purchase orders. QuickBooks will fill in the amounts and items for you.
Next, select the payment terms that tell when the bill is due. Go to the Terms line to do this.
You can enter a memo in the Memo line if you want.
Now, let's move down to the columned areas.
![]()
The Expenses tab is showing. Under Account, enter an expense account name that's already on the Chart of Accounts. You can change the amounts and numbers if you want. You can also apply it to a customer or job, as well as assign items to it by clicking on the Items tab. This would include items you are buying, their costs, and quantities.
Finally, save the bill.
The next step in this accounts payable method is paying the bill. We'll learn how to do that in just another minute.
There are times that you may receive items and a bill will not come with those items. The bill will come later. In instances like this, you will record your bill a different way.
The first thing you have to do is enter the received items into inventory when you receive them. To do this, go to Vendors>Receive Items. This will create a blank Create Item Receipts window. Select the vendor name. If a purchase order exists, QuickBooks will let you know.
Go ahead and fill out the window. When you are finished, click Save & New. The amount for the items received is now posted to your Accounts Payable account as an Item Receipt type. When the bill arrives and you record it, the Accounts Payable account will be updated. The transaction type will be changed to a bill.
When you receive the bill for the items, it's time to enter the bill. Do NOT use the method in the last section if you've already created an Item Receipt. Instead, go to Vendors>Enter Bill for Received Items.
Choose the vendor. You'll then see current items receipts for that vendor. Select the correct information, then click OK.
The Enter Bills window opens.
![]()
Fill out the information in the Enter Bills window, then click Save & Close.
The big decision with paying bills is if you should pay them right away or wait. If there's a proper answer to this, then it lies within the accounting system that you use. The first method is the easiest-- paying them right away. The second method, which is called an accounts payable method, gives you accurate records, but lets you pay your bills later. It's called accrual-basis accounting. We'll talk more about this a little later in this lesson. For now, let's talk about paying bills by writing checks.
To view your bills that are due, go to Reports>Vendors & Payables>Unpaid Bills Detail.
When you're ready to pay your bills, you can tell QuickBooks which bills you want to pay. Go to Vendors>Pay Bills. You'll see the Pay Bills Window. Place a check mark next to the bills that you want to pay.
![]()
Whenever you write checks to pay bills, you are doing cash-basis accounting. What this means is that you count your bills as expenses when you write the checks and pay the bills. The only drawback to using this method is that you lose the ability to heavily track your expenses and keep track of your bills. Your bills will pile up on a stack on your desk.
To write checks for bills the fast way, go to Banking>Use Register.
It's pretty simple because now all you do is fill in the information on the check. Just keep in mind that the people you write checks to should be vendors. Make sure this person or company is in your lists. You'll also have to choose an account to use for this check. If the account isn't listed in the drop-down list, QuickBooks will give you a chance to add it.
Click the Record button when you're finished.
You can also write checks the slow way. The slow way takes longer, but it also gives you more options to add payees and do things like tracking expenses and items. If you want to do things like this, it might actually be the quicker way.
To write checks the slow way, go to Banking>Write Checks.
Now you'll see the Write Checks Window.
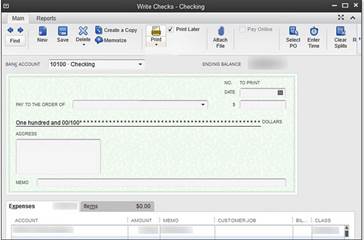
Click on the Bank Account drop-down list. Select the account you want to use to write the check.
Enter the check date.
Enter the name of the payee in the Pay to the Order Of line. If you've never paid this person before, you'll see a Name Not Found message from QuickBooks. Click either Quick Add or Set Up to add the name to your lists.
Next, type the amount of the check. Simply put the amount next to the dollar sign. QuickBooks will write it out for you.
If you want the address to appear on the check (such as for windowed envelopes), enter that.
You can also put in a memo if you want.
Now, move down to the section of the window below the check. You'll see Account (Expense is right above it). Find the account in your Chart of Accounts that lists the bill or expense you're paying. Expense accounts are usually toward the end of the list.
You can edit the amounts in the Amount column if you need to, add a memo, or assign the expense to a customer or a job.
If you're buying supplies or inventory, click the Items tab (next to accounting). List the items. If the item doesn't already appear on your lists, you'll have to click Add New from the top of the list. You'll then be required to fill out the New Item window.
When you're finished, you can click the Print button to print the check right then and there. Or, you can click Save and New to write another check, or Save and Close to close out the Write Checks window.
To delete a bill, you're going to have to go to the Accounts Payable Register. To locate this, go to Lists>Chart of Accounts, then open the Accounts Payable account. Select the bill you want to delete. Then, go to Edit>Delete Bill. Confirm that you really want to delete the bill, then it's gone. That simple!
QuickBooks can remind you when it's time to pay bills, but you have to let it know that you want it to do that. Go to Edit>Preferences. Click Reminders on the left, then click the Company Preferences tab. You'll see a list of reminders.
Skim down to Bills to Pay and set how many days before the bill is due that you want to be reminded. Just make sure that the Show Summary or Show List option is selected.
![]()
You may want to track your vehicle mileage for your company vehicles. To do this, all you do is go to Company>Enter Vehicle Mileage. A dialog box will appear. You'll be asked to enter the vehicle, date, miles driven, odometer reading, and the reason for the trip.
QuickBooks contains a feature called Manage Sales Tax, which makes tracking and paying sales tax easier. To access this, go to Vendors>Sales Tax>Manage Sales Tax.
At some point, you'll need to report your total sales, non-taxable sales, and taxable sales to the taxing authority. You'll also have to write a sales tax payment check to pay the taxes.
You can run reports in QuickBooks that will help you fill out your tax forms. To run these reports, go to Vendors>Sales Tax>Sales Tax Liability. You can use the dates drop-down menu to choose an interval that will match the way you report to the taxing authorities.
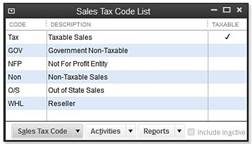
If you have to report specific types of taxable or nontaxable sales, you can create a report on the tax code you created that will track the information for you. Go to Lists>Sales Tax Code List. Then select the tax code for which you need a report. You can also create the report so it shows all of your sales tax codes.
If you want to pay the sales tax you owe, go to Vendors>Sales Tax>Pay Sales Tax. This opens the Pay Sales Tax dialog box.
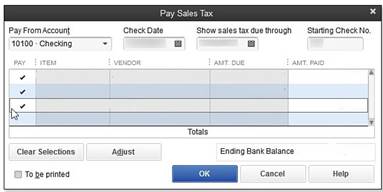
Select the bank account you want to use to pay the tax.
Make sure the date shown in the Show Sales Tax due matches the end date of your reporting period.
Put a check mark next to the taxes you want to pay.
Make sure to check the To Be Printed check box if you want to print the check.