Invoices are bills that you send customers. In this article, we're going to learn how to create and print them.
Before we begin, though, there are a few things you need to check before you start to create invoices. Everything we've gone over so far should be set up in QuickBooks before you create invoices. Don't try to take a shortcut and create an invoice without having these steps done first. You are going to make more work (and headaches) for yourself if you do.
You are going to love this lesson because it's so easy compared to the others. Just please note that we're going to teach you how to create a Product Invoice in this lesson. Service invoices are less complicated, and if you learn to do a Product Invoice, you will be able to easily create a Service Invoice.
To create an invoice:
Go to Customers>Create Invoices.
Now, either press CTRL+I or click the Create Invoice icon in the Customers section on the Home page.
When you do this, a blank invoice form opens up. You will see four tabs at the top of the window. These tabs are Main, Formatting, Send/Ship, and Reports. Take a minute to click on each of these tabs. You will notice that they each contain buttons that allow you to do tasks pertaining to the invoice you are creating.
In addition to the tabs, there's also an informational panel. Before you create the invoice, that panel will be blank. However, when you select the customer you want to invoice, you will see the open balance, recent transactions, or notes. You can click the Hide History arrow to the left of the customer's name to close the panel.
The first step in putting together an invoice is choosing the template or invoice form that you want to use from the Template drop-down list. This is located in the upper right corner of your window.
Now your invoice is ready for you to fill out.
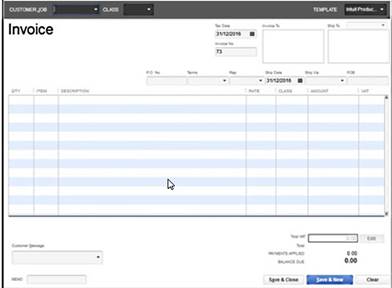
Before we start doing just that, let's learn the parts of the invoice, and where the information goes.
The top part of the invoice is called the invoice header. Here is where the basic information will go.
The middle section is called the line items section. This is where the items that you are billing for are listed.
The bottom section is called the footer. It holds the totals and other things such as customer messages.
Each section contains fields where you will enter data.
Let's fill out the invoice header.
To start, find the customer that you want to invoice. You can also select the job by using the Customer: Job drop-down. Find the customer or job and select it. If you need to add a customer, choose <Add New>.
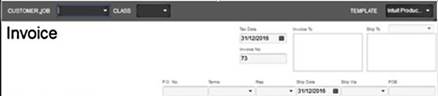
Enter a date for the invoice by going to the Date text box.
If you want, enter an invoice number in the Invoice # box.
If you need to adjust the Bill To address, do so in the Bill To box. The same goes for Ship To.
If there is a purchase order that goes with this invoice/order, enter it in the P.O. Number box.
Enter the payment terms by choosing the payment terms from the Terms drop-down list. As you may remember, we added your terms to QuickBooks earlier in this course.
If there's a sales rep, you can enter it in the Rep box.
Enter the shipping date if it differs from the invoice date.
Now, enter the shipping method.
The Via field is available in Product and Packing Slip templates.This is for the method of shipping. Choose a method, or choose <Add New>.
In the F.O.B. text box, enter the F.O.B. point. FOB stands for free-on-board. This is important, even if it doesn't seem that way. The F.O.B. point determines the point that ownership is transferred, who pays the shipping charges, and who incurs the risk if there's damage to the product during shipping. If a shipment is F.O.B., ownership transfers to the buyer (your customer) when the order is shipped. This means the customer pays the shipping and holds all the risk if there's damage. Enter the name of the shipping point if this is what you want, and where the product ships from is the F.O.B. point. For example, F.O.B. Atlanta. The FOB field is available only in Product and Packing Slip templates.
Now, let's enter line items.
Enter each item that's being sold. Start to fill in items. QuickBooks will use the information you added in your lists to fill in price and things like that. It's pretty easy, isn't it?
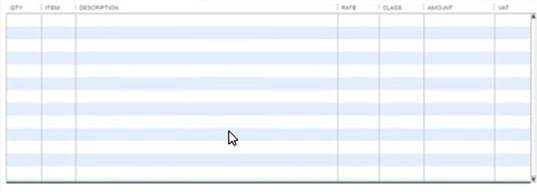
If you've enabled price levels, you can change the amount charged for any line item by applying a price level. If you've already assigned a price level to a customer, the adjusted amount automatically shows up.
You can also apply discounts in an invoice. You enter discounts as line items. If you want to create a discount against multiple or all line items, you must first create a subtotal for those items. Simply use a subtotal item type that you create in your Item list.
After you do this, it's time to move to the footer section. You will notice that QuickBooks has kept a total for your items, including taxes. Now you can add a message if you want. You can also add a memo. A memo doesn't print on the invoice. It only appears on your screen. Just be warned that the memo will appear on statements next to the listing for the invoice. Be careful you don't put anything you don't want the customer to see.
![]()
- Now, add a customer message if you want.
- Enter the sales tax.
- If you want to wait to print the invoice, make sure you clear the To Be Printed box. This is located in the lower left area of this window. If you are following along in the software, go ahead and clear this. We'll discuss how to print in just a minute.
- Finally, save the invoice by clicking Save and New if you still want to create more invoices. Or click Save and Close if you are done creating invoices.
You might have customers who don't just buy products from you, so you don't invoice them for just products. Instead, you may invoice them for your time and expenses to complete the job.
In order to be able to bill for time and expenses in QuickBooks, you will have to set it up in your preferences.
To do this, go to Edit>Preferences, then select Time & Expenses on the left.
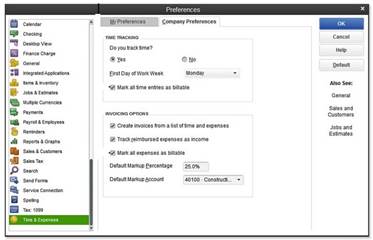
Time Tracking Options
If you need to provide invoices that show your costs plus markup, enable this preference by selecting from the following time tracking options.
Select Yes to enable time recording on timesheets. These can then be transferred to vendor and employee payment, as well as customer invoices.
First Day of Work Week. Specify the first day of the work week.
Mark All Time Entries as Billable. This is a new feature. Use it if you list detailed information on vendor or employee time on invoices to customers.
Create Invoices from a List of Time and Expenses. Select Yes for Do You Track Time. This will enable you to track time on timesheets. This can then be transferred from payment transactions to invoices.
Track Reimbursed Expenses as Income. Put a check in this box if you want costs invoiced to customers counted as income.
Mark All Expenses as Billable. This is also new in QuickBooks 2013. This marks all expense line transactions as billable. If you detail costs on invoices, this is helpful.
Default Markup Percentage is used to define a percentage that's added to an invoice when billing for cost and time.
Default Markup Account is used to select an account for all amounts charged as markup.
Credit memos are easy ways to correct errors in invoices, or to issue refunds to customers. It's a way of giving a customer credit. Below is what a credit memo looks like in QuickBooks 2013:
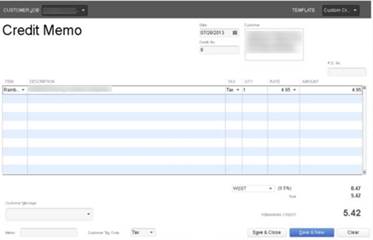
Again, we're going to learn to create a product credit memo. Service credit memos are easy once you learn how to do these.
To create a memo against an invoice you have already created, first locate and open the invoice. Click the Refund/Credit button on the Main tab. This creates a return receipt for the invoice. Now you can edit line items as needed. When you save it, QuickBooks will ask you how you want to apply the credit. We'll discuss that in just a minute.
To create a credit memo without an invoice, go to Customers>Create Credit Memos/Refunds.
Find the customer or job, just as you did when creating an invoice.
Now, save the credit memo.
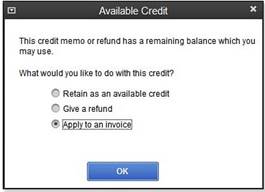
Once you do this, a dialog box will appear. It will ask you how you want to apply the memo. Let's learn how to do this.
Whenever you save a credit memo, QuickBooks prompts you to select how you want to apply it. You can retain it as an available credit, give a refund, or apply to an invoice. Select which one you want, then click OK.
If we chose Apply to an Invoice, we'd click OK, then see this window:
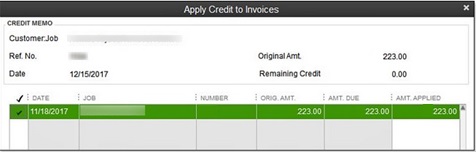
Now, we could apply all or part of the credit to an invoice or multiple invoices for the customer.
An estimate does not affect your financial records. The amounts listed in the estimate do not affect any of your accounts. An estimate simply quotes a customer a price for a job so the customer can determine if he/she wants to hire you.
To create an estimate, go to Customers>Create Estimates. The window that opens is very much like the invoicing window.
Go ahead and fill this out just as you would an invoice. Again, the difference is that an estimate is not an invoice, and it does not affect your accounts.
If you have enabled estimates and progress billing in Preferences, you can bill for milestones on a job � or bill for part of the job before the job is finished. The important thing to remember when doing this is that progress invoices are invoices that are connected to an estimate for a customer or job. In other words, the customer accepts your estimate, and you use that estimate to bill for milestones.
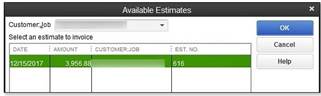
To create a progress invoice, go to the Create Invoices window, then select Progress Invoice from the drop-down list. Choose the customer or job. QuickBooks will then present a list of the estimates available for that customer or job. Choose the appropriate one, then click OK.
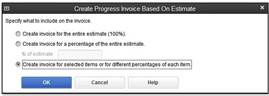
QuickBooks will then allow you to specify what you want included on the invoice. You can:
- Create an invoice for the entire estimate
- Create an invoice for a percentage of the entire estimate
- Create an invoice for selected items, or for different percentages of each item.
Creating a progress invoice is easy in QuickBooks.
You will then see a dialog box where you can specify the invoice amount for items. Simply change the quantity.

Click OK when you are finished.
An invoice opens. Make sure you use the Progress Invoice template.
Of course, printing begins with loading the proper paper into the printer. However, you also have to set up the Invoice Printer on QuickBooks. You can use this for credit memos also.
Go to File>Printer Setup. Go to the Form Name drop-down box and select Invoice (for printing invoices).
Find the printer that you want to use and select it from the Printer Name drop-down list.
If you want, select the printer type. This is just the type of paper that you are going to use.
Now, choose the type of invoice form you are going to print on: Intuit Preprinted Forms, Blank Paper, or Letterhead.
Go ahead and print a test invoice on paper. To do this, click the Align button. When the dialog box comes up (shown below) click Print Sample.
Now you can fix any alignment problems.
Save your settings by clicking OK.
You are ready to print! If you want to print invoices as you create them, you can click the Print button after you create one. A dialog box will appear.
Just select the type of invoice or credit memo.
Click on the Print button.
If you want to print batches of invoices, make sure the check box "Print Later" is checked when you create invoices. When you are ready to print, go to Customers>Create Invoices, click the arrow by the Print button, then choose Batch.
Now, select the invoices that you want to print, then click OK.
Now you can print the forms.