In this article, we're going to teach you how to create your budget. You don't have to do this. If you have so much cash that you don't have to worry about spending, then great. But if you're like most of us, this is a article you won't want to miss. The good news is that if you've take the time to create a really good Chart of Accounts, you're already on your way to creating a solid budget.
Here are some basic budgeting tips to follow before you ever bring QuickBooks into it:
- Plan your income as well as your expenses.
- Always include some cushion in your budget plan.
- Compare your actual income and spending to your planned income and spending.
- Make adjustments if you need to.
- Don't spend more just because you're starting to make more.
Go to Company>Planning and Budgeting>Set Up Budgets. If this is your first time setting up a budget in QuickBooks, you'll see the dialog box to create a new budget.
Choose the year you want to budget. This is the fiscal year.

Now, choose the type of budget you want to create. Then click Next.
![]()
Give QuickBooks the criteria that you want to use to budget, as well as instructions. You can use Customer: Job information, or class. Answer it by checking the option button next to the criteria you want, then click Next again.
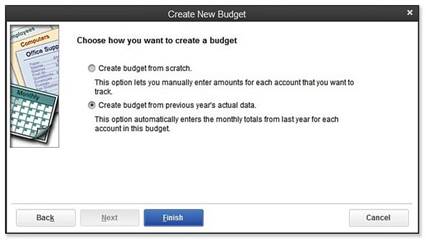
Tell QuickBooks if you want to start from scratch, then click Next.
You'll then see the Set Up Budgets window.
Create your budget. Set the amounts that you want to plan for each account. Click on the monthly amount you want to enter for the budget, then enter in a value.
If you need to adjust your budget, go to Company>Planning and Budgeting>Set Up Budgets. Select the budget from the drop-down list, then make changes.
If you want QuickBooks to forecast your profits and losses based on previous year's income and expenses, or on actual numbers that you enter, go to Company>Planning and Budgeting>Set Up Forecast. Follow the instructions to set this up.
We all know that balancing a bank account is a chore, but it's a chore we can't live without doing if we don't want to write bad checks and lose control of our account completely. In this section, we're going to learn to balance your bank account using QuickBooks.
As you know, when you reconcile (or balance) a bank account, you compare what you've written in your register with what the bank's saying you've actually deposited and spent. The same principle holds true with QuickBooks.
To start balancing your account, go to Banking>Reconcile. You'll see the dialog box shown below.
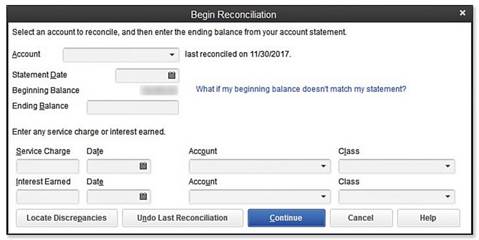
If you have more than one account, you'll have to choose which one you want to balance.
Now, enter the date of your bank statement in the Statement Date field.
QuickBooks now will show you an amount in the Beginning Balance field.
Next, enter the ending balance from the bank statement in the Ending Balance field.
Enter the service charge your bank assesses you and the date the service charge was assessed. Then, assign the charge to an account. QuickBooks has a default Bank Service Charges account you can use for this.
If your account earns interest, enter the income from it in the Interest Earned field. Of course, then you'll need to assign an account to it.
Finally, click Continue. You'll now see the Reconcile window.
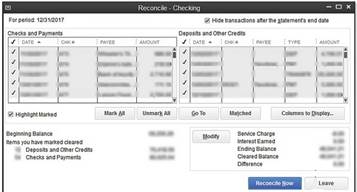
Click Continue in the window we talked about in the last section to go to the Reconcile window.
QuickBooks sorts transactions, first by date, and then by transaction number by default. If more than one check has the same date, the checks are sorted by numerical order.
However, you can change the way QuickBooks sorts the data so it matches your bank statement. This makes things a lot easier.
Now that the reconcile window is open, you can start to mark which checks and deposits have cleared the bank. Here's how you do it.
Find the first deposit that's cleared. Mark it as cleared by putting a check mark next to it.

If there's a deposit missing in your QuickBooks statement that appears on your bank statement, you need to register it. You'll have to close the Reconcile window by clicking Leave, then open the register and enter it.
Once you've gone through the deposits, it's time to do the checks. Follow the same steps you did for the deposits by putting check marks by those that appear on your QuickBooks statement and your bank statement. Again, if there's a check that's cleared on your bank statement, but isn't showing in QuickBooks, you haven't registered it yet. You'll have to click Leave, register your check, then come back.

If the difference between QuickBooks and your bank statement doesn't equal zero, you'll see a window letting you know there's a discrepancy. You can then return to reconcile, leave reconcile, or enter an adjustment. When you've finished, click the Reconcile Now button.
Sometimes you might realize that you entered a wrong amount for a check in QuickBooks. You can easily correct it by editing the transaction. Double-click the listing in the Reconcile window. This will open the original transaction window. Make the changes, then close the window. QuickBooks will ask you if you want to record the changes. Answer Yes.
Once you have a balanced reconciliation, QuickBooks will congratulate you and offer to print a copy of the reconciliation report. Note that QuickBooks saves the report no matter what, so it's up to you whether you want to print it. You can print three types of reports: Summary, Detail, or Both. Click Display to display it on the screen, or Print to print it.
If you want to print both reports, choose the printer you want to print the report. If you select either, but not both of the reports, the Print Reports dialog box offers the following options:
- Print the report to a printer.
- Print the report to a file. You can choose between ASCII text (unformatted text), Comma Delimited (a comma is put between each column. This is helpful if you want to use the file in a spreadsheet), or Tab Delimited (almost like Comma Delimited, except a tab marker is used instead of a comma
QuickBooks 2013 gives you the ability to run several different types of reports. We're going to talk about these in this section, as well as teach you how to run them.
All reports in QuickBooks are organized into categories. This makes it a lot easier to find the reports you want, because you just have to go to the applicable category. You can see the categories by clicking on the Reports menu at the top of the window, or by clicking on the Report Center icon.
Below, we've created a chart to show you reports by category with a brief explanation of the reports within the category. However, if you want a detailed description of a certain report, go to Help>QuickBooks Help, then click on the Index tab Enter in what type of report you want to see.
Chart of Report Categories
|
Category |
Description of Reports |
|
Company and Financial |
Reports detailing cash flow and company health. This includes assets, liabilities, and equity. |
|
Customers and Receivables |
Reports that detail invoice standings. |
|
Sales |
Details what your company has sold, and who it sold to. You can sort by item, customer, or sales rep. |
|
Jobs, Time, and Mileage |
Job and item profitability. Compare job estimates vs. cost, time on jobs, and vehicle mileage. |
|
Vendors and Payables |
Details about unpaid bills |
|
Purchases |
Tells you who you bought from, what you bought, and how much was paid. |
|
Inventory |
Shows you what you have in stock. |
|
Employees and Payroll |
Only available if you've signed up for Payroll options with QuickBooks. Track payroll. Check payroll liability accounts. |
|
Banking |
View checks and deposits |
|
Accountant and Taxes |
Income tax reports, general ledger reports, and trial balance. |
|
Budgets and Forecasts |
We talked about this in the last lesson. Compare actual money spent/earned with your budget. |
|
List |
See your lists in detail. |
|
Industry Specific |
Some versions of QuickBooks allow you to run industry-specific reports for accountants, wholesalers, professional service firms, manufacturers, and contractors. |
Select the report you want to create from the Report menu, or from the Report Center window. If QuickBooks has to compile a lot of information to create your report, you may see a "Building Report" box until the report is ready.
If you want to print a report, click the Print button at the top of the report. You'll then see the Print Reports dialog box.
If everything looks okay to you there, click Print.
If you're going to show a report to vendors, investors, or other people, you may want to make them look a little better or more tailored to your business and its needs. You can also use QuickBooks to customize these reports.
To do this, go to Edit>Preferences. Now, Reports and Graphs in the list on the side.
Here are the things you can do by clicking on the various options displayed:
- Accrual. A tricky word, but what it means if you select this is that your QuickBooks report will show what your business as accrued -- or gained. This includes transactions, sales, purchases, expenses, etc from the time that you recorded them.
- Cash. Selecting this will mean that all transactions are counted from the time you receive payment from the customer and make expense payments. Accrual means from the time they are recorded. Cash means from when you receive/pay.
- Age from Due Date counts expenses and invoices from their due date.
- Format will help you change the look of your report, such as the headers and footers.
- Reports -Show Accounts By. This will allow you to tell QuickBooks how to arrange the information in the report. You can choose by name, description, or both.
- Statement of Cash Flows - Classify Cash. This is better left for a CPA. It tells QuickBooks what to do when it comes up with a perfect statement of cash flows using accounting. Again, leave it for a CPA.
- Also, you can use Fonts and Numbers tab located in the Report Format Preferences to change the look and feel.