You'll install your QuickBooks 2013 software like you would any other software program. Follow the instructions that pop up on your screen. You will be able to choose, among other things, where the program will be saved on your hard drive.
If, for some reason, you have problems during installation, or the program does not function properly once it's installed, here are some tips that will help.
1. Make sure the software is compatible with your computer and your operating system. It should be, and this should never be a problem.
2. Uninstall the software by going to the Control Panel on your computer, then Programs and Features. Find QuickBooks 2013, then uninstall it.
3. Reboot your computer. This is important for a fresh install. If you try to re-install without rebooting, you may have the same problems all over again.
4. Re-install the software.
If you still have problems at this point, you can do some things to help eliminate the problem.These things include running Scandisk on your computer, defrag, and also making sure there aren't any viruses. If nothing else works, visit the Intuit website for help.
Express Start allows you to set up your company to use QuickBooks in just three simple steps. It will guide you through the basics, asking you for the information it needs.This includes company information, contact information, and also contacts, products, services, and bank accounts if you want to go ahead and enter it.
To use Express Start, go to File in the menu bar, then Create a New Company (File>Create a New Company). Next, click the Express Start button that you'll see in the QuickBooks Setup dialog box.
Now, enter the following information:
- Company Name. This will be the name of the file that you're creating. It doesn't have to be your legal company name.
- Industry. By telling QuickBooks your industry, QuickBooks will provide you with a sample chart of accounts (for some industries), as well as some ready-made items you can use when invoicing customers and buying products or services from vendors.
- Company Type. This will help QuickBooks create equity accounts used for tax preparation. If you need help selecting a company type, click Help Me Choose.
- Tax ID#. This will be used when processing payroll.
- Do You Have Employees? Choose Yes, No, or No, but I might in the future.

Click Continue when you've entered all information.
In the next window you see, you're going to continue entering information.
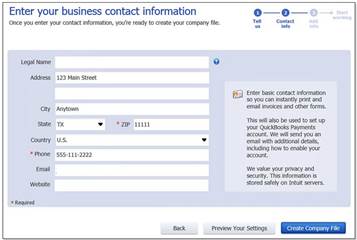
Enter the following information in the dialog box that looks like the one above:
1. Enter the legal name for your business. This is the name that will be used with your payroll.
2. Enter contact information for your business. This includes the address and phone number. Please note that the zip code and phone numbers are mandatory information that you must enter. It's this information that QuickBooks will use to enable you to receive payments online from customers. Plus, more information will be sent to you in the email address you provide.
3. When you're finished, you can click the Preview Your Settings button. When you do this, you will see tabs that will allow you to see the Features Selected, Chart of Accounts, and Company File Location that QuickBooks recommends for you based on the answers you gave in the first step.
4. Click Ok to close the Preview Your Settings box.
5. Click the Create Company File button to go to the next steps.
Next, you'll add info into QuickBooks, such as the people you do business with, products and services, and bank accounts. You can skip these steps if you want by clicking the Start Working button, as shown below.

If you've used previous versions of QuickBooks, you know how easy the Easy Step Interview can make getting started. The good news is that the Easy Step Interview still exists in QuickBooks 2013; however you click on Advanced Setup or Detailed Start in the QuickBooks window to start it.
As we said in the first lesson, it's going to take a while to get through the Easy Step Interview. It's not going to be something you want to breeze though quickly. However, there are some things you can do to get prepared. We're going to cover those for you in this lesson before we walk you through the Easy Step Interview process.
First:
- Decide on a conversion date, or the date that you convert from the accounting system you were using to QuickBooks 2013.
- Have a trial balance as of the conversion date. We'll talk about that in just a minute.
- Collect things you'll need or want to have close by for the interview. Don't worry. We're going to provide a list.
Conversion Date
You can pick a conversion date using one of these three methods:
Convert at the beginning of the calendar year. This makes the most sense and is, by far, the best way. In fact, we recommend it. It requires less work, and all your information for the calendar year will be in one accounting system instead of two.
You can convert at the beginning of a month or quarter. This can be a beast to do, because you have to enter your year-to-date income and expenses from the old system into the new. It's kind of like double the work, since you did all of it already in the old system.
You can convert when you feel like it. It's going to be a lot of work, but you can do it.
The Trial Balance
A trial balance simply lists your assets, liabilities, and owners' equity account balances. It also includes the year-to-date income and expense numbers for the conversion date. You're going to need this information for the Easy Step Interview.
This may sound like a daunting task, but it's really not. If you're currently using Quicken or Simply Accounting (by Computer Associates), it may be able to produce a trial balance for you.
Your trial balance should show all of your account balances for the day when you start to use QuickBooks 2013. If you're using another accounting system, or this is your first time ever using one, here's how you get those balances:
- Determine your cash balance by reconciling your bank accounts. This must be the balance on the conversion date.
- To get an accounts receivable (or money owed to you) balance, total up unpaid invoices from customers.
- To get asset account balances, you must know the original cost of the asset. If they're depreciable fixed assets, you'll need the accumulated depreciation amount, or the total amount that you've already depreciated the asset.
- To get your liability account balances, have the amount that you owe on each liability handy.
There's no need to fuss with equity accounts. QuickBooks 2013 will generate the balances for you by figuring out the difference between your assets and liabilities.
What You Need
Once you complete those things, it's time to gather the information you'll need. We've included a list below for you to use as a guide. Although the gathering of the information may be time consuming in itself, it's important that you take the time to do it.
- The federal tax return from last year.
- Copies of the most recent state and federal payroll tax returns.
- Copies of unpaid invoices.
- Copies of unpaid bills.
- A detailed list of your inventory.
- Copies of the prior year's W-2 and W-4 statements.
- Details of any payroll tax deposits.
- A list of ALL transactions for the past year, including sales, purchases, and payroll transactions.
The Easy Step Interview allows you to enter more detailed information than the Express Start. It may take more time to go through, but it will save you time in having to enter all the information later.
The first thing you're going to enter for the Easy Step Interview is company information, as shown below.
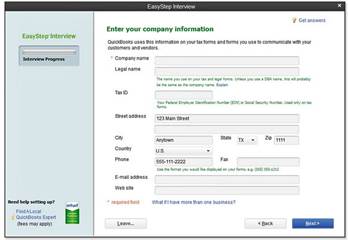
Click Next to progress to the next window.
Now you'll be asked to enter information about your industry.
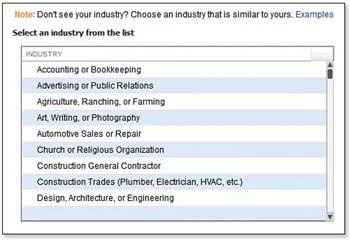
Pick the industry that's closest to yours. Then click Next.
The next window will show you different legal entities for businesses. This includes proprietorship, partnership, corporation, etc. Choose the way your business is organized. If you're not sure, you can ask an accountant or find a copy of the income taxes your business filed last year. If you simply don't know the answer to this, then choose Other/None. You can always change it later by going to the Company menu and then the Company Information dialog box.
The next window will ask you to enter the first month of your fiscal year. January is the default entry for QuickBooks; however, if your company doesn't use the calendar year, select the month your fiscal year begins from the drop-down list.
Next, you'll be asked to create an administrator password. This will limit access to your company's file and prevent anyone from looking at your information unless you want them to. If you want, you can set up multiple users for QuickBooks 2013, but you don't have to worry about that in the Easy Step Interview. You can do that later. We'll also cover that later in the course.
The next window you'll see will allow you to create a file for your new company. It's best if you keep the suggested name that appears in the File Name box and click Save.
Next, you'll be asked to customize QuickBooks 2013 for your business. We're going to walk you through that step by step.
The rest of the Easy Step Interview is going to ask you about the way you do business. You're going to be asked what you sell, if you charge sales tax, if you estimate, etc. This information all takes time to enter. However, it's asked in such as simple way, it's actually easier to take the time to do it in the Easy Step Interview than to wait until later.
Listed below are the things QuickBooks will ask you about, and the answers you'll be able to give:
What Do You Sell? You can choose from services, products, or both services and products. The selection you make here will affect the type of invoice that QuickBooks selects when you start to use the program. Click Next when you're finished.
Do You Charge Sales Tax? Select either Yes or No. This can always be changed later. Click Next when you're finished.
Do You Want to Create Estimates in QuickBooks? Choose either Yes or No. Choose Yes if you provide proposals, as well as estimates. Click Next when you're finished.
Tracking Customer Orders in QuickBooks. Check Yes or No. Please note that this feature is only available in QuickBooks Premier, Accountant, or QuickBooks Enterprise Solutions. Click Next when you're finished.
Using Statements in QuickBooks. Choose Yes or No. Checking Yes will allow you to print past-due statements for customers. Click Next when finished.
Using Invoices in QuickBooks and Using Progress Invoicing in QuickBooks. Choose Yes or No. If you choose Yes, you'll enable the use of customer invoices. For some industries, you may also be asked to enable progress industry � or milestone billing � where you can invoice a customer for part of the total amount before the project is complete.
Managing Bills You Owe. If you choose Yes here, you'll be allowed to enter bills from vendors and pay those bills later. Click Next when you're finished.
Tracking Inventory in QuickBooks. Select Yes to enable this. Click Next.
Tracking Time in QuickBooks allows you to bill customers for time, analyze the time spent on projects, and also pay hourly employees. Select Yes or No. Click Next when you're finished.
Do You Have Employees? You can choose either W-2 employees or 1099 contractors. If you select Yes for W-2 employees, QuickBooks creates the Chart of Account items you'll need. Click Next when finished.
Using Accounts in QuickBooks. Click "Why Is the Chart of Accounts Important" link to learn about this list in QuickBooks, then click Next.
Select a Date to Start Tracking Your Finances. This is also a conversion date. We talked about conversion dates earlier in this lesson. Click Next.
The Review Income and Expense Accounts window will ask give you a list of accounts that QuickBooks will want to use for tracking your business' finances. Unless you're an accountant or really good with accounting, use the suggested Chart of Accounts.
The next window that appears asks you how you want to track your expenses. Select Yes to choose to track the bills you owe. Select No if you don't want to and would prefer to use your checkbook.
At this point, you are finished with the Easy Step Interview and ready to proceed to setup. Click the Go To Setup button to launch the setup window. We talked about it briefly earlier in this lesson. It looks like this:
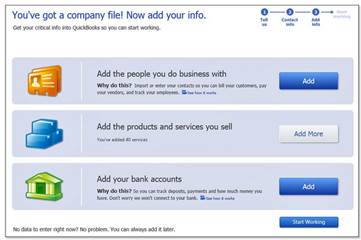
In the window shown above, you'll be able to finish setting up QuickBooks 2013. Click the Add button to the right of the information you want to add.
The first button is to add the people you do business with � or your contacts. You can import these from Outlook, Yahoo, Gmail, or paste from Excel. You can also enter this information manually.
You can also add products and services, or your bank account information.
The interview and setup in QuickBooks is not hard to complete. The important thing is to take your time and make sure you are entering the correct information. In this course, we're going to teach you how to use QuickBooks 2013. However, always remember that if you have questions regarding what you should enter or the best way of using QuickBooks for your business, you should contact a qualified accounting professional, such as a CPA .