The EasyStep Interview is just the beginning of setting up your QuickBooks 2013. You've entered the core information; however, you may still need to add products, employees, customers, and other pertinent information that QuickBooks will need if you didn't enter it during set up. If you did enter this information during set up, then good for you. In this artcle, we're going to teach you how to enter this information without using set up or the Easy Start Interview. That way, you can go back and make changes or enter more information later.
The first thing you need to know is that information such as products/services, employees, and customers are entered into lists. Lists are part of what makes QuickBooks so easy to use because all your different types of information is easy to find � and to use.
Lists will contain different things, such as a list of customers, a list of employees, and so on. However, the first lists you need to create are lists that your business absolutely needs to stay in business. These things are the backbone of your company. They're the things that you buy and sell.
Just be warned that QuickBooks thinks that anything you stick on an invoice or purchase order is something you buy and sell and that it needs to be in a list. This means things like shipping charges are viewed as something that you sell in the eyes of QuickBooks. In other words, if you add shipping charges to an invoice, QuickBooks thinks you're adding a product, so it will need to be included in your product list. That may be confusing right now, but that's perfectly understandable. We're going to clear it up for you.
Remember this: Everything that you could possibly add to an invoice or purchasing order is an item you need to put on your list. This includes products, services, sales tax, shipping and handling, subtotals, discounts, etc. These are all items. These items need to be included in your Item list.
To create an item list, go to Lists>Item List from the menu bar.
This opens the Item List.
Press CTRL+N (N for new) to bring up the New Item Window.
You'll see this screen:
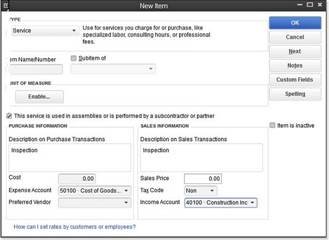
The first thing you need to do in this window is select an item type from the Type drop-down list.
- Service. If this item is a service that you charge for, select Service.
- Inventory Part. If this is something you buy from someone else, then sell, classify it as this.
- Inventory Assembly. If what you're classifying as an item is a raw material that you use to make other items.
- Non-Inventory Part. This is for something that you sell, but don't want to count as inventory. It can also be for something that you don't sell, but that you buy, such as office products.
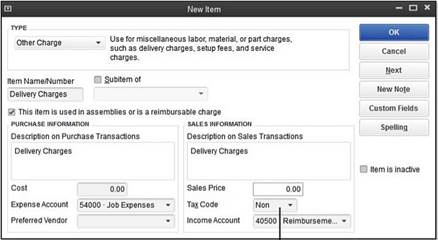
- Other Charge. Freight, handling charges, and things like that would be classified under this.
- Subtotal. This will add everything before you add tax, discounts, etc.
- Group. This can be used to enter several items that are already on the list at one time. It's helpful to do this if you sell products as sets.
- Discount. A discount that you give customers after the invoice is subtotaled.
- Payment. You don't have to use this if it confuses you. However, you add this item if perhaps you customers puts down a deposit when they buy, but before they receive the product.
- Sales Tax Item. This is for sales tax.
- Sales Tax Group. For sales taxes that are collected in a transaction and owed to different agencies.
We're going to add a Service item.
Next, add an item number or name. You can also create sub items. These are items that go within other items. To do this, choose the Sub-item Of box, then assign a parent item to it.
Also, add a short description of the item. Enter the description into Description on Purchase Transactions if this is an item you buy. Enter the description into Description on Sales Transactions if this is an item you sell.
Next, enter a default cost. This can be changed at the time of entry into an invoice, or when paying a bill if you need to change it. You do not have to enter a default cost.
In the Expense Account field, choose the account to assign the item to. In our example, we're assigning it to the Cost of Goods Sold. We'll learn about accounts later in this course.
Assign a vendor in the Preferred Vendor field. You can also leave it blank if you want. If you fill in the Preferred Vendor field, QuickBooks will fill in the name of the vendor on a purchase order when that item is selected. It can save you time.
In the tax code drop-down menu, select whether or not the item is taxable.
Next, choose an income account that you want the item linked to in QuickBooks.
Click Save when you're finished, or click Next to add another item.
This is the basics of adding an item. Now, let's talk about the item types that you can add in a little more depth.
If an item type is classified as Non-Inventory Part, Service, or Other Charge, you must tell QuickBooks how much will be charged for the item, if it should be taxed, and the income account to use to track the income from it.
- For Service type, use the Rate text box and enter in how much you charge per unit.
- For Non-Inventory Part type, use the Price box and enter the price.
- For Other Charge type, use the Amount or % text box. This is usually used for shipping charges.
Also, use the Tax Code drop-down to let QuickBooks know if the item is taxed. You also will have to use the Account drop-down to let QuickBooks know which account you want to use to track income from the sale.
If the item type you're adding is an Inventory Part, you must specify how much to charge for the part, how much it costs, and which income account to use to track it.
You'll also have to specify the following information:
- Description on Purchase Transactions. Enter a description that will be used when you buy the part.
- Description on Sales Transactions. Enter a description to be used when you sell the part.
- Cost: Enter the average cost per unit for the items that you have. This will become the default rate when you purchase more.
- COGS (Cost of Goods Sold) Account: Let QuickBooks know which account you want to use to track the item's cost when sold. Use the Costs of Goods Sold Account unless you have created other accounts for this.
- Preferred Vendor: Put down your first choice in a vendor when buying this item. If the vendor isn't on your vendor's list, you'll be asked to add it.
- Sales Price: The price you will sell the item for.
- Tax Code: Enter if it's taxed.
- Income Account: Assign an income account that will be used to track the income from this product. This will probably be the Resale Income or Sales Account.
- Asset Account: Assign the other asset count that you want QuickBooks to use to track the item's value.
- Reorder Point: How many of this item do you want left in your inventory before you reorder?
- On Hand: Tell QuickBooks how many of this item that you currently have on hand.
- Total Value: Leave this at zero.
- As Of: Enter today's date.
A sales tax item is just data about a sales tax. For the Sales Tax Item, enter:
Sales Tax Name and Description. Add details for identification.
- Tax rate. Enter the tax rate as a %.
- Tax Agency. Specify the state or local agency that collects the tax money. If you have to add an agency, click Add New from the list.
A payment item is used to record the receipt of partial payment. This reduces the balance due. If the item type is Payment, describe the payment method, then specify how QuickBooks should handle it. You can add more payment methods by selecting Add New from the drop-down list.
When you're finished, click OK or Next. Use Next if you still have items to add.
Remember, if you've added a new inventory item to record the purchase of the item by creating a transaction. We'll cover that later.
Subtotal items allow you to add and total groups of items in an invoice or receipt. To use it, list the subtotal item, then list the items you want included in the subtotal.
Groups of items are items that you sell together. For example, maybe you have a shampoo and conditioner set. You may sell the shampoo and conditioner separately � and together. To create a group of items, go to File>Item List, then press CTRL+N. Choose Group as the item type.
Create an item with the item type as Discount, then give it a name. If you have different discount items, you might want to be specific -- such as Level One Discount for a name. Level One may be a 10 percent discount. Then, use the Amount or % box to specify the discount. Next, use the Account drop-down list to specify how to track the discount.
Other Types of Lists
Lists are very important to QuickBooks. Therefore, learning to create different lists should be very important to you. To help explain to you why lists are so important, let's use an analogy. When you bake a cake, the cake takes different ingredients. Butter, eggs, and milk are just a few of those ingredients. If you take those ingredients on their own, you simply have butter, eggs, and milk, right? But when you combine them (with other ingredients), they make a cake. Think of lists that way.
It may seem tedious to create all these lists. But once you start using QuickBooks for business, those lists become the ingredients that make the program work.
We're taking two lessons to teach you to create lists, so you know exactly how to do it. Take time and study these lessons. They'll save you time when using QuickBooks.
If you buy things such as vehicles, furniture, or equipment, you're supposed to track these things (fixed assets) in a list, so you can calculate depreciation. If you later get rid of one of these items, you need the info to calculate loss or gain from the sale.
To create a fixed asset item list, go to Lists>Fixed Asset Item List. Click the Item button, then choose New. You can now enter in fixed assets, such as furniture, equipment, machinery, vehicles, etc.

Price levels make it possible for you to adjust prices as you create an invoice. This means you can charge some customers less for an item than other customers. You do this by selecting a price level from the Price field when you create an invoice. We'll learn how to do this later. For now, let's learn to create the list.
First, you have to enable the feature.
To do this, go to Edit>Preferences. Select the Sales & Customers category on the left.
Go to the Company Preferences tab.
Select the Use Price Levels option.
Click OK.
Now, to create a price level, open the Price Level List from the Lists menu. Press CTRL+N. The New Price Level dialog box then opens.

Enter a name for the price level
Now, select the price level type:
- Fixed Percentage Price Levels
- Per Item Price Levels
To assign a price level to a customer, go to the Customer Center, then select a customer list item from the list.
Click the Edit Customer button, then choose Additional Info.
Go to the Price Level drop-down list. Choose the price level to assign.
Sales tax codes in QuickBooks serve to identify a product or service as taxable or non-taxable, and to also identify a customer as taxable or nontaxable. You can also use the sales tax codes if your state has reporting requirements for nontaxable sales. You can create a sales tax code for every nontaxable sales type.
To create a sales tax code list, go to Lists>Sales Tax codes List.

Go to the Sales Tax Code drop-down box and either select a sales tax code from the list, or select New to create a new code. If you select New, you'll see a New Sales Tax dialog box.
Go to the Sales Code Tax field and enter a three-character code. You can see codes in the snapshot above in the Code column.
Now you can assign the sales tax code to items or customers.
Earlier in this course, we taught you to create new items in the item list. Let's look at the New Item dialog box again.
You can now assign a tax code to an item.
Class lists allow you to classify transactions by department or location. This is something you may not want to mess with until you get more familiar with QuickBooks. However, to use it, you need to turn on the Class Tracking feature by going to Lists>Class List.
The Other Names list is a list you create with other names of people or companies that you may send checks to. All you can do is write checks to these names. You cannot do anything else.
This is a list of the sales reps you work with. You can also use this list to indicate which sales rep sells to which customers or when they generate a sale. The name of the rep must appear in the vendor, employee, or other member of the Other Names list.
Go to Lists>Customer and Vendor Profile Lists>Sales Rep to create this list.
Select the rep's name from the Sales Rep Name drop-down list.
Enter in their initials in the Sales Rep Initials box.
Enter in the sales rep type in the Sales Rep Type box. For example, vendor.
Click OK when you're finished.
This is for your payment terms. Go to Lists>Customer and Vendor Profile Lists>Terms List.
To create a payment term, go to Lists>Customer & Vendor Profile Lists>Terms List. You'll see the terms displayed:
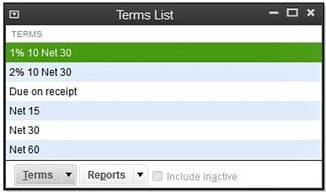
In the drop-down list, select New if you don't see the terms you want. You'll then see the New Terms dialog box.
![]()
Enter in the terms. Click OK when you are finished.
You'll then be returned to the Terms List.
Payment Method List. Just as it sounds, this lists your accepted payment methods. Go to Lists>Customer and Vendor Profile Lists>Payment Method.
Ship Via List. List for shipping methods used.
You can also create vehicle lists, a reminders list (to remind you to print invoices or checks, etc.), and a memorized transaction list. This list is really a list of accounting transactions that you ask QuickBooks to memorize so that when you record them again later, you save time.
You need to create an employee list if you track sales by employee, or wish to use QuickBooks for payroll. This will describe each employee to QuickBooks. Don't worry, though. It's easy to do. Start by clicking the Employee Center (Employees) on the top icon bar, as shown below.
![]()
You can see the Employee Center window. Click the New Employee button. You'll find this button above the list in the upper-left corner of the screen.
Now, fill out the information about the employee.
Simply put, the chart of accounts is a list of equity, liability, asset, and expense accounts. You'll assign your transactions to one of these accounts. Since you'll use these accounts for every transaction, that makes the chart of accounts the most important list you'll create in QuickBooks.
It may seem difficult if you're not an accountant to understand the different types of accounts you'll include in this list. But it's really not. Let's cover these accounts so it's easier for you.
There are six account categories that you'll use to track financial activities for your business.
1. Assets. An asset is something you've purchased that will be used to generate economic benefit for your company in the future. Asset accounts include bank accounts, Accounts Receivable, other current asset (includes Inventory Asset and Undeposited Funds), fixed asset, and other assets.
2. Liabilities include Accounts Payable, credit cards, other current liability (debt that's expected to be paid within one year, Payroll Liabilities, and Sales Tax Payable accounts), and long term liability (debt that will take more than one year to pay.)
3. Equity holds the owner's residual interest in the company after liabilities are paid. Accounts included in this are common stock, owner investments and draws, retained earnings, and opening balance equity.
4. Income is money for the sale of products and services.
5. Cost of Goods Sold is the material, labor, and other costs to make and sell the product.
6. Expense is for whenever an asset is used, or cash is spent.
To create a new account, go to Lists>Chart of Accounts.
Select New from the Account drop-down list or press CTRL+N.
You'll then see the Add New Account dialog box (pictured below).
We've already covered the types of accounts. Set up your account, then click Continue.

Now enter information about the account.
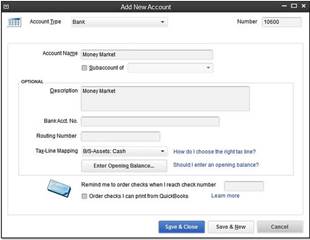
Click Save & Close when you're finished, or Save & New to create another account.