There's no doubt that payroll is one of your biggest headaches, especially if you are doing it yourself. Just messing with withholdings, writing the checks, and trying to decipher payroll taxes can take up so much time -- and all of your patience.
Because it is so complicated, you may want to hire an outside source to take care of your payroll. That way, you don't have to worry about Uncle Sam coming back on you later. However, if you don't want to pay for payroll services, and you insist on doing it yourself, we'll show you how to use QuickBooks to do your payroll.
Before we begin, it should be noted that payroll through QuickBooks does not come with the software you purchased. It is an addition and, yes, you are going to be asked to pay for it. How much it costs will depend on what you need. You can buy a basic payroll package for a few hundred bucks per year. If you want everything that you will need to do your payroll with QuickBooks, it is going to be more.
Plus, it will be critical (no matter what payroll package you buy) that you update your QuickBooks software all the time and, when a new version comes out -- pay to upgrade. If all this is something you are willing to do, let's get started.
Payroll With QuickBooks
To get started with QuickBooks payroll services, we need to use QuickBooks to get online. To do this, go to Employees>Payroll Service Options>Order Payroll Service. QuickBooks connects to the Internet for you. You will see a web form pop up that will ask you to sign in and start setting up the service. Just follow the onscreen instructions. However, you will need your year-to-date payroll information for employees. You will also need state withholding rates.
Once you are signed up, it is time to schedule your payroll. We'll learn how to do all of it in this article.
Scheduling Payroll
Once you have everything set up, it is time to schedule your payroll. Go to Employees>Add or Edit Payroll Schedules to do this.
You'll see the Payroll Schedule List window. Click on the Payroll Schedule button, then click New.
Next, tell QuickBooks about your payroll by describing it. If it is a weekly payroll that you pay on Friday, perhaps you'll describe it as Fri Pay. You'll also tell QuickBooks how often you do payroll. This could be weekly, bi weekly, monthly, etc.
After you have told QuickBooks about your payroll, it is time to tell about your employees. To do this, go to the Employee Center and click the New Employee button.
You'll use the tabs to provide employee information such as name, address, and social security number. You'll use the Payroll and Compensation tab to tell QuickBooks about the employee's salary and scheduled payroll.
Paying Employees
Once you have got the payroll service set up, you can now pay someone. Easy enough so far, is it not? Even though payroll, itself, is a headache, you are probably going to be amazed how simple QuickBooks makes it.
To start paying employees, go to Employees>Pay Employees>Scheduled Payroll.
-
Select the scheduled payroll that you want to use to pay employees.
-
Click Start Scheduled Payroll. This opens the Employee Center. The payroll tab will be selected.
-
Select the schedule, then click Start Scheduled Payroll.
-
The Enter Payroll Information dialog box opens.
-
This will list all the employees who are supposed to get paid using this payroll. If you don't want to pay a certain employee, remove the check mark beside their name by clicking it.
-
Next, it is time to create the paychecks. You start this process by clicking Continue.
-
QuickBooks figures everything out for you from here. It will figure out gross wages, deductions, and net wages, then display it for you in the Review and Create Paychecks window.
If you want to review an employee's information, just click on the name of the employee. This will open the Preview Paycheck window.
When you have reviewed everything, click Create Paychecks. You can choose to either print the payroll checks, or just print the stubs. If you print the stubs, you must hand write the paychecks. If you are going to write checks by hand, give QuickBooks the first check number so it can number the checks for your register.
Paying Payroll Liabilities
When you create payroll checks, QuickBooks keeps track of the liabilities you accrue � and must pay. But don't worry! QuickBooks makes paying payroll liabilities easy. To do this, you go to Employees>Payroll Taxes and Liabilities>Pay Scheduled Liabilities. When the window appears, select the payroll liability you want to pay, then click View/Pay.
The payment transaction window opens up so you can pay your liabilities.
Quarterly Payroll Tax Returns
As you probably know, every quarter you have to file a quarterly payroll tax return. The good news (again) is that QuickBooks makes this simple. You will have to fill out the forms and send them in, but QuickBooks will prepare Form 941 for you, which is the form you will need. It will also help you fill out the 942, or a state payroll tax form. QuickBooks will make this easy for you; however, the exact steps you'll take depend on the payroll service you're using.
Basic Payroll Service
If you have your accountant fill out Form 941, you don't need to worry about this section of the article dealing with quarterly payroll taxes. Your accountant takes care of payroll tax returns (most likely) and does this for you.
Assisted Payroll Service
If you're using Assisted Payroll, this service fills out the form and sends it for you. Again, you don't have to worry about it.
Enhanced Payroll Service
QuickBooks will create and print Form 941 for you. To do this, go to Employees>Payroll Forms and W2s>Process Payroll Forms. You'll then go through a wizard that will ask you for the state your business is in, as well as the number of employees you had in the quarter. QuickBooks then prepares your Form 941.
You can access a couple of reports to get a look at the numbers QuickBooks used to prepare your form if you want.
To look at the gross-wages totals and balances in each of the payroll tax liability accounts, go to Reports>Employees & Payroll>Payroll Summary.
To get information on payroll liabilities accounts, go to Reports>Employees and Payroll>Payroll Liability Balances. You will then see a report that tallies the amounts.
Annual Returns and Wage Statements
You will also need to file annual returns, such as the 940 Federal Unemployment Tax Return, as well as the W-2 and W-3 wage statements. You will have to fill out and send the forms yourself. QuickBooks won't do that for you, but it will help you create them. Go to Employees>Payroll Tax Forms and W-2s>Process Payroll Forms. You will then be asked to enter a little information, then QuickBooks will calculate everything for you. Make sure everything adds up and looks okay, then print the forms.
State Taxes
We all know that balancing a bank account is a chore, but it is a chore we can't live without doing if we don't want to write bad checks and lose control of our account completely. In this article, we are going to learn to balance your bank account using QuickBooks.
Balancing a Bank Account
As you know, when you reconcile (or balance) a bank account, you compare what you have written in your register with what the bank's saying you have actually deposited and spent. The same principle holds true with QuickBooks.
To start balancing your account, go to Banking>Reconcile. You will see the dialog box shown below.
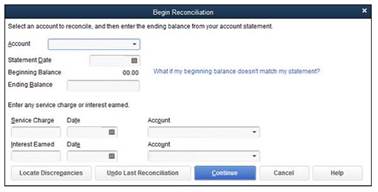
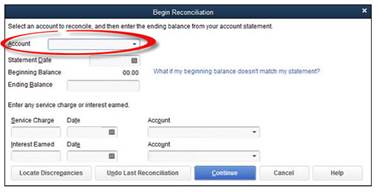
If you have more than one account, you will have to choose which one you want to balance.
Now, enter the date of your bank statement in the Statement Date field.
QuickBooks will now show you an amount in the Beginning Balance field.
Next, enter the ending balance from the bank statement in the Ending Balance field.
Enter the service charge your bank assesses you and the date the service charge was assessed. Then, assign the charge to an account. QuickBooks has a default Bank Service Charges account that you can use for this.
If your account earns interest, enter the income from it in the Interest Earned field. Of course, then you will need to assign an account to it.
Finally, click Continue. You will now see the Reconcile window.
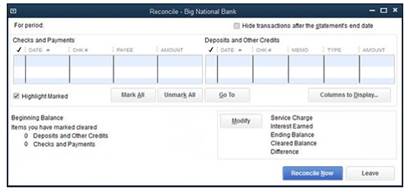
The Reconcile Window
Click Continue in the window we talked about in the last section to go to the Reconcile window.
QuickBooks sorts transactions first by date and then by transaction number by default. If more than one check has the same date, the checks are sorted by numerical order.
However, you can change the way QuickBooks sorts the data so it matches your bank statement. This makes things a lot easier.
Marking Checks and Deposits That Have Cleared
Now that the reconcile window is open, you can start to mark which checks and deposits have cleared the bank. Here's how you do it.
Find the first deposit that's cleared. Mark it as cleared by putting a check mark next to it.
If there's a deposit missing in your QuickBooks statement that appears on your bank statement, you need to register it. You will have to close the Reconcile window by clicking Leave, then open the register and enter it.
Once you have gone through the deposits, it is time to do the checks. Follow the same steps that you did for the deposits by putting check marks by those that appear on your QuickBooks statement and your bank statement. Again, if there's a check that's cleared on your bank statement, but is not showing in QuickBooks, you haven't registered it yet. You will have to click Leave, register your check, then come back.
If the difference between QuickBooks and your bank statement doesn't equal zero, you will see a window letting you know there's a discrepancy. You can then return to reconcile, leave reconcile, or enter an adjustment. When you have finished, click the Reconcile Now button.
Editing Transactions During Reconciliation
Sometimes you might realize that you entered a wrong amount for a check in QuickBooks. You can easily correct it by editing the transaction. Double-click the listing in the Reconcile window. This will open the original transaction window. Make the changes, then close the window. QuickBooks will ask you if you want to record the changes. Answer Yes.
Print the Reconciliation Report
Once you have a balanced reconciliation, QuickBooks will congratulate you and offer to print a copy of the reconciliation report. Note that QuickBooks saves the report, no matter what, so it is up to you whether you want to print it. You can print three types of reports: Summary, Detail, or Both. Click Display to display it on the screen, or Print to print it.
If you want to print both reports, choose the printer that you want to print the report. If you select either, but not both, of the reports, the Print Reports dialog box offers the following options:
-
Print the report to a printer.
-
Print the report to a file. You can choose between ASCII text (unformatted text), Comma Delimited (a comma is put between each column. This is helpful if you want to use the file in a spreadsheet), or Tab Delimited (almost like comma delimited, except a tab marker is used instead of a comma).