Email can quickly get out of control if you're receiving dozens of emails per day. You may want to save some of these emails, but you don't want to save them all in your inbox or another folder. Instead, you may want to organize them by sender or the nature of the email. For example, you may want all receipts for online purchases organized into a single folder.
In this article, we're going to talk about organizing and managing your email in Outlook 2013.
Creating Mail Folders
If you save a lot of your emails in Outlook, rather than deleting them after reading, you may want to arrange them into folders. By creating folders, you could save all emails from Tom, for example, to a folder named "Tom." You could also save all emails from Jane to a folder entitled "Jane," and so on.
To create a mail folder:
Go to the Mail module.
Select the email address for which you want to create a new folder. Click on it to select it, then right-click, as we've done in the snapshot below.
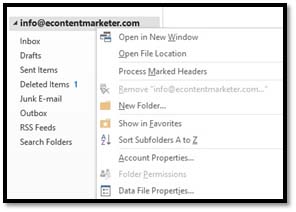
Select New Folder.
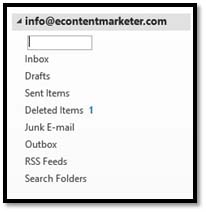
Type a name for the new folder in the box (shown above).
Hit Enter.
You can see the folder in our folder list below:
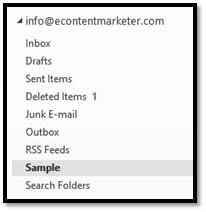
To move the folder up or down the list, select it, then drag and drop. We want to move it to below Sent Items.
As you drag, a black line will appear that is highlighted in dark gray:
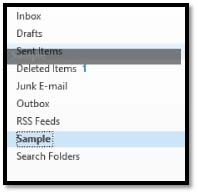
Make sure the black line appears below the folder where you want your new folder to appear.
Move Mail
To move an email message from your inbox to another location or folder, click on the email that you want to move to select it. (In your inbox as shown below).
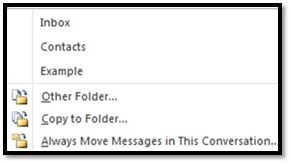
Now, right-click on it and select Move from the drop-down list.
When you click on move, a menu will appear to the right. You can then choose to move it to an email folder or another folder (email account) in Outlook. You can also choose to have all messages in the conversation moved.
Deleting Emails
Deleting emails in Outlook 2013 is easy. You can empty a whole folder of emails, delete every email in your inbox, or delete individual emails.
To delete all the emails in an email folder or your inbox:
- Click on the email folder. In this case, Inbox.
- Right click, then select Delete All.
To delete a single email:
- Click on message in the Information Viewer to select it.
- Right click on the message and select Delete from the drop-down menu.
You can also select a message, then hover your mouse over it in the Information viewer. A gray X will appear. Click the X to delete the email.

To delete an opened email message:
- Click the Message tab, then click Delete:

Sort and Find Messages
If you have a lot of emails in Outlook 2013, it can get hard to find an email that you need. If you know who sent the email or the subject line, you can use the search box at the top of the Information Viewer.

Search Current Mailbox is shown by default, but you can use the downward arrow on the far right to narrow or expand your search:

But if you're not sure of any of this, it can make it almost impossible to find the email you are looking for.
However, don't despair. You can use the sort feature of Outlook 2013 to find the email you need using parameters that you specify.
To sort emails, first select the folder you want to sort.
Then, click the View tab.
In the Arrangement group, there are different options you can select to sort your emails.

Choose an option to sort the emails. You can then click Reverse Sort in the Arrangement category to view emails in alphabetical order. You can click Columns to add more information about the emails you've sorted.
Your sort results appear in the Information Viewer. Below, we've sorted by size.
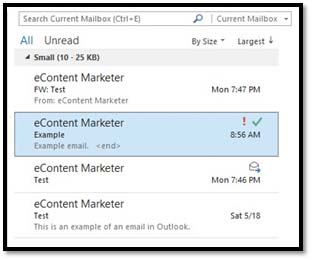
Enter the sort parameters that will help you find the message you're looking for in Outlook.
Instant Search
We mentioned Instant Search briefly in the last section when we showed you how to type in information about an email into the search bar. Now, let's learn more about it.
To start, select a folder in Outlook that you want to search. Now, enter keywords to start searching in the box above your inbox. Keywords could be the sender, the date, the subject, etc. These keywords can be as vague or as exact as you want. We're going to learn to refine the results too.

You'll then see all the search results that contain the keywords you entered.
NOTE: As you type in your keyword, you'll see a drop-down box that allows you to search by keyboard, subject, etc. You can move your mouse down to select one of these options for your search. For example, you can search by keyword, which will search all emails in the current mailbox to locate that keyword no matter where it's at � or you can just search by subject line for the word(s) you enter into the box. If we chose to search by sender and entered in the word "example," this is what would appear in our search box:

We entered the keyword "example" below. We entered it as a keyword.
Our search results are highlighted in yellow.
But Outlook doesn't stop there. Now you can refine your results.
The Search tab is now displayed on the ribbon.

Now, you can further filter your search results using the options in this ribbon. For example, if you want to search for attachments, click Has Attachments in the Refine group.
You can also choose other options in the Refine group to further refine your search. Click From in the Refine group to search for emails from a particular person.
Click More to see even more options to refine your search.

Advanced Find
Go to the Search Ribbon again; this time click Search Tools in the Options group.
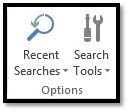
Select Advanced Find from the drop-down list.
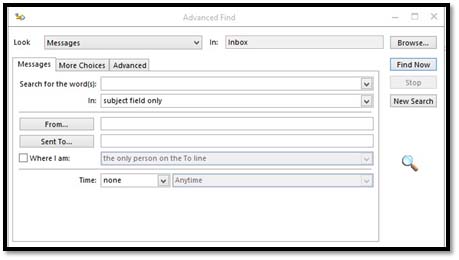
You can use this to enter in all sorts of search options. You can also easily navigate through the tabs in this window and enter different criteria. Everything in this window is self-explanatory and simple to use. All you do is enter the information that you know regarding the email you're looking for. Outlook 2013 does the rest.
Defining Rules
You can also establish "rules" that tell Outlook how to deal with an email. For instance, you may have a colleague with whom you share an informal correspondence, and you may not want Outlook to send an automatic reply to him or her.
Let's look at how to do that.
Go the File tab. Click Info on the left, then click the Manage Rules & Alerts button.

You'll then see this dialog box:
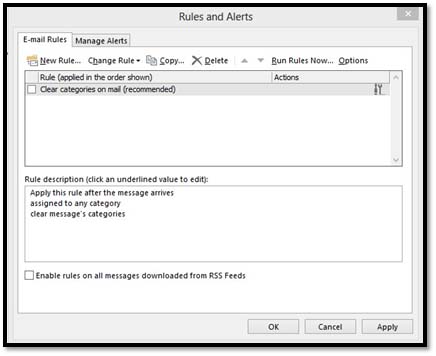
Click New Rule under the Email Rules tab.
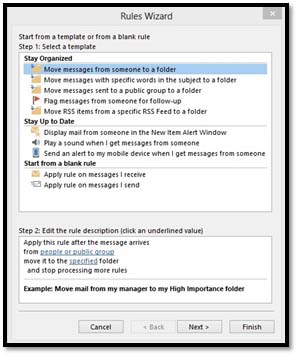
STEP 1: Choose a rule that you want to apply. There are pre-set rules, or you can create your own.
We're going to use: Move Messages from Someone to a Folder in the Stay Organized section.
Now, we go to Step 2 and edit the rule description.
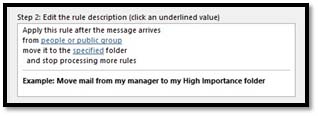
This is where we tell Outlook how to apply the rule. Click on the hyperlinks in Step 2 to do this, starting with "people or public group." We're going to choose to send emails from a certain person or group to a folder we'll specify later.
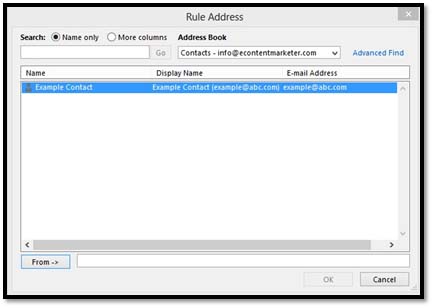
As you can see above, we are taken to our address book. If we want to select more than one contact, hold the CTRL button down while making selections.
Click OK when you're finished.
Now we're back to this dialog box:
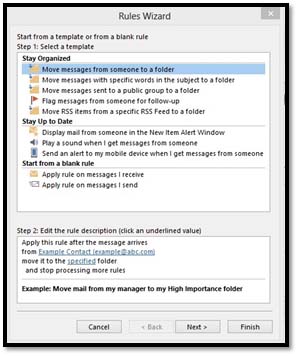
Let's click on the next hyperlink: "specified." This is where we'll specify the folder to move the messages into.
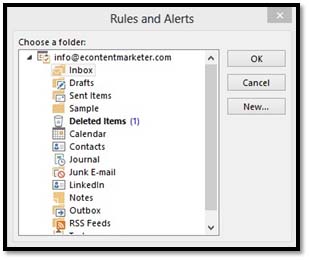
Choose your folder, then click OK.
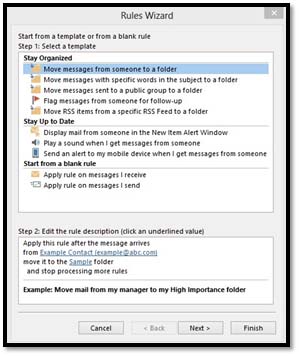
Click Finish when you're done creating rules.
If you want to add more conditions to the rule � to further refine the rule itself � click Next.
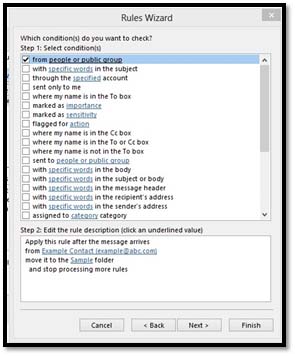
Again, click Finish when you're done creating rules.
Categories
Categories is a new feature that was introduced in Outlook 2010. It's basically like flagging an email, but in a way that is meaningful to you. For instance, let's say you get an email from a client seeking a certain kind of information, but before you can release that information, you have to discuss it with your boss. So instead of just flagging the email for follow-up (which certainly doesn't give you any information other than you have to answer the email), you can categorize it with a special tag. So the next time you open Outlook, you'll see the tag and be reminded that you must discuss it with your boss.
 :
: To categorize an email, you must select it, then click the Categorize button. You'll see a drop-down menu that looks like this:
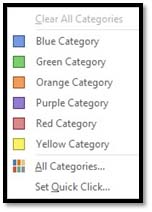
Select a color. If it's the first time you've applied this particular category, you'll see a window that looks like this:
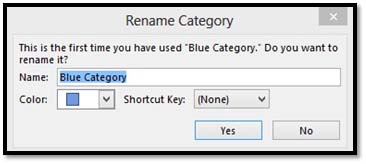
From this window, you can customize the name of the category. For instance, you may want to call it "Check with Boss." You can also select another color and even create a shortcut key. When you're finished, click Yes.
As you can see in this next example, any email that is categorized will have a box next to it indicating which category it is in.
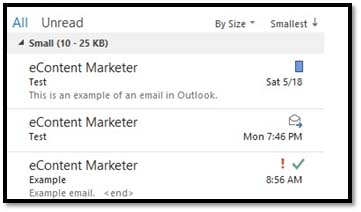
You can see the blue box on the right side in the snapshot above.
Another thing you might notice in the above example is that when the Arrange By box is set to Categories, Outlook 2013 sorts the emails into their respective categories.
Filters
Using filters is just another tool Outlook 2013 gives you to help you sort through your email. To find the Filter Email command, navigate to the Home tab, and locate the Filter Email button in the Find group. When you click on it, a drop-down menu appears. It looks like this:
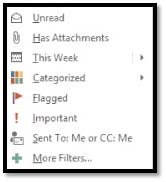
Select how you want to filter your messages.


