Technical Documents in Word 2016
Technical documents that you create may require more formatting than a creative document (such as short story). Microsoft Word provides tools to make creating technical documents a breeze too. In this article, we are going to focus on some elements common to documents that are more of a technical nature, and the features Word provides to create these elements.
Line Numbering
By default, Microsoft Word numbers every line in a document except for those in tables, footnotes, endnotes, text boxes, frames, as well as headers and footers. However, it does not show these line numbers. You have to specify if you want Word to show line numbers and which ones to display. This is especially helpful in technical papers to create reference points. You can display line numbers in all or part of a document, or at certain intervals such as every tenth line.
To display line numbers, go to the Layout tab. Click on Line Numbers in the Page Setup group, as shown below. Line Numbers is right below Breaks.
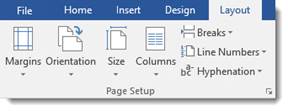
If you click the Line Numbers button, you will see this dropdown menu:

As you can see, None is selected by default. You can also select:
Continuous to display every line number within the document. Microsoft Word will label the first line "1," the second line "2," and so on throughout the entire document.
Restart on each page means that each page's first line will be numbered �1."
Restart Each Section means that line numbering will start over in each section. You must use headers for Microsoft Word to be able to do this.
Suppress for Current Paragraph means you can select a paragraph and select this option to that the paragraph's lines are not numbered.
If you want more exact specifications (such as line numbering at certain intervals), click on Line Numbering Options.
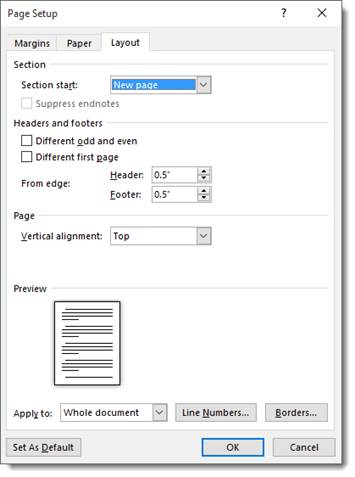
Click the Line Numbers button that appears above the OK button.
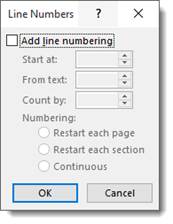
You can use this window to set intervals. Check the Add Line Numbering box, then specify the page where you want to start numbering lines. Set the rest of the options, then click OK.
References and Citations
If you have ever written a term paper, you know how important (and time consuming) writing a bibliography and citing sources can be. But guess what? Microsoft Word 2016 helps you do all those things quickly and easily.
The first thing you need to do when creating a bibliography or citing sources in Microsoft Word is to select the style you want it formatted in. To do this:
Click the References tab in the Ribbon.
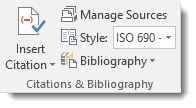
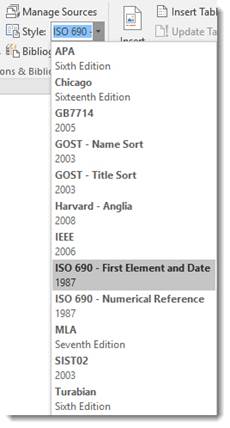
Click the Style dropdown menu under the Citations and Bibliography group and select the style you want to apply.
How to Insert Citations
A citation is giving credit to a source in the body of the document. For instance, if you used a quote from a magazine article, you would want to cite the article, author, and magazine after the quote.
To insert a citation:
- Go to the References tab in the Ribbon.
- Click on Insert Citation
 in the Citations and Bibliography group.
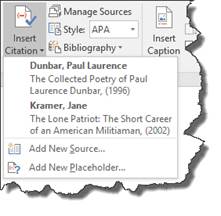
 - Choose the appropriate option item from the dropdown menu. You can choose to insert a source by clicking on it or just insert a placeholder. In the following example, you can see that we have already added two sources. The first is a book by Paul Laurence Dunbar, and the second is a book by Jane Kramer. If we had not already added these sources, we would only see an option to add a new source or to add a new placeholder.
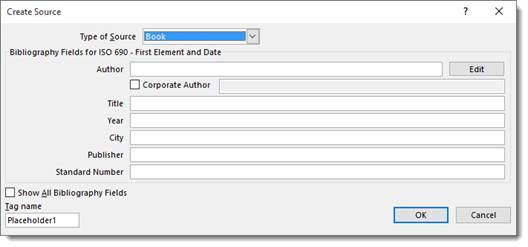
- If you have not created any sources yet, you can do so by clicking the Add New Source button. Alternatively, you can click the Manage Sources button. Then fill out the following form.
Placeholders
Use placeholders when you need to insert a source, but do not yet have all the information you need.
To insert a placeholder:
- Go to the References tab on the Ribbon.
- Click Insert Citation
- Select Add New Placeholder
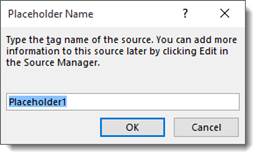
- You can type in any name for the placeholder that you would like.
Manage Sources
If you ever need to add or delete sources, modify them, or go back and enter information for a placeholder, you can do this simply by managing your sources.
To manage your sources:
- Go to the References tab
- Select Manage Sources.

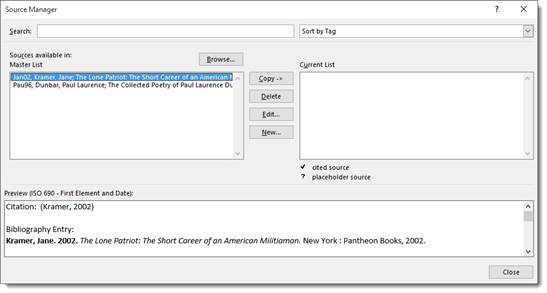
Now you can manage all your sources easily and quickly.
Adding a Bibliography
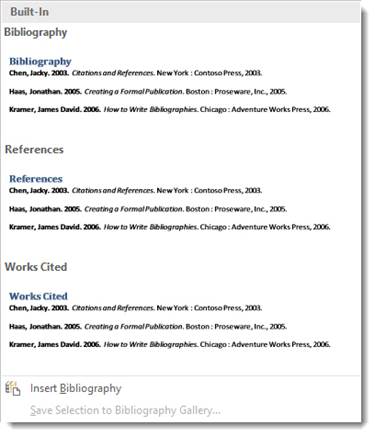
To add a bibliography to your document, go to the References tab in the Ribbon. In the Citations and Bibliography group, select Bibliography. You can choose from one of the bibliography layouts listed.
Creating an Index
An index is simply a list of terms that you used in a document with the page numbers where those terms appear. It is kind of like a glossary, just without the definitions. You can mark words, phrases, symbols, etc., for inclusion into the index. You mark them in your document, then create the index. Let's learn how to do that.
To insert an index into a Microsoft Word 2016 document, you must first mark entries that will be indexed.
Marking Entries
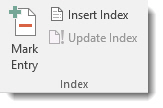
Start out by selecting the word or phrase that you want to index. Go to the References tab, then click Mark Entry in the Index group.
You will then see this window:
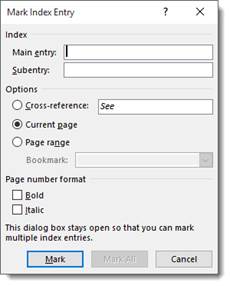
The text that you selected is the text that will appear in the index. If you want something else to appear in the index, then type that into the Main Entry box. For example: if you selected the word "cow" within your document, it will appear as Cow in the Main Entry box above. If you want "cow" to appear as Cattle instead, type Cattle in the Main Entry box. You can also type a subentry. This might be "Longhorns."
You can also create a cross reference to another index entry. If you want to do that, select Cross-Reference in the options group. Perhaps you want to cross reference cattle with dairy farm.
Now, you can specify the way that the indexed page numbers appear. You can make them boldface or italic by using the checkboxes at the bottom of the window above.
If you want to format the text for your index, right click on the text in the Main Entry or the Subentry box. You will then see this dropdown menu:
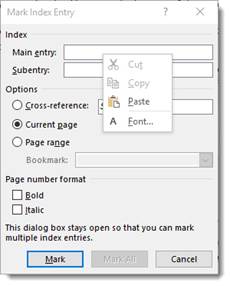
Select Font and click on it. You will then see this window:
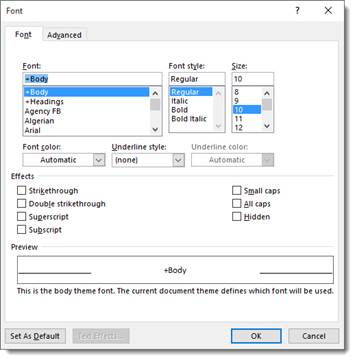
You can now change your font type, style, size, etc. Click OK when you are finished. When you are finished marking an entry, click Mark. If you want to mark all entries, click Mark All.
Marking Text over Multiple Pages
If you want to mark text that is rather lengthy, such as a few pages in length, here is how to do it.
First, bookmark the text. You can bookmark text by selecting it, then clicking the Insert tab on the Ribbon. In the Links group, select Bookmark. We will cover this more in depth in just a minute.
Now, type in a name for the bookmark, and click add.
Now, position the cursor after the bookmarked text, then go to the References tab and click on Mark Entry. Name it. When you select Page Range, you can choose your bookmark from the Bookmark dropdown list.
Adding the Index
When you are finished marking entries, it is time to create the index. Simply move the cursor to where you want the index to appear. Then go to the Reference Tab and click on Insert Index.

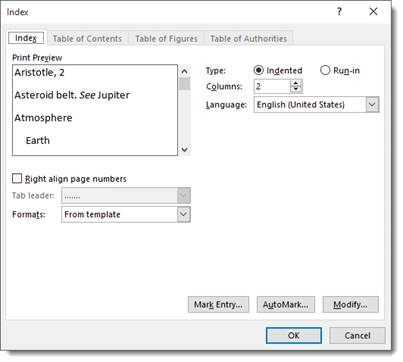
Now you can set the preferences and options for your index:
-
Right align page numbers means that all your page numbers will appear on the right and neatly � one under the other.
-
Tab leader is only available if you right align page numbers. Tab leader means that a dotted line, dashed line, or straight line will appear from the entry to the page number.
-
Formats means that you can choose a format to change the style of the index. A format is shown in the Print Preview window.
-
Type. If you choose indented, each entry will appear on a new line. Run-in displays entries one after the other with multiple entries on the same line.
-
Columns determines how many columns your index will have.
When you are finished, click OK. Microsoft Word will collect all of your marked entries for the index, sort them alphabetically, reference their page numbers, then display your index in your document.
Formatting Marks
Formatting marks are marks that show the ends of paragraphs, spaces between words, indentions, etc. If you want to see the formatting marks in your document, go to the Home tab, then click on Show/Hide, as shown below. By default, formatting marks are hidden.

When you show formatting marks, your document now looks like this:

Inserting Special Characters into Your Document
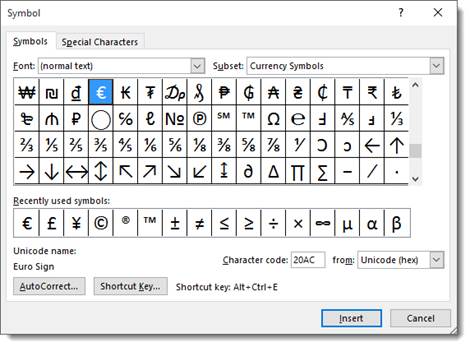
Special characters refer to punctuation, symbols, or other items that are not generally available on keyboards, such as copyright symbols, trademark symbols, etc.
To insert special characters or symbols:
- Place your cursor where you want the symbol to appear.
- Click the Insert tab.
- Click the Symbols button in the Symbols group.
- Choose the symbol you want from the dropdown menu, or click on More Symbols.
Inserting Equations
You can create and insert mathematical equations into your document using Microsoft Word 2016.
To do this:
- Place your cursor where you want the equation.
- Select the Insert tab.
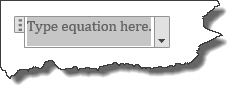
- Click the equation button (located beneath Symbol) and select your equation from the dropdown menu. If you do not see the equation you want, select Insert New Equation. This box will then appear in your document:
And you will see this toolbar in the Ribbon:

Select your equation.
To edit an equation, click Design in the Ribbon while the equations dialogue box is open. (See above picture.)
Adding Footnotes
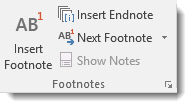
If you need to add footnotes to your document, you can do this by going to the References tab in the Ribbon. Go to the Footnotes group. From there, you can insert a footnote, view and edit footnotes, and also add endnotes.
Adding Bookmarks
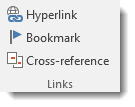
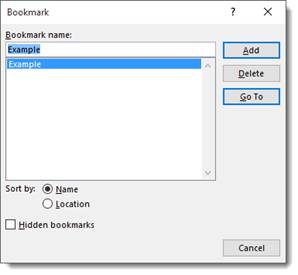
You can use bookmarks in Word 2016 the same way you would use a bookmark to mark a page of a book so you can pick up reading where you left off. You bookmark text by selecting it, then clicking the Insert tab on the Ribbon. In the Links group, select Bookmark.
Now, type in a name for the bookmark, then click add.
Cross-reference
You can also insert a cross-reference to refer someone to another portion of a document. To start with, type the introductory text for the cross reference, such as "See Page 3."
To do this, go to the Insert tab, then click Cross-reference in the Links group.
You will see this box:
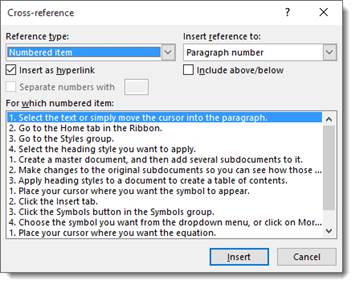
- In the Reference type box, select what you want to refer to. Maybe you want to refer to a heading.
- In the Insert Reference To box, click the information that you want inserted into your document.
- In the For Which box, select the item that you want to refer to. If you want users to be able to jump to that item, make sure the Insert as Hyperlink box is checked.
Click Insert.
Insert a Hyperlink
A hyperlink is a link to a website or location on the Internet � or even your computer if the person reading your document has access to your computer files. To insert a hyperlink into a document, go to the Insert tab, then the Links group. Click the Hyperlink button.
You will see this window:
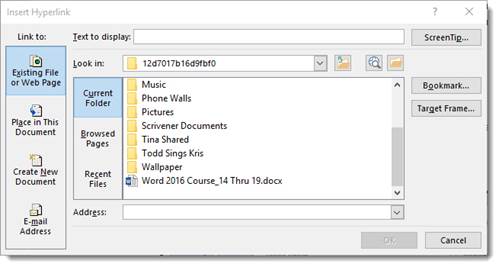
In the Text To Display field, enter in the text you want displayed in your document. This will be the text people can click on to take them to the web page. It does not have to be a URL. You can type in the word "cow" if you want.
Now, let Word 2016 know what to link to.
Go to the column on the left and choose a file or web page, a place within your document, a new document, or an email address for an email link.
Then let Word know where to look, either on your computer, on web pages you have recently visited, etc.
You can also type in the address in the bottom field.


