To write a check using Quicken, go to Tools>Write and Print Checks.
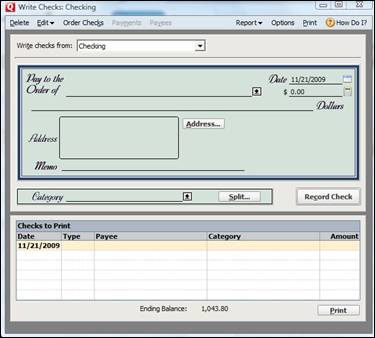
In the box above, select the account that you want to write checks from.
Next, enter the Payee's name.
Enter the amount of the check on the $ line.
Then, write the Payee's address. This is optional.
Enter a category and memo (optional).
To print checks, go to File>Print Checks.
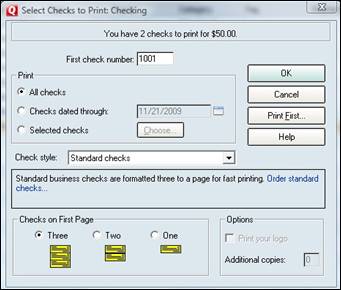
Select the first check number. This number should be considerably higher than your paper checks so that you don't use the same number twice.
Decide if you want to print all checks, checks through a certain date, or selected checks only.
Next, decide what style of check you want.
You can choose from Standard which prints three to a page, wallet, or voucher.
Next select how many checks you want printed to a page.
To do this, we're going to return to the Setup tab.
Scroll down to the Checking and Savings Accounts section.
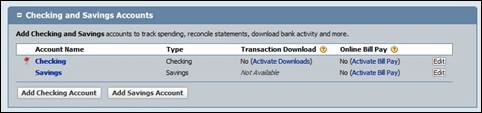
As you can see in the snapshot above, we haven't yet connected our accounts to Quicken's online bill pay system.
To connect an account, click Activate Bill Pay next to the account that you want to activate.
When you do, this window will appear:

Enter your Quicken Bill Pay User ID and password. Quicken will then walk you through the rest of the set up process.
The first method, of course, is Direct Connect.
Listed below are the features of Direct Connect. These are the features that you will receive if you do your online banking through Quicken and Direct Connect.
With Direct Connect:
- You don't need to login in to your financial institution's web site. Everything is done from within Quicken.
- You can use One Step Update to get updates on multiple accounts during one session.
- You get two way communication with your financial institution. Not only can you download transactions and get account balances, you can also pay bills, transfer money, etc.
- The transactions that you download from your financial institution are automatically matched with transactions in your register. New transactions are entered into your register for you.
- Quicken remembers your login information for you.
- Please note that your financial institution may require a monthly fee to use Direct Connect.
- You can use Direct Connect in Quicken even if you already have a login to your financial institution's web site.
Web Connect is the other method that Quicken may use to download your transactions, etc. It has a lot of the same features as Direct Connect, but some are different.
With Web Connect:
- You can specify a date range for transactions. You can download transactions that occurred between one date and another.
- Like Direct Connect, Web Connect transactions are matched with transactions in your register. New ones are entered for you.
Using One Step Update, you can:
- Update cleared transactions and balances for online activated accounts in Quicken. This includes bank accounts, credit cards, investments, and 401(k).
- Send pending and recurring payments. It also allows you to cancel payments and update payment status instructions.
- Easily reconcile monthly statements.
- Send pending online transfers between accounts that are at the same financial institution.
To use One Step Update, go to Tools>One Step Update.
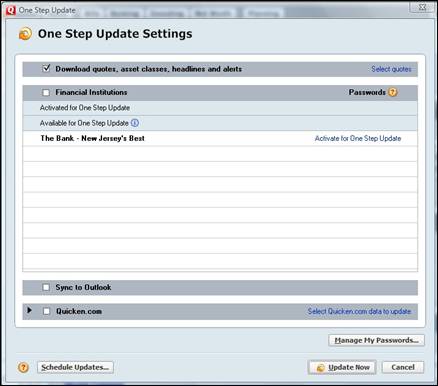
You may have to enter your password at this time, or even individual passwords for different institutions.
Select the accounts that you want to include in the update, then click Update Now.
Quicken allows you to set up bill payments for either recurring bills or one time payments.
First, let's learn how to set up recurring payments for online bill pay using Quicken. This means you will create a series of payments based on a schedule you determine.
To begin, click on the Planning tab.

Click Manage Reminders at the bottom of the screen.
You'll then see the following dialogue box:
Set up a new bill by clicking Create New>Scheduled Bill or Deposit.
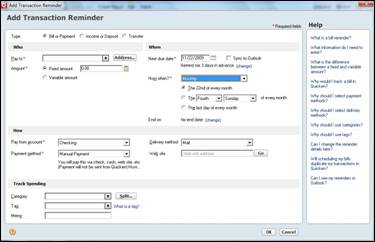
In the Payment Method list, make sure you select Online Payment from Quicken.
To set up a one time payment, select Only Once in the How Often field.
Now you have to send the instructions to your online banking. To do that, go to Tools>One Step Update.
To set up an online payee:
- Go to Tools>Online Center>Payees.
- Choose New on the tool bar.
- Enter a name for the Payee. For each payee that you enter, the combination of the name and description must be unique from other payees. The name and account number combination must also be unique.
- If you want, you can enter a note.
- Next, add an account number for this payee. This should be the account number that the payee uses to identify you. It might be an actual account number, but it also could be a loan number or insurance policy number. Make sure you enter this information correctly because otherwise your payment might not be credited to your account.
- Now, enter a phone number for the payee. You must enter a phone number so that the processor can reach the payee (on your behalf) if there is a problem. Don't forget to enter the area code!
- Click Ok.
Transfer Money Between Accounts Online
- To set up your Password Vault, go to Tools>One Step Update.

- Click the Manage My Passwords Button toward the bottom right side of the screen.
- You will then see the following dialogue box that will prompt you to create a Vault password. You will need this password to access your vault.
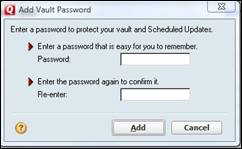
- Enter your password, then click Add.
- Once you've created a password for the Vault, Quicken opens the Edit Password Vault.
- Now, select the financial institution for which you want to enter a password. Make sure that you enter the password that you use whenever you connect to this financial institution.
- Click Add Password.
- Enter the password again to confirm it.
Whenever you use One Step Update, Quicken will ask you to enter your Vault password only. It will fill in your stored passwords for you.
Balancing Banking Accounts
When you balance a checking, savings, or credit card account, you compare the balance in your Quicken register with your account statement. If you hate balancing your check book, you're going to love this because Quicken makes it easy. It even does some of the work for you.
Start out by opening the account that you want to balance. We're going to select our checking account.
Click the Account Actions button and select Reconcile from the list.
This dialogue box will appear:
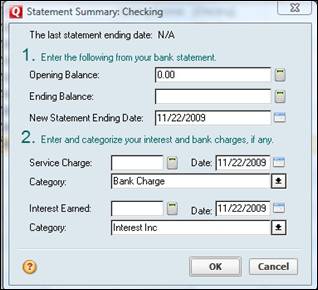
Enter the opening balance, ending balance, and new statement ending date from your paper statement.
Next, enter any interest charged or earned by your bank as well as any other charges.
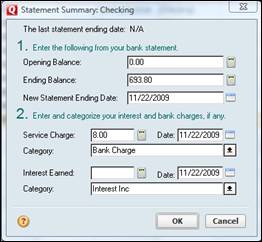
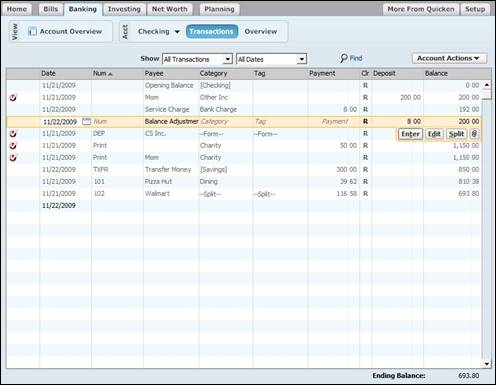
Keep in mind that we never recorded the $8.00 service charge in our register. This was because we want to show you what happens when there is a discrepancy between the register and the statement.
Click OK.
You'll now see the following window.
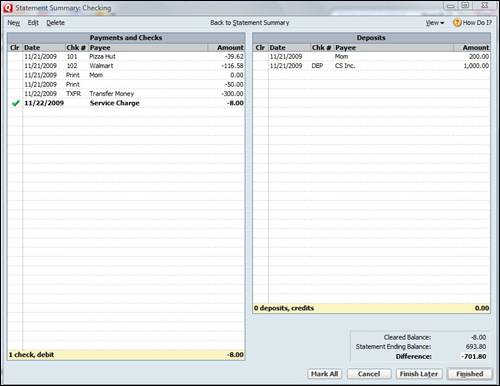
If you look at the first window where we entered our ending balance, you'll see that amount and the different listed at the bottom of the above snapshot are very different. Don't panic when this happens to you!
The next step is to put check marks by all the Payments and Checks, as well as Deposits listed above that appear both in your account register and your paper statement.
When we do this, we have a difference of -$8.00. (We already knew there would be a discrepancy, so we're happy with that!)
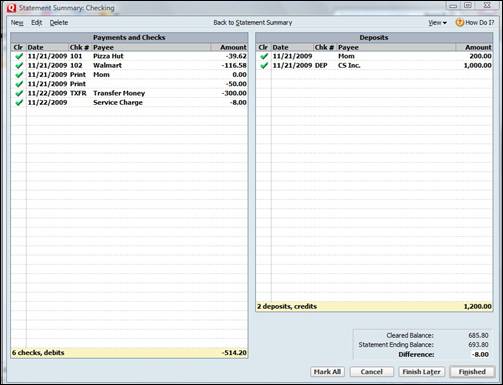
Click Finished.
You'll now see this dialogue box:
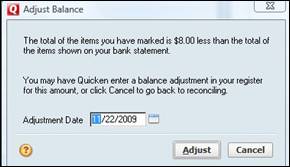
If you want to continue going through your statements and register, click Cancel. However, if you're ready to allow Quicken to make this balance adjustment for you, click Adjust.
We're going to click Adjust.
Quicken then tells us that the adjustment has been made in our register, and asks us if we want a reconciliation report. You can select Yes or No.
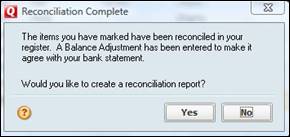
We've selected Yes just to show you what to expect.
If you select Yes, you'll then be faced with this dialogue box.
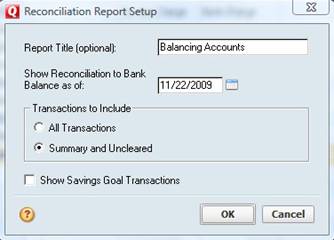
You can add a report title if you'd like and also show your savings goals transactions.
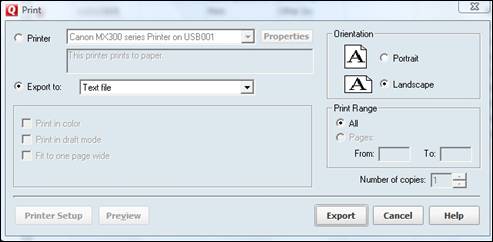
Click OK. You'll then see the next dialogue box that will ask you if you want to print the report or save it to a text file.
After you're finished with your report, you can then return to your account register and see the changes Quicken made to it.
When there's a discrepancy between the amount you have in your account register and the amount shown in your statement, you may want to figure out exactly why. In the above example, we already knew why. However, let's say you don't. Below are the following steps that you can take to correct any differences in your account.
First, go through your register and make sure that all transactions are listed in your register, even if they haven't yet cleared your records.
Next, if you have a difference in the number of cleared items versus the number of items on your statement, check for the following things.
Make sure you haven't:
� Missed marking an item
� Forgotten to record a transaction
� Missed a service charge
� Entered a transaction twice
� Marked an item as cleared by mistake
� Entered a deposit as a payment or vice versa
� Entered multiple transactions for a single deposit.
Also, make sure the bank didn't list separate deposits that occurred on the same day as one transaction. They will do this sometimes.
If the dollar amounts don't match, make sure you have entered all transactions and entered them correctly. If it's a bank error, go ahead and reconcile your account, then contact your bank.
NOTE: If you've noticed the CLR field in your account registers, and are wondering why we haven't mentioned it yet, there's a reason. Quicken marks the CLR field when a transaction has been cleared during reconciliation or balancing.