Introduction
In this article, we will provide an overview of macro-enabled presentations, the quick access toolbar and the slide master.
Learning Outcomes
Macros and Macro-Enabled File Formats
Once you have worked with PowerPoint 2007 for a while, you will come to realize that many of the tasks you perform are quite repetitive. The macro is the answer to repetitive tasks; basically, a macro is a set of instructions (or programs) that execute a series of tasks to accomplish a goal. Don't worry � macros are relatively easy to create and even easier to run.
Before we get into the nitty-gritty of creating a macro, it is first important to understand the macro-enabled file formats in PowerPoint 2007:
1. PPTM � this is the default file format that PowerPoint uses when saving a presentation that contains macros.
2. POTM � this is the file format that PowerPoint uses when saving a template presentation that contains macros. This format is especially helpful if you will be creating a number of different templates that all use the same macros.
3. PPSM � this is exactly the same format as the PPTM format except it will only open in show mode.
4. PPT � this is the default file format from earlier versions of PowerPoint.
Working with Macros
The key to working with macros is the Developer tab. If the Developer tab is not visible to you (and unless you've specifically set PowerPoint to show it, it won't be), click on the Microsoft Office Button and select PowerPoint Options. Be sure that the Show Developer Tab in the Ribbon box is checked (see Figure 9.2). Once the Developer tab is visible, it will appear as the last tab on the right in the Ribbon.

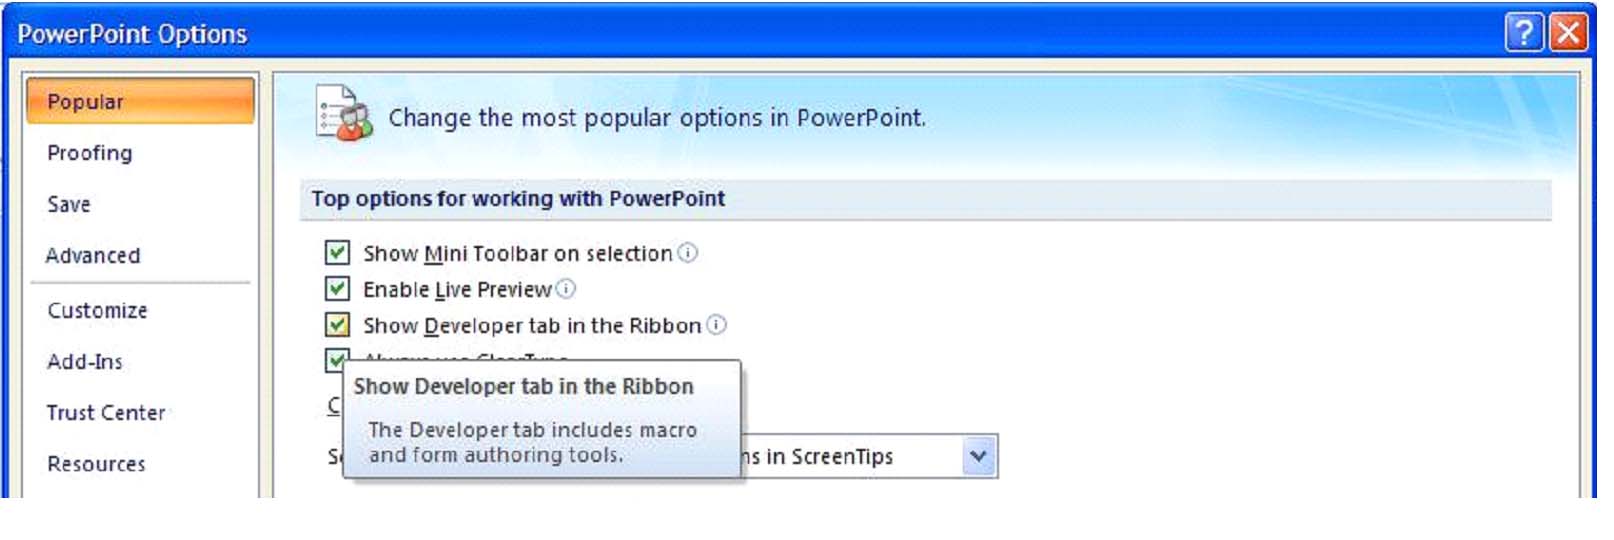
Before creating a customized macro, you must first create a blank macro. Click on the Macros button on the Developer tab, which will bring up the Macro Dialog Box.
|
Be sure to use an underscore (_) rather than a space when choosing a name |
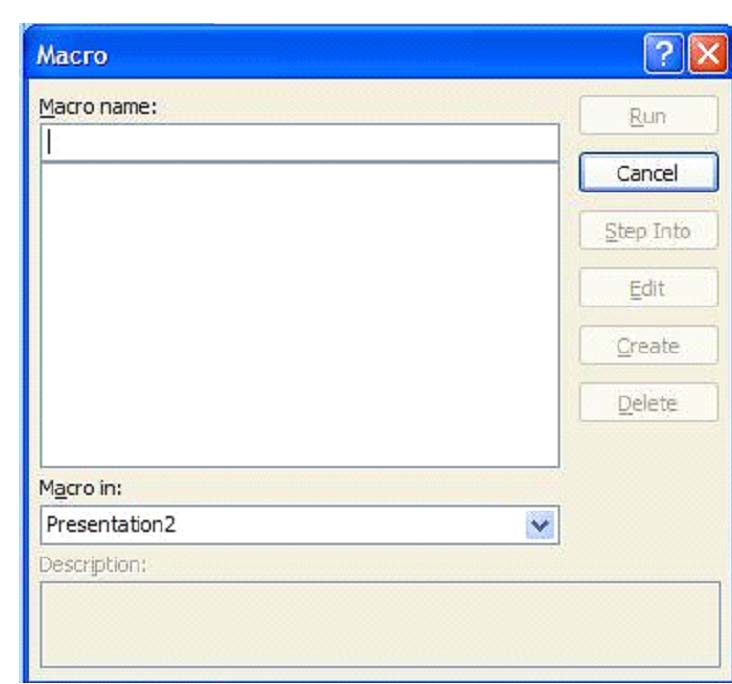
Figure 9.3 � Macro Dialog Box
After clicking Create, the Microsoft Visual Basic Environment will appear.
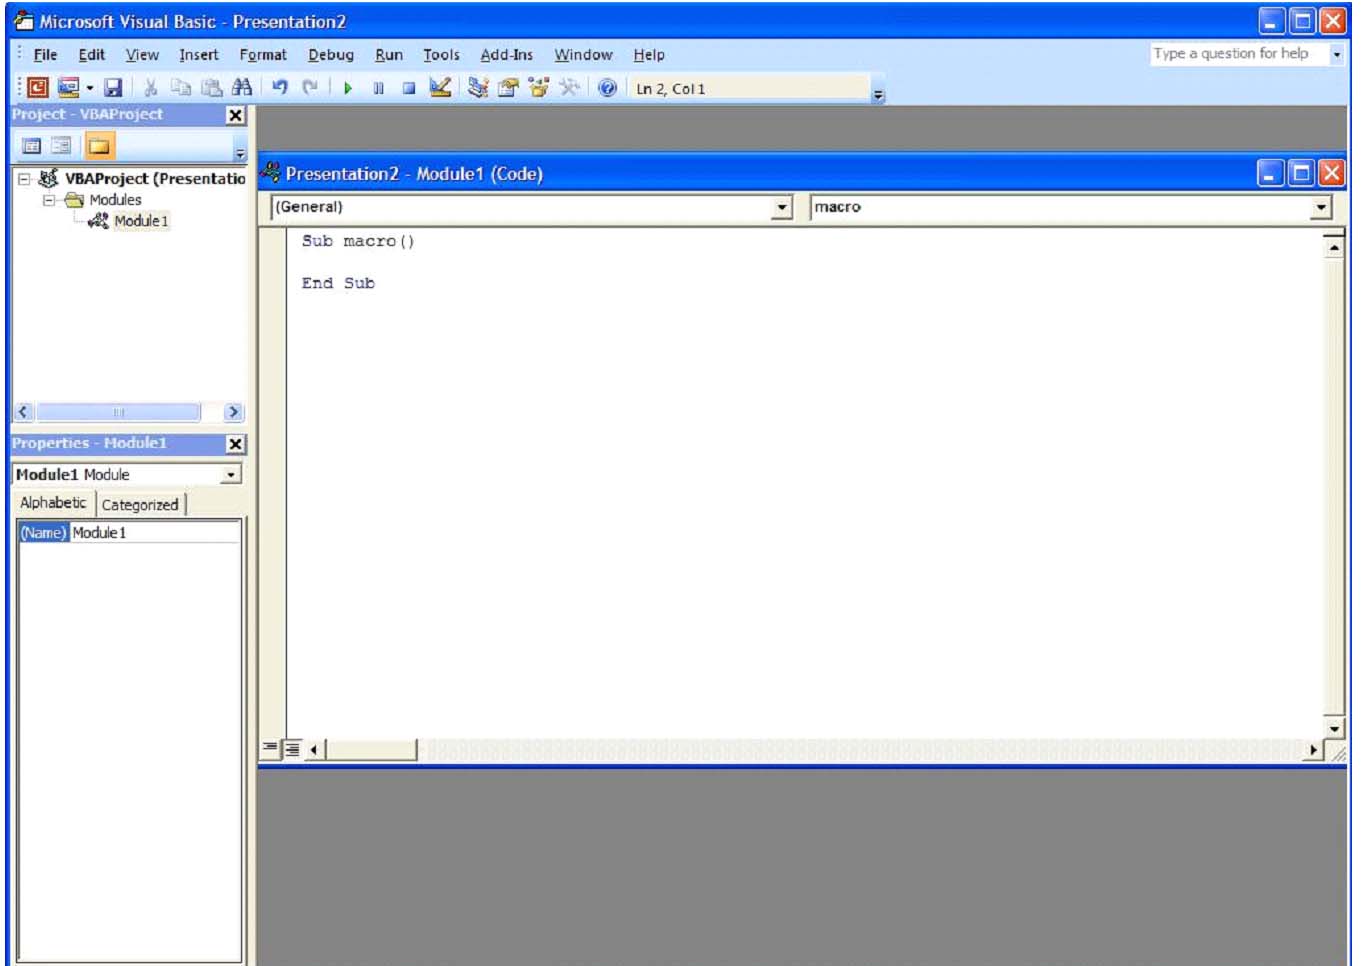
Figure 9.4 � Microsoft Visual Basic Environment
It is at this point that code for particular tasks is entered. For now, however, we will just save the presentation with a blank macro. Close the Microsoft Visual Basic window to get back to PowerPoint and save your presentation.
For detailed information on macros and macro codes, visit Microsoft Office Online.
Setting Personalized Options
The Quick Access Toolbar is one of the new Features of PowerPoint 2007; it is a customizable toolbar that displays the commands of your choice in the upper left hand side of your screen, regardless of which tab is active. The default available commands are Save, Undo, and Redo, but you may add any commands you wish.

Figure 9.5 � Quick Access Toolbar
Commands can be added to the Quick Access Toolbar in two ways. The first is through the Down Arrow to the right of the Redo command. This provides a list of the most popular commands, as well as allows you to choose more commands from the Ribbon.
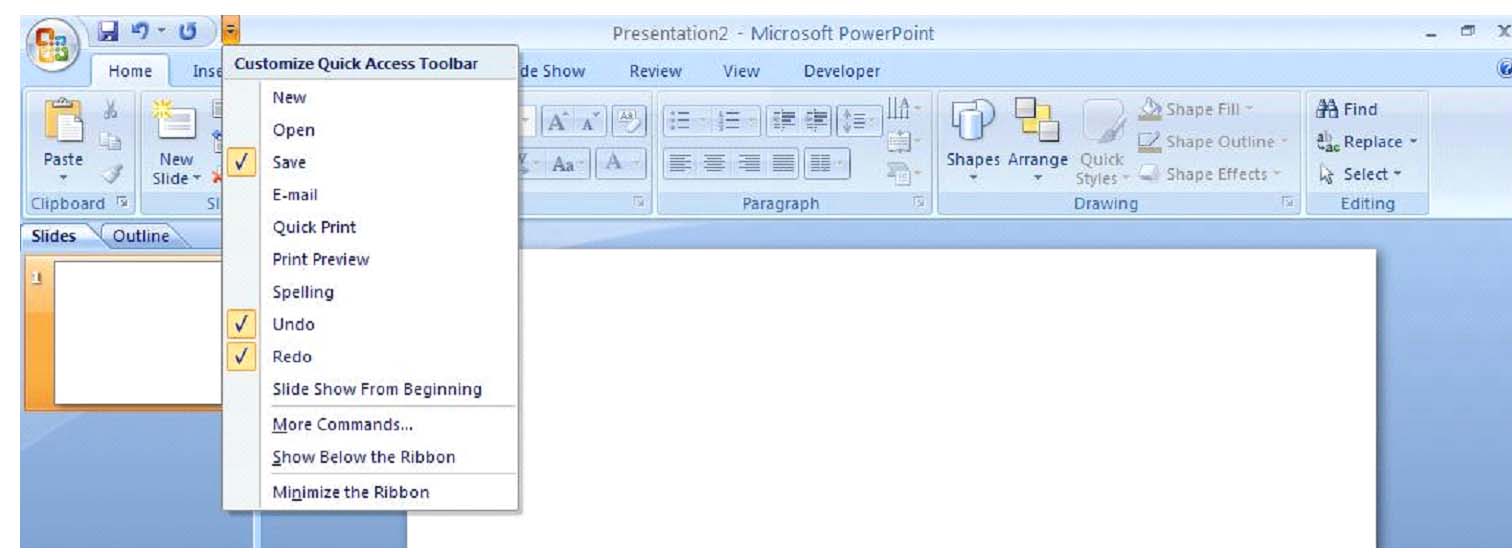
Figure 9.6 � Customizing the Quick Access Toolbar
The other method of adding a command to the Quick Access Toolbar is to simply right-click on any command on any tab on the ribbon and select Add to Quick Access Toolbar.
Setting PowerPoint Options is another way to customize PowerPoint to suit your specific needs. By clicking on the Microsoft Office Button and selecting PowerPoint Options, you are given a list of various options to personalize PowerPoint.
Presentation Properties
As you work through the creation of your presentation, many of the presentation's properties will be changed. These properties can be viewed and changed by clicking the Microsoft Office Button and choosing Prepare and then Properties. This will bring up the Document Properties Dialog Box.

Figure 9.7 � Document Properties Dialog Box
This dialog box allows you to specify different details about your presentation as well as custom information in summary form.
Navigating the Slide Master
The main purpose of the Slide Master is to ensure that the design of your presentation is as consistent and cohesive as possible; after all, you want people to pay attention to your message and not be distracted by poor presentation design.
Whenever a design template is applied to your presentation, PowerPoint automatically applies a slide master. Basically, the slide master is a blueprint of all of the design details of your presentation, so if you want to change something across the presentation, the slide master is the place to do it. To modify the slide master, click on the Slide Master command in the Presentation Views group on the View tab.
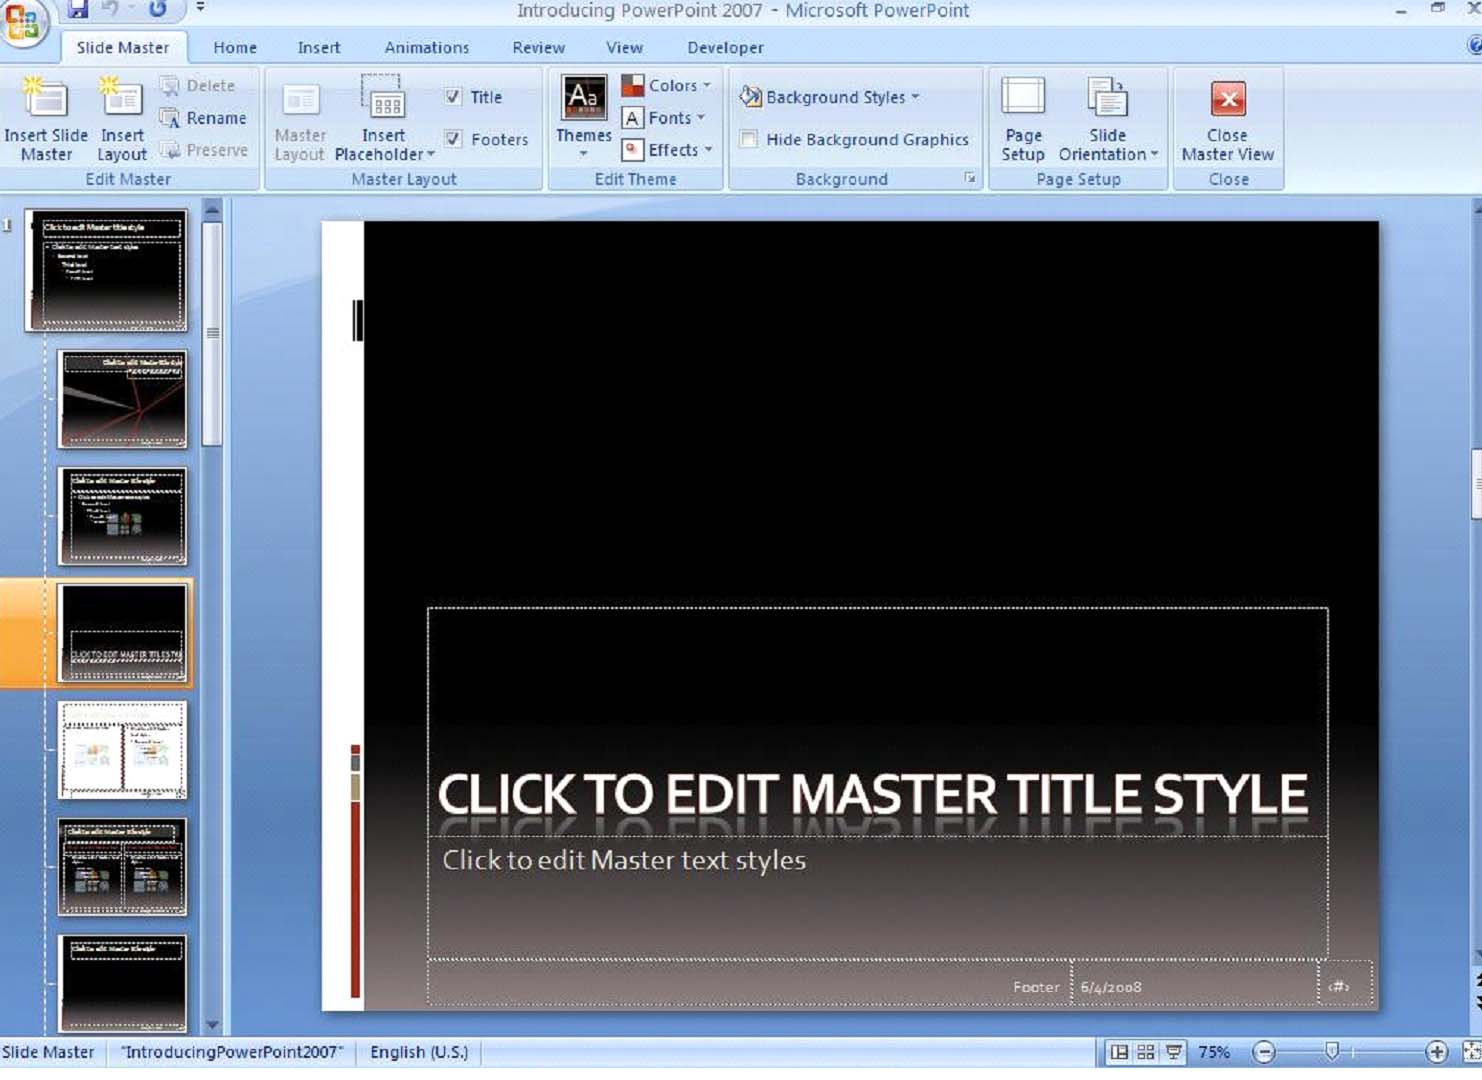
Figure 9.8 � Slide Master View
Troubleshooting PowerPoint 2007
Introduction
In this section, we will provide an overview of error messages and troubleshooting help both online and offline.
Learning Outcomes
Understanding Error Messages and Prompts
Although we would all prefer the creation of a presentation to be nothing but smooth sailing, you will inevitably encounter difficulty at some point. Usually, when there is an issue in PowerPoint, you will be informed by an error message. Other times, specific commands will be unavailable for reasons unknown. Here are some general ideas about how to handle difficulties in PowerPoint 2007:
� Try it again � To the best of your ability, try to recreate the steps that brought you to the error message. It is possible that the message will not appear again and the problem will disappear. If not, it's time for Plan B.
� Call Tech Support � Even if the idea of being on hold makes you cringe, oftentimes, tech support can be extremely helpful. Frequently, many people have already experienced the problem you're having and so the tech support people probably know exactly where to lead you.
� Visit Microsoft's Online Tech Support � visithttp://support.microsoft.com which has an extensive listing of support and troubleshooting articles as well as contact information for both phone and online support.
� Visit PowerPoint Association Sites � Microsoft's Most Valuable Professionals sponsor several websites that are dedicated to the sharing of knowledge about PowerPoint.
Using Help Files
One of the best ways to troubleshoot PowerPoint is to use the in-application help tool, which connects you directly to Microsoft Office Online Help. Nearly any topic relating to PowerPoint can be found here.
The PowerPoint Help Window has many new features, not the least of which is the simple fact that it is now linked to the entire knowledge base online about PowerPoint 2007. Simply click on the Help icon in the upper right hand side of the Ribbon and the Help Window will appear (see Figure 10.1).
The main help window has an extensive list of popular topics that can be browsed as well as a search field at the top of the window. Additionally, the coding behind the search field allows for both standard keyword searching as well as natural questions such as "How can I insert a picture?"
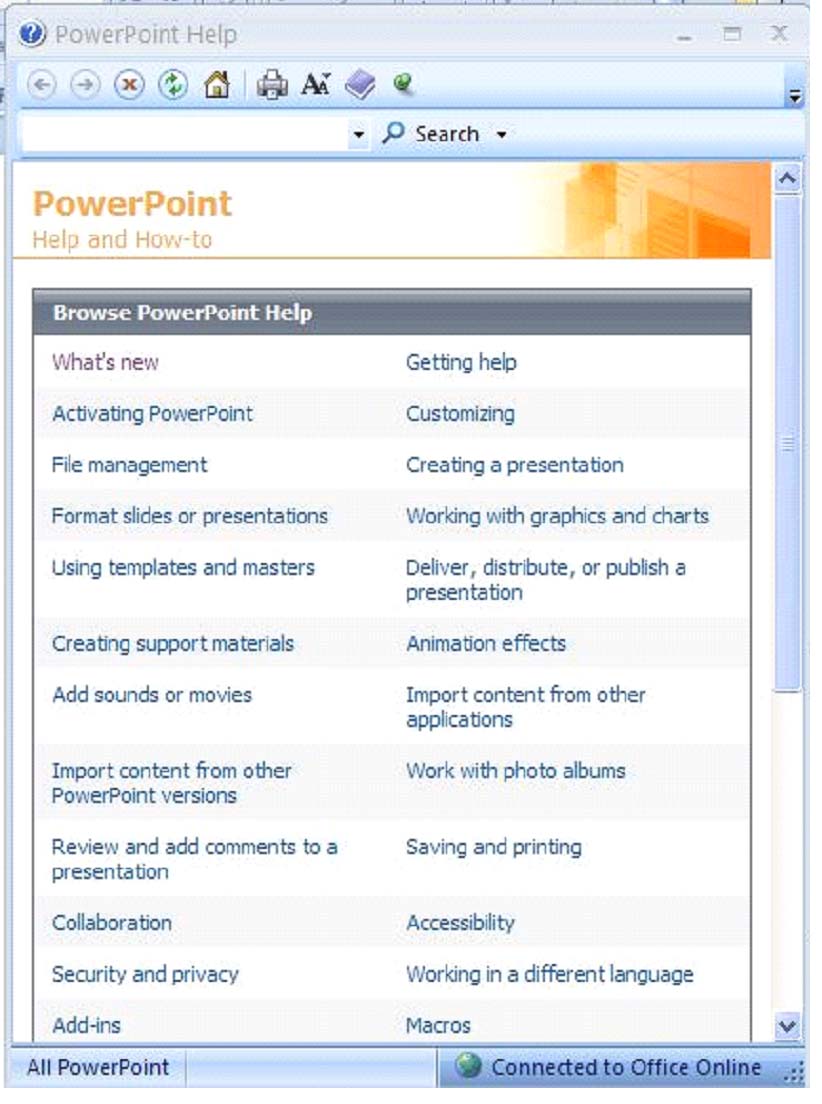
Figure 10.1 � Help Window
Running Office Diagnostics
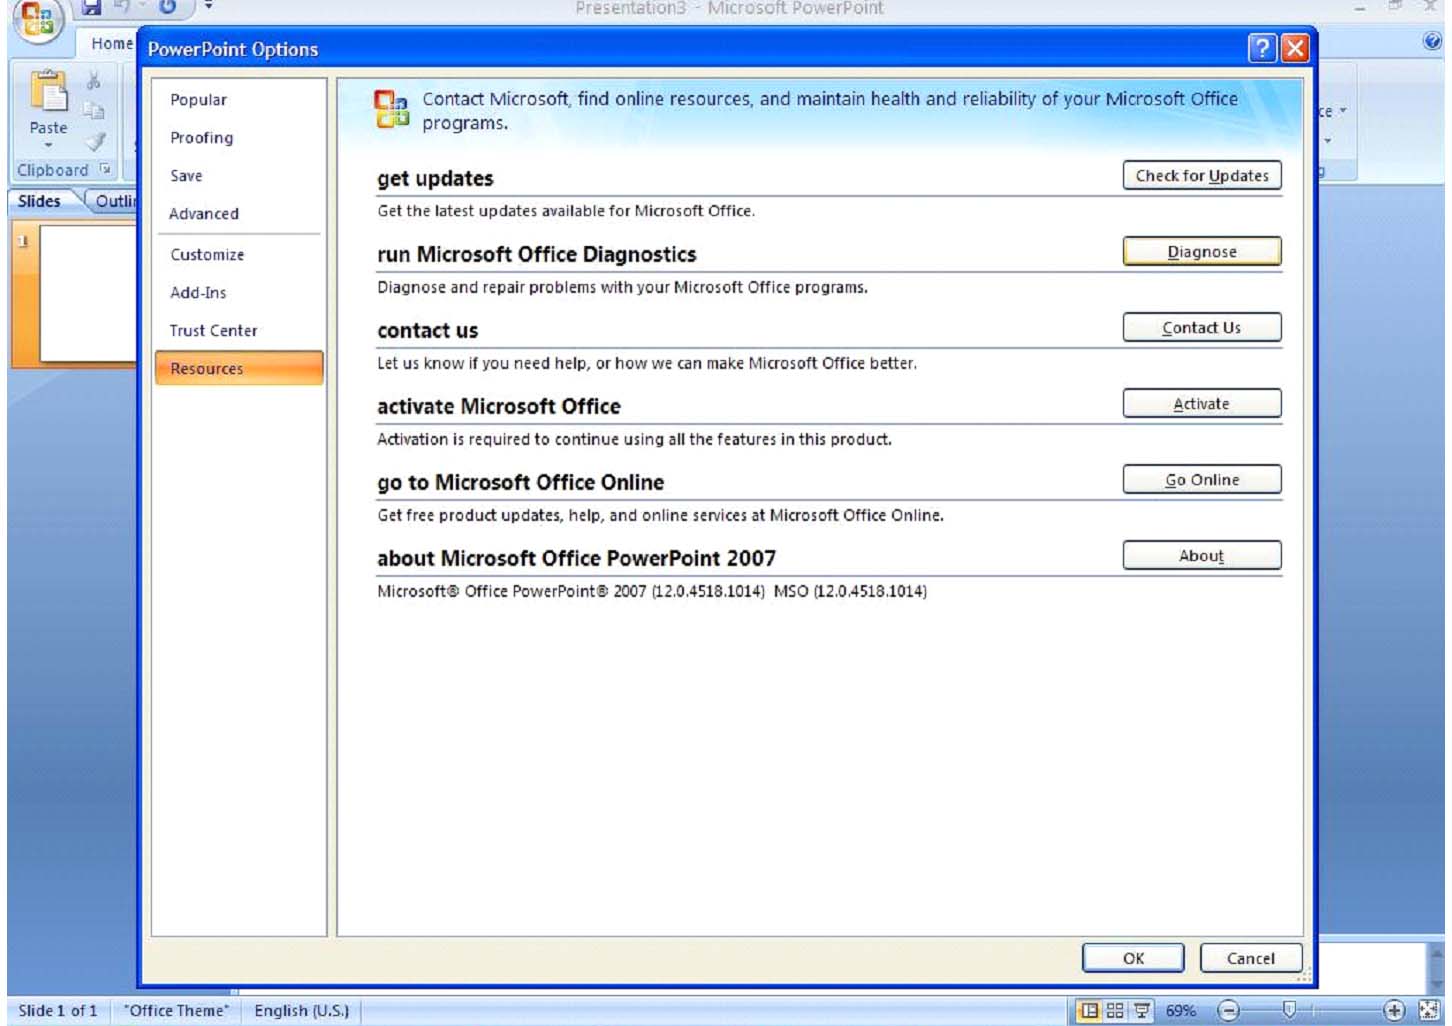
Office Diagnostics is a valuable feature provided by PowerPoint 2007 that locates and fixes common problems such as registry issues and missing files as well as analyzes system resources and compatibility. To run Office Diagnostics, click on the Microsoft Office Button and select PowerPoint Options. SelectResources and click on Diagnose.
Introduction
In this section, we will provide an overview of packaging presentations and publishing presentations to the web.
Learning Outcomes
Packaging a Presentation on a CD
Frequently, presentations may need to be run on a computer other than the one on which it was created. Packaging a presentation on a CD is ideal for these circumstances. When you save a presentation on a CD, PowerPoint also automatically uploads the viewer by default so you don't have to worry about a thing.
To package a presentation on a CD , click on the Microsoft Office Button , select Publish and click on the Package for CD command. This will bring up the Package for CD dialog box .
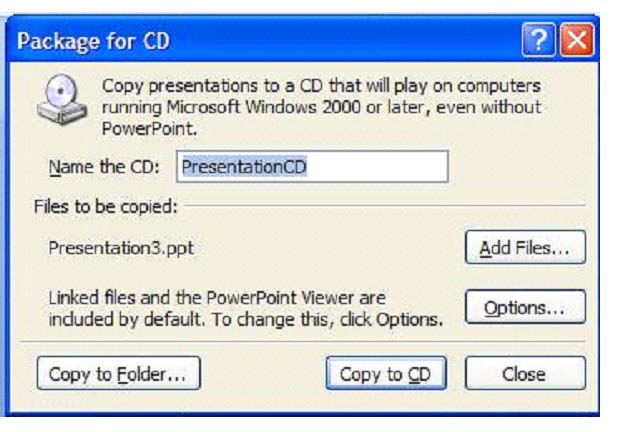
Figure 11.1 � Package for CD Dialog Box
To package more than one presentation on a single CD, click on Add Files and a window will open in which you can browse to the appropriate files. Clicking on Options will bring up a dialog box that allows you to select the type of package you'd like to use; most often, you will be using the Viewer Packagewhich runs the presentations as shows.
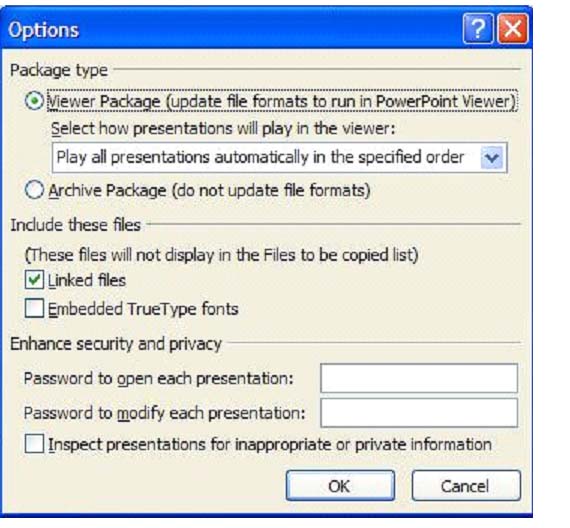
Figure 11.2 � Package Options
Using PowerPoint 2007 in other Office Applications
Although it is most common for content from other Office applications such as Word and Excel to be imported into PowerPoint, there are occasions when the opposite is necessary. The easiest way to do this is to simply copy and paste the content from PowerPoint into the other application. However, PowerPoint 2007 also offers you the ability to save slides and objects as graphics so they can be inserted and manipulated in such file types as JPEG, PNG, GIF and others.
To save a PowerPoint slide as a graphic file, click on theMicrosoft Office Button and select Save As .
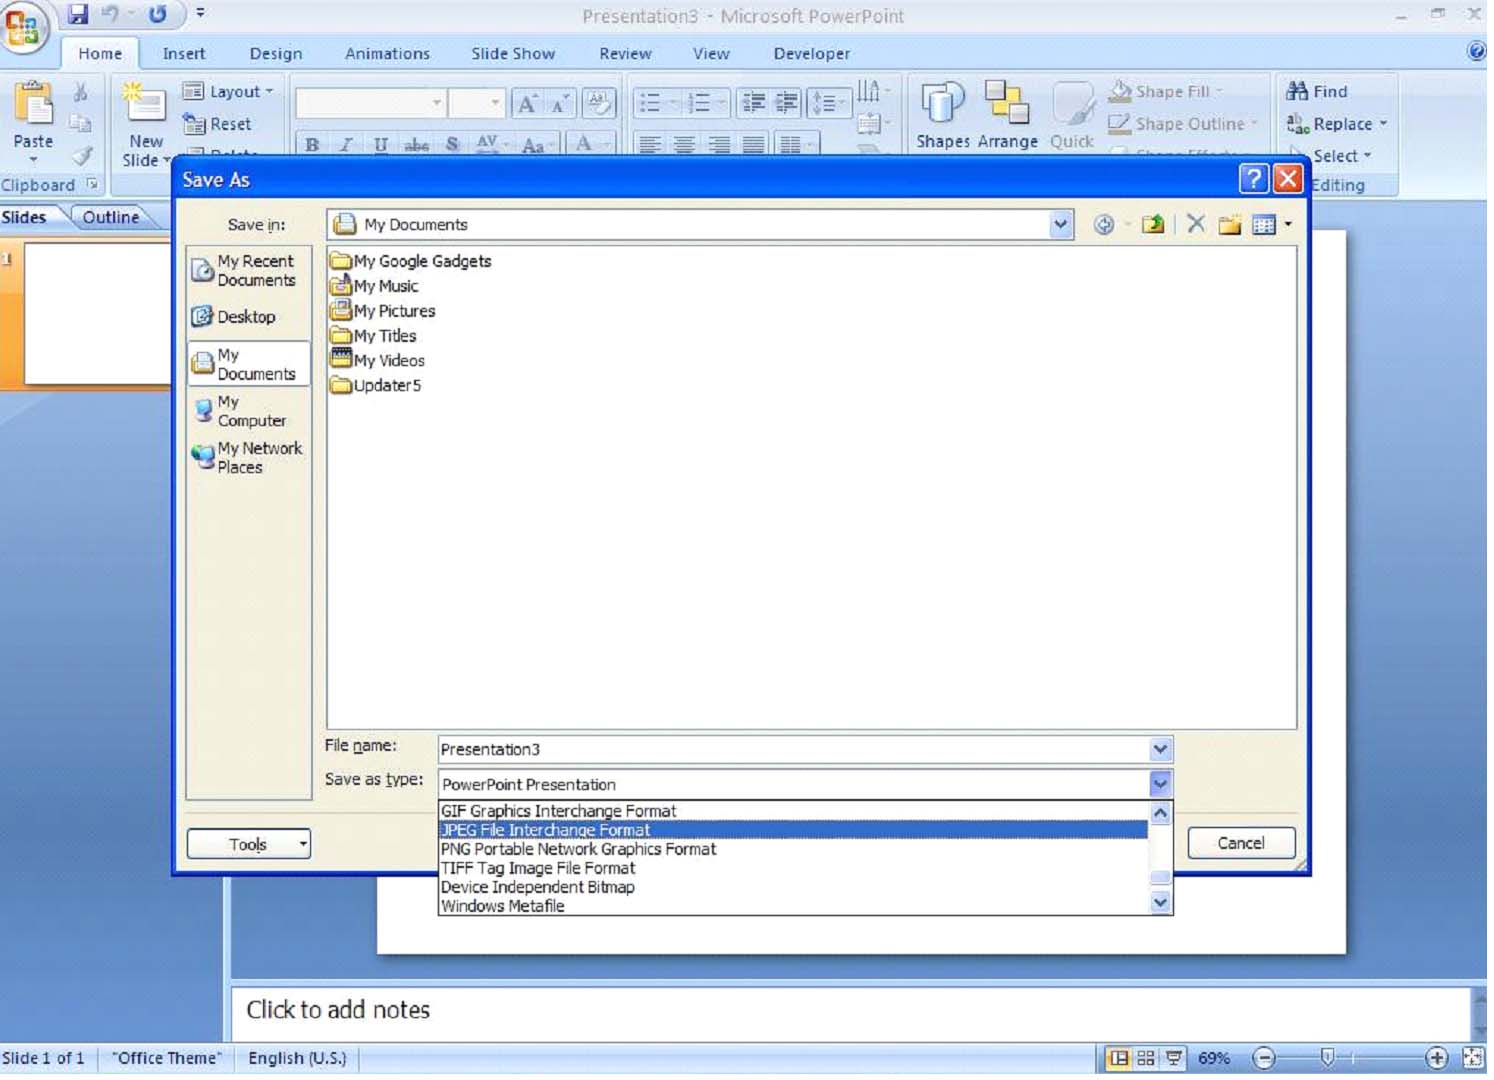
Figure 11.3 � Saving as a Graphic
As you can see in Figure 12.3, the Save as Type drop down menu provides the options of saving the file as GIF, JPEG, PNG or TIF. Select the format that best suits your needs and then save as usual.
Publishing to the Internet
PowerPoint 2007 is completely compatible with HTML, which conveniently allows you to save your presentation in HTML and still be able to open and edit it in PowerPoint without losing any of the HTML integrity. There are two main steps to publishing your PowerPoint Presentation to the Internet:
To save a presentation as a web page, use the Save Ascommand and browse to the location where you would like to save your file. In the Save as Type drop down menu, choose either Single File Web Page or Standard Web Page .
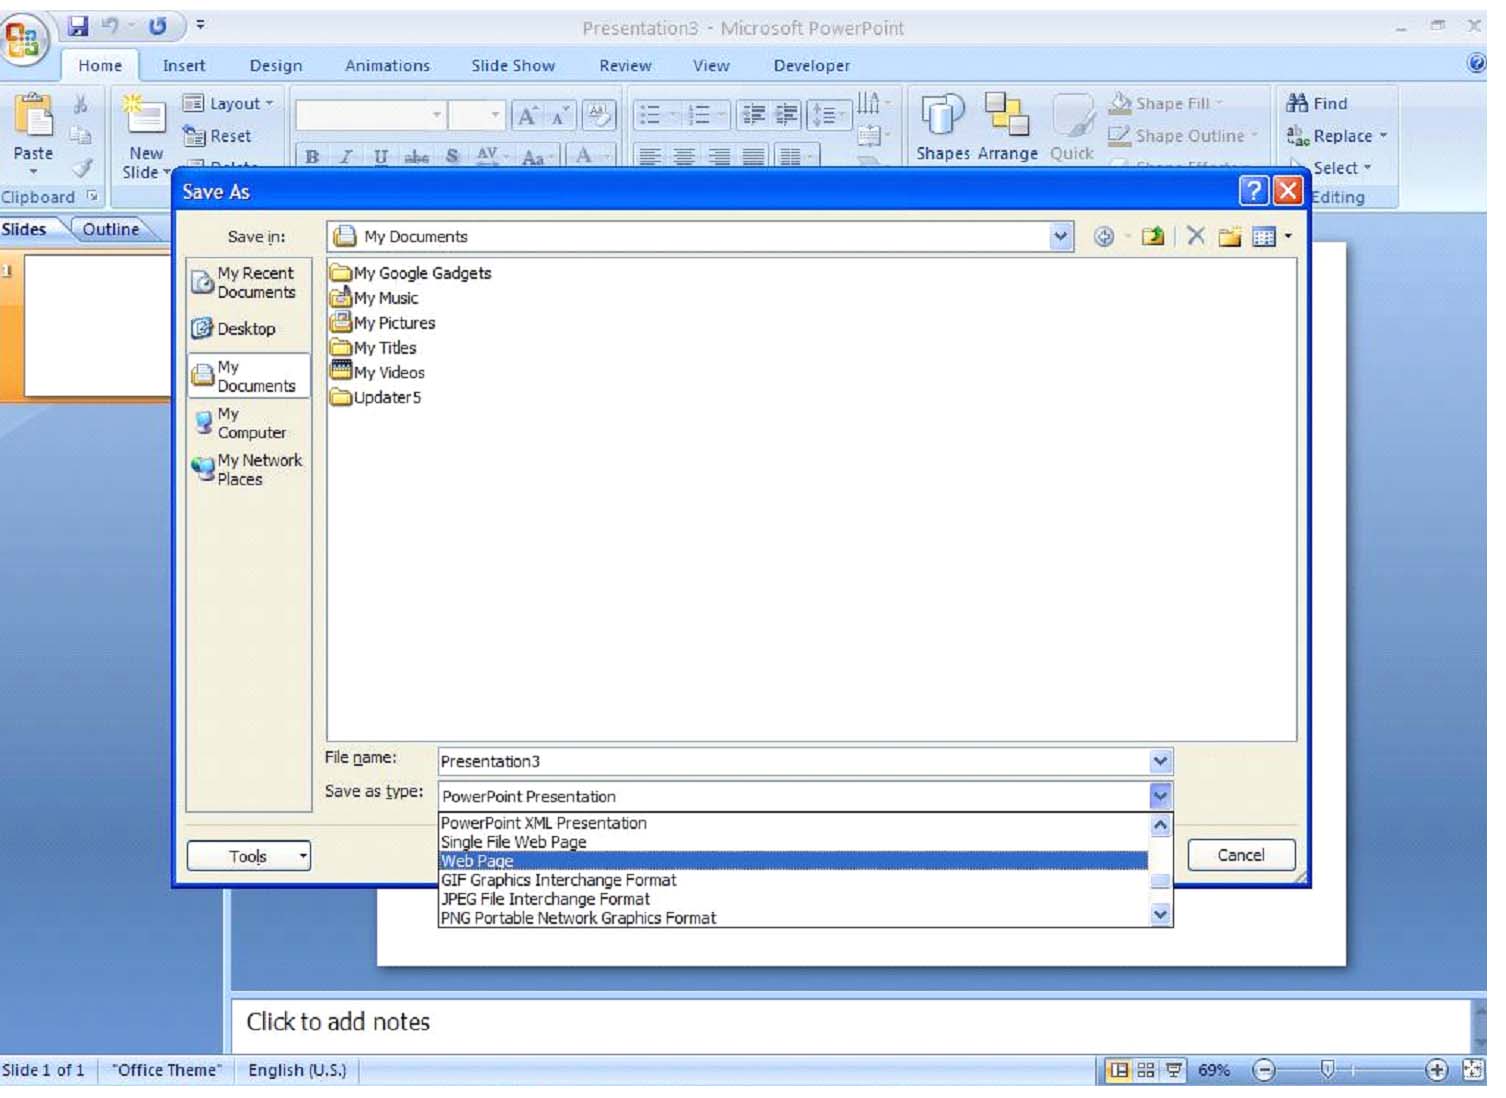
Figure 11.4 � Saving a Presentation as a Web Page


