Vendors List
Here is how to add vendors to QuickBooks:
Go to Vendors>Vendor Center.

Click the New Vendor button.
Now, you can enter information about the vendor by using the tabs on the left. The information you will need to enter under each tab is listed below � under the name of the tab.
Address Info Tab
-
Enter the vendor's name. If you want, you can also add a contact name.
-
Enter the address where you are to mail checks.
-
You can also enter the vendor's telephone and fax number, as well as email address.
-
Specify what you want to print on the check in the Print on Check As box. QuickBooks assumes it is the company's name. If it is different, add it here.
Payment Info Tab
Fill out the information requested including:
-
If you have an account number, add this in the account number text box.
-
Select the payment terms you have with the vendor from the dropdown list.
-
You can also enter a credit limit with that vendor, if you have one.
Tax Settings
-
Vendor Tax ID. Enter the vendor's social security number, or EIN, if the vendor receives a Form 1099.
-
1099 Status. Select the check box for Vendor Eligible for 1099, if appropriate.
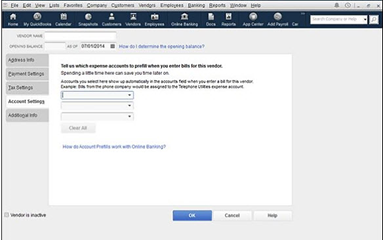
Account Settings
You can go ahead and prefill expense accounts. When you select accounts for a vendor, they will automatically appear when you write a check for the vendor.
Additional Info
Select a category for the vendor by clicking Type and choosing an option from the dropdown list.
Click OK when you are finished.
The Vendor Center
Your list of vendors is located in the Vendor Center. In addition, information about vendor transactions is listed there, too. You can open the Vendor Center by going to Vendors>Vendor Center, or by clicking the icon on the top icon bar. There you will see your Vendors list. You can also get access to reports.
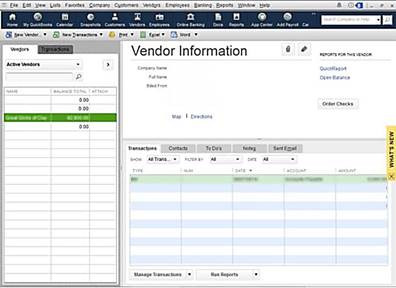
Just as with the Customer Center, there are two panes in the Vendor Center.
The left pane has two tabs: Vendors (your vendor list) and Transactions.
When you are in the Vendors tab, you will see the information for the selected vendor in the right pane.
If you click the Transactions tab, you can see all transactions for vendors and all transaction types.
Customizing the Vendors List
The Vendors List (shown in the left pane) has three columns: Name, Balance Total, and Attach. You can use the scroll bar to get to any vendor you want to view. If you want, you can also use the dropdown list at the top of the Vendors tab to display: All Vendors, Active Vendors, Vendors with Opening Balances, Custom Filter.
You can use the custom filter to only show vendors that meet criteria you establish.
If you want to add more columns to the Vendors list, right-click anywhere in the pane, then select Customize Columns. The Customize Columns dialog box then opens.
Choose a column label from the left, then click Add to add a column.
To delete a column, choose a column label from the right, then click Remove.
The Vendor Information Pane
All the information you have entered about your vendors, as well as purchase transactions, are located in the Vendor Information pane (right pane).
On the bottom half of the pane, you will see four tabs: Transactions, Contacts, To Do's, Notes, and Sent Email.
The Transaction Tab
Under the Transaction tab, you can filter the information you see. There are filters displayed above the columns. Use these to enter the criteria for the filter.
Editing Vendor Information
To edit a vendor's information, double-click on the vendor in the Vendors List. It then puts the record in edit mode. You can edit the information you already have, and add new information.
Creating Custom Fields
To add a custom field for your Vendors list, open the Vendors list.
Double-click on the name of the vendor.
You are then in edit mode.
Go to the Additional Info tab.
In this section, you are going to learn how to enter those payments into QuickBooks, deposit the money into the bank, track the amount owed, and even add finance charges.
Sales Receipts
You record a sales receipt whenever a customer pays in FULL for the products or services that are delivered at the time they are purchased.
Remember:
-
A sales receipt changes your cash balance.
-
Invoices change your accounts receivable balance.
To create a sales receipt, go to Customers>Enter Sales Receipt.
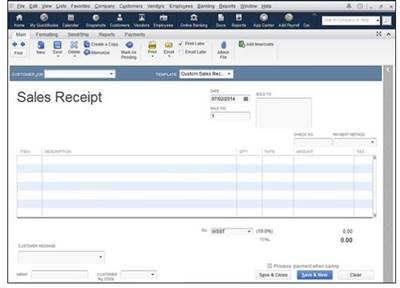
Now, select the customer and the job. Filling out a sales receipt is just like filling out an invoice.
-
Enter the date in the Date field.
-
Enter a sale number. This is optional, but handy.
-
Adjust the Sold To address, if it needs to be adjusted.
-
Enter the check number, if the customer is paying by check. If they pay by cash, leave it empty.
-
Enter the payment method.
-
Describe the items, the same as you did with invoices.
-
You can add a customer message, if you want. You created a list for these earlier.
-
Add the sales tax information.
If you want, add a memo.
If you don't want to print the receipt, make sure that Print Later under the Main tab is selected.
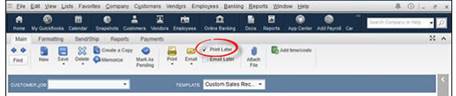
When you are ready to print the receipt, click Print.
As with invoices, select the type of sales receipt form you are going to use, then click Print.
Recording Payments
Your customers aren't always going to pay up front. You know that as well as we do. Because of this, you will need to record another type of payment. This type is the money your customers pay you to pay off what they owe -- or pay a partial payment on what they owe.
To do this, you must first have invoices created for that customer. If you use credit memos to reduce what they owe on invoices, you must also create credit memos for each customer. But from there on out, it is very easy.
Go to the Receive Payments window. Go to Customers>Receive Payments.
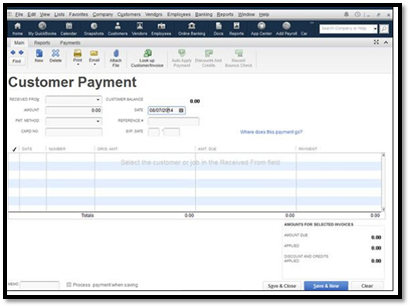
Now, record the customer payment and the invoices that were paid. All the fields in this window should be familiar to you by now, so doing this should be a piece of cake.
Making Bank Deposits
If you record a sales receipt or payment on an invoice, QuickBooks sees that as money received by your company. All money received by your company needs to be assigned an account. When your company receives (or spends) money, you will assign that money to an account in your Chart of Accounts.
That said, whenever you record a payment from an invoice, or create a receipt, QuickBooks takes that amount and adds it to a list of undeposited funds. You will need to take those undeposited funds and deposit them into your bank account.
Here's how to do it:
Go to Banking>Make Deposits.
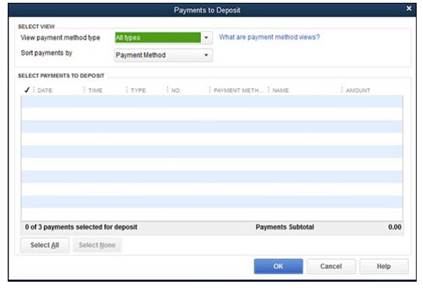
Choose the payments you want to deposit by putting a check mark in front of it.
Click OK.
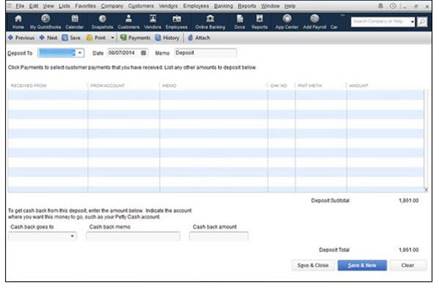
Next, choose which bank account you want to use to deposit the money by using the Deposit To dropdown list.
Then, follow these instructions:
-
Enter in the deposit date.
-
You can add a memo if you want.
-
Enter a cash back amount if you want some of the deposit to go somewhere else. To do this, click the arrow in the Cash Back Goes To box and select an option.
Now it is time to record your deposit. To do so, click the Save and Close button or the Save and New button, if you want to make more deposits.
Tracking What Customers Owe
The simplest way to track what your customers owe to you is by going to Customer>Customer Center. Just select the customer from the Customer and Jobs tab on the left side of the window.
You can also use Income Tracker, formerly the Collections Center. Income Tracker is within the Customer Center, as shown below.

It helps you keep track of past due and almost past due balances. To use it, go the Customer Center. Now click the Income Tracker button at the top of the window.
In the Income Tracker:
-
Double-click on a transaction to open it.
-
You can filter your results by open or overdue transactions.
-
You can even use color-coded bars to filter one type, such as unpaid, paid, or unbilled.
Assessing Finance Charges
Before we discuss adding finance charges, it is important that you apply payments or credit memos to unpaid invoices before adding finance charges. That way, the finance charges are accurate.
To add finance charges:
-
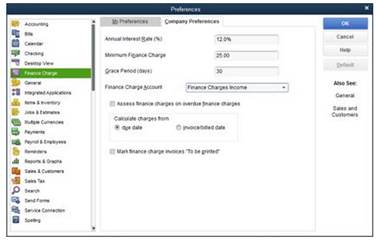
Go to Edit>Preferences, then click Finance Charge icon on the left. Next, click the Company Preferences tab.
-
Enter the interest rate you want to use.
-
If a minimum finance charge exists, enter it.
-
Enter the grace period you give. The grace period is the period after the invoice is due, before you start to add finance charges.
-
Now, pick the account you want to use to track finance charges. There's a dropdown list next to the Activate Finance Charge Account. You can select Income or Other Income Account.
-
Decide if you want to charge finance charges on finance charges. This means if you add a finance charge to an invoice that was unpaid after 30 days, and it is still not paid after 60 days, do you want to simply add another finance charge to the principal amount owed (the original amount of the invoice) or do you want to add finance charges to the original amount owed AND the finance charges that were already added.
-
Select if QuickBooks should calculate finance charges from the invoice due date or the invoice date.
-
Decide if you want to print the finance charge invoice.This is the same as printing invoices and sales receipts, so you should know how to do that by now.
Next, click OK.
Next, go to Customers>Assess Finance Charges.

Go to the Assessment Date box. Enter the date that you are adding the finance charge.
Then, select which customers you want to assess a finance charge to by leaving the check mark next to the customer's name. By default, QuickBooks put check marks next to all customers.
QuickBooks can be used to track your business credit cards, as well as your checkbook. First, however, you must learn how to set up credit card accounts. You may have already done this in the interview.
How to Set Up a Credit Card Account
To set up a credit card account in QuickBooks:
Go to Lists>Chart of Accounts.
Click the Account button in the lower left-hand corner of the window. Select New.
Choose the Credit Card option, then click Continue.
Give the account a name in the Account Name box.
Next, click the Save and Close button. You will be taken back to the Chart of Accounts window. The credit card account you just created will appear there.
Now, enter the card number.
Enter Credit Card Transactions in the Register
If you want to work with a credit card account to add debits or credits, you are going to use the Chart of Accounts window again. Go to List>Chart of Accounts.
Double-click on the credit card account you want to work with. You will see the Credit Card Register. This is what you will use to record transactions.
Enter Credit Card Charges in Banking
You can also record transactions by going to Banking>Enter Credit Card Charges. The Enter Credit Card Charges window will open.
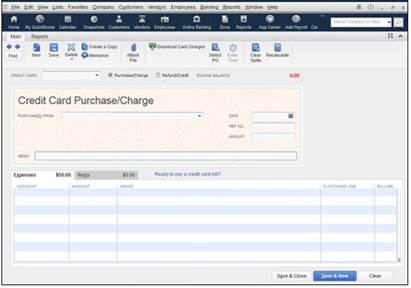
To record a transaction this way:
-
Use the Credit Card dropdown menu to select the appropriate credit card.
-
Select either Purchase/Charge or Refund/Credit.
-
Enter the name of the establishment where the card was used in the Purchased From field.
-
Enter the date the transaction took place.
-
You can also fill in a reference number. Use the number found on the credit card statement.
-
Next, fill in the amount of the charge.
-
For general expenses, use the General tab. If the item was purchased for inventory, or a customer, use the Items tab.
Note: Don't use credit card accounts to record transactions for debit cards. Debit cards are nothing more than plastic checks, so use your checking account for this.
Editing Charges
If you made an error entering a credit card charge and need to go back and change it, you can easily edit it with QuickBooks.
Simply go to Lists>Chart of Accounts, then double-click the credit card account you want to edit.
Now, select the transaction that needs to be removed or changed.