Recording Bills
A majority of companies use an accounts payable system when it comes to paying their bills. This simply means they do not pay their bills as soon as they receive them. If you use the accounts payable system, then you will want to record your bills in QuickBooks as soon as you receive them � so you don't forget to pay them.

Choose the vendor you want to pay. Your vendors should already be in your vendor list, but -- if not -- QuickBooks will allow you to add them.
If you have a purchase order open for that vendor, QuickBooks will ask you if you want to apply this bill to a purchase order.
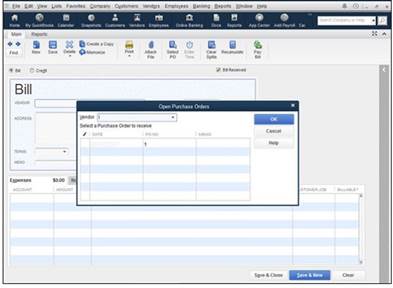
Select the purchase order. QuickBooks will fill in the amounts and items for you.
Click OK.
If you do not have a purchase order to apply, fill out the fields in the Enter Bill window. You will want to fill in the vendor, the date, the vendor address, a reference number (Ref No.), if needed, and the amount due.
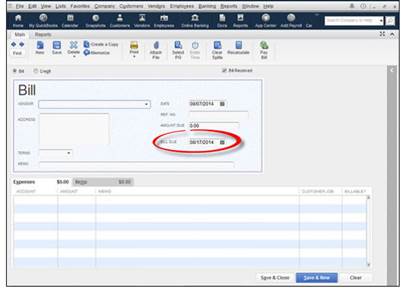
You can enter a memo in the Memo line if you want.
Under the Expenses tab, you are going to assign expense accounts. The expense accounts are the accounts you will use to pay the bill. These should already be listed in your Chart of Accounts.
Choose the account in the Account column, as well as the amount.
By using the Customer/Job column, you can also apply it to a customer or job.
Now, let's click the Items tab (to the right of the Expenses tab).
We can also assign items to the bill. For example, if we purchased 20 toothbrushes, we can list these items to show that the bill is to pay for the toothbrushes we purchased.
When you are finished, click Save & New, if you need to record more bills, or click Save & Close.
Recording Bills for Items Already Received
There are times that you may receive items, and a bill will not come with those items; the bill will come later. In instances like this, you will record your bill a different way.
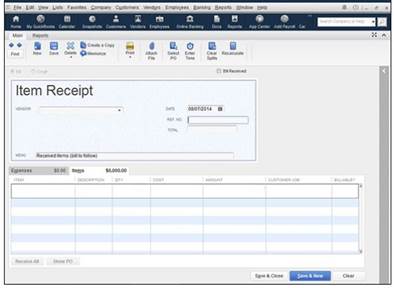
Select the vendor name. If a purchase order exists, QuickBooks will let you know.
Go ahead and fill out the window, including the Expenses and Item tabs � as you learned to do in the last section.
When you are finished, click Save & Close. The amount for the items received is now posted to your Accounts Payable account as an Item Receipt type. When the bill arrives and you record it, the Accounts Payable account will be updated. The transaction type will be changed to a bill.
When you receive the bill for the items, it is time to enter the bill. Do NOT use the method in the last section if you have already created an Item Receipt. Instead, go to Vendors>Enter Bill for Received Items.
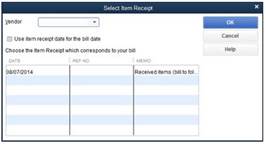
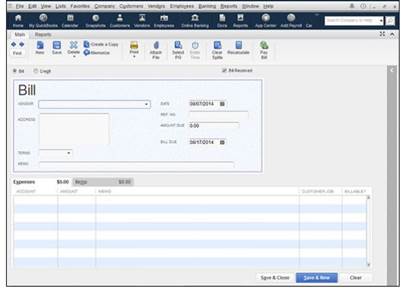
Fill out the information in the Enter Bills window, then click Save & Close.
When to Pay Bills
The big decision with paying bills is if you should pay them right away, or wait. If there's a proper answer to this, then it lies within the accounting system you use. The first method is the easiest -- paying them right away. The second method, which is called an accounts payable method, gives you accurate records, but lets you pay your bills later. It is called accrual-basis accounting. We'll talk more about this a little later in this lesson. For now, let's talk about paying bills by writing checks.
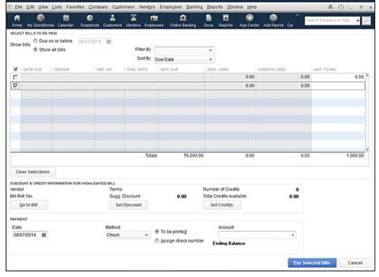
Selecting Bills to Pay
When you are ready to pay your bills, you can tell QuickBooks which bills you want to pay. Go to Vendors>Pay Bills. You will see the Pay Bills Window. Place a check mark next to the bills you want to pay.
Pay by Writing Checks
Whenever you write checks to pay bills, you are doing cash-basis accounting. What this means is that you count your bills as expenses when you write the checks and pay the bills. The only drawback to using this method is that you lose the ability to heavily track your expenses and keep track of your bills. Your bills will pile up on a stack on your desk.
The Fast Way
To write checks for bills the fast way, go to Banking>Use Register.
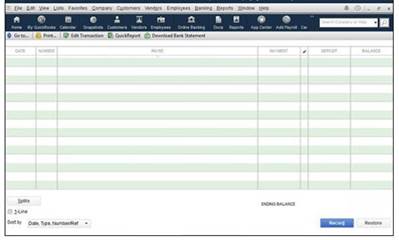
It is pretty simple, because now all you do is fill in the information in the columns. This is the same information you'd enter on a check.
Just keep in mind that the people you write checks to should be vendors. Make sure this person or company is in your lists.
You will also have to choose an account to use for each check. If the account is not listed in the dropdown list, QuickBooks will give you a chance to add it.
Click the Record button when you are finished.
The Slow Way
You can also write checks the slow way. The slow way takes longer, but it also gives you more options to add payees and do things like tracking expenses and items. If you want to do things like this, it might actually be the quicker way.
To write checks the slow way, go to Banking>Write Checks.
Now you will see the Write Checks window.
- Click on the Bank Account dropdown list. Select the account you want to use to write the check.
- Enter the check date.
- Enter the name of the payee in the Pay to the Order Of line. If you have never paid this person before, you will see a Name Not Found message from QuickBooks. Click either Quick Add or Set Up to add the name to your lists.
- Next, type the amount of the check. Simply put the amount next to the dollar sign. QuickBooks will write it out for you.
- If you want the address to appear on the check (such as for windowed envelopes), enter that.
- You can also put in a memo if you want.
Now, move down to the section of the window below the check. You will see the Expenses tab. Find the account in your Chart of Accounts that lists the bill or expense you are paying. Expense accounts are usually toward the end of the list.
You can edit the amounts in the Amount column if you need to, add a memo, or assign the expense to a customer or a job.
If you are buying supplies or inventory, click the Items tab. List the items. If the item doesn't already appear on your lists, you will have to click Add New from the top of the list. You will then be required to fill out the New Item window.
When you are finished, you can click the Print button to print the check right then and there. Or, you can click Save & New to write another check, or Save & Close to close out the Write Checks window.
Delete a Bill
To delete a bill, you are going to have to go to the Accounts Payable Register. To locate this, go to Lists>Chart of Accounts, then open the Accounts Payable account. Select the bill you want to delete. Then, go to Edit>Delete Bill. Confirm that you really want to delete the bill, then it is gone. That simple!
Bill Reminders
QuickBooks can remind you when it is time to pay bills, but you have to let it know that you want it to do that. Go to Edit>Preferences. Click Reminders on the left, then click the Company Preferences tab. You will see a list of reminders.
Skim down to Bills to Pay and set how many days before the bill is due that you want to be reminded. Just make sure the Show Summary or Show List option is selected.
Track Vehicle Mileage
You may want to track your vehicle mileage for your company vehicles. However, first you have to add your vehicles to a list. To do this, go to Lists>Customer & Vendor Profile Lists>Vehicle Lists.
Click the Vehicle button, then choose New from the Vehicle dropdown menu in the bottom left corner.
Fill in a description for the vehicle, then click OK.
To track mileage, all you do is go to Company>Enter Vehicle Mileage. A dialog box will appear. You will be asked to enter the vehicle, date, miles driven, odometer reading, and the reason for the trip.
Pay Sales Tax
If you want to pay the sales tax you owe, go to Vendors>Sales Tax>Pay Sales Tax. This opens the Pay Sales Tax dialog box.
Select the bank account you want to use to pay the tax.
Make sure the date shown in the Show Sales Tax due matches the end date of your reporting period.
Put a check mark next to the taxes you want to pay.
Make sure to check the "To Be Printed" check box if you want to print the check.
QuickBooks allows you to enter and track your inventory using the program. However, before you can do that (as with most things QuickBooks), you must do a few things. First, you must tell QuickBooks that you want it to track your inventory. Then, you must create an item list, if you haven't already done so. You must include on this list anything you might put on an invoice. All items that you order and sell MUST be on this list.
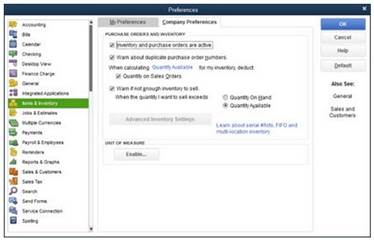
To tell QuickBooks you want it to track your inventory, go to Edit>Preferences. You will then see the Preferences dialog box. Click on Items and Inventory on the left-hand side of the window. Now, check to make sure the Inventory and Purchase Orders Are Active box is marked -- and that the Warn if Not Enough Quantity on Hand and Warn if Duplicate Purchase Numbers are checked, as well.
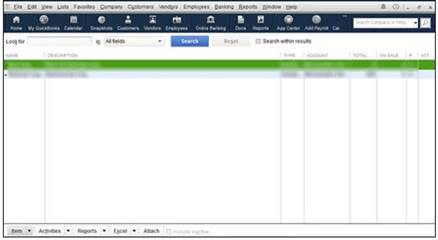
As for the item list, if you need to now add items to your list, go to Lists>Item list. Click the Item button, then select New.
What Is an Inventory Item?
An inventory item is simply a product you manufacture, assemble, or purchase to sell to a customer. Inventory includes items you store or use that are resold to customers. However, if you store low-value parts to do a job (such as a plumber who might store pipes, valves etc.), you may want to track those as non-inventory items.
Creating Inventory Items
To create an inventory item, go to the Item list (Lists>Item List) and open the Item List window. Press CTRL+N to add a new item, or click Item at the bottom left-hand side of the window, as we did when we learned to create an Item list.
Now, we are going to add a new item. Note that in the Type category, we chose Inventory Part.
Next, enter the following information:
-
Enter the item name. This is the name you will use to reference the item in the software.
-
Enter the manufacturer's part number. This will need to be included on purchase orders when you reorder inventory.
-
You don't need to enter anything for Description on Purchase Transactions or a cost, if you don't want to. These fields will be filled in when you create a purchase order.
-
Enter a sales price. This is the price to your customers.
-
Choose a tax code.
-
Select the proper accounts for COGS (Cost of Goods Sold) and Income accounts.
-
Enter a number in the Reorder Point field. This should reflect the minimum amount of the product that you want to keep in stock.
-
Do NOT enter information into the On Hand or Total Value fields. QuickBooks will track these for you.
Press OK when you are finished.
Recording Inventory
It is important to remember that inventory is actually things that you buy. All items that you buy and/or resell must be added to your Item lists in order to be tracked in your inventory.
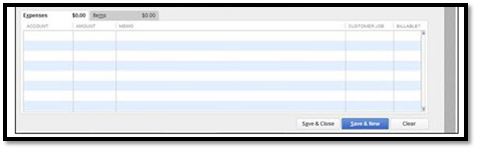
Here's what this means. If you purchase items and record the bill, you are entering it into inventory. If you enter in a purchase receipt, you are entering your purchases into inventory.
This is why it is so important that you fill out the information under the Items tab when you record bills. We have pictured the Items tab for recording bills below as a reminder:
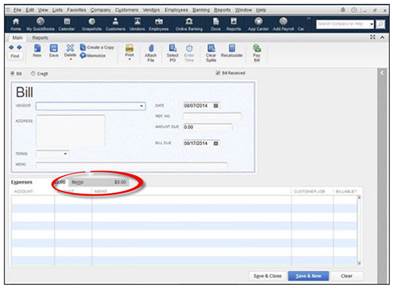
If you do not record the items on a bill, those items cannot be entered into inventory.
Recording Inventory Purchased Over the Counter
Let's say you bought two dozen spatulas from a discount store while you were out shopping. You paid cash for them. There wasn't a purchase order for them (as we'll learn about later in this article), or a bill. However, since your company sells spatulas, you want to add them to your inventory and resell them.
To, enter inventory that you purchased "over the counter" (or paid cash at time of purchase), go to the Write Checks window, as we learned to do earlier in this article. Write the check for the items, and assign it to the proper account. In this case, if you paid cash, perhaps you have a petty cash account.
Counting Inventory
QuickBooks will keep track of your inventory for you, letting you know how many of each item you have on hand. However, even though it is not fun, you will also want to do a physical inventory every so often to make sure that the number of items QuickBooks says you have on hand matches the number of items you actually have in stock.
To do this, you can print a physical inventory worksheet by going to Reports>Inventory>Physical Inventory Worksheet. This lists your items in alphabetical order along with the quantity you have on hand. There's also a column in the worksheet that's set up so you can fill in your physical count.
To print the worksheet, click the Print button to bring up the Print Reports window.
Things to Do in QuickBooks While You Do a Physical Count
Of course, once you print out the worksheet, you don't want QuickBooks to "freeze" until you get the physical count finished. In other words, if two more of an item are sold after you print the worksheet � but before you do a physical count � it can mess up the physical count.
Unfortunately, QuickBooks doesn't give you a way to freeze anything. However, you can make sure that sales transactions are handled differently until you finish your count.
Here are the ways you can do this:
-
Print an extra copy of each invoice. Save the copies in a folder. Don't pick or pack the inventory for the invoices until after the physical count is completed.
-
Don't enter invoices until after the physical count is over. However, if the count takes a while, this is not a good idea.
-
If inventory arrives while you are counting, don't unpack it until after you are finished.
-
Don't receive inventory in QuickBooks until after the count is finished.
Making Adjustments to Inventory
You may have to make adjustments to your inventory in QuickBooks after the physical count is complete. You will discover that most of the time, the items you have on hand are actually less than QuickBooks figures. This is called shrinkage -- or unexplained, missing inventory.
To adjust the count in QuickBooks, go to Vendors>Inventory Activities>Adjust Quantity/Value on Hand.
A window then opens.
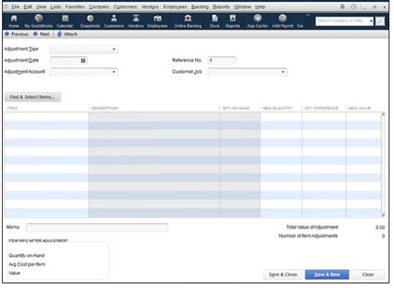
Here's how to fill out this window:
-
Select Quantity from the Adjustment Type dropdown menu.
-
Enter the date.
-
Go to the Adjustment Account field and enter the inventory adjustment account in the Chart of Accounts.
-
You can use a reference number to track adjustments if you want.
-
Next, click the Find & Select Items button. A new window opens.
-
Now you can tell QuickBooks which items need to be adjusted. Put a check mark by the items, then click Add Selected Items.
-
Now you can adjust the quantity in the Adjust Quantity/Value on Hand window.
Filling out a Purchase Order
Defined, a purchase order is simply a document requesting to purchase items from someone else. By creating purchase orders, you know what you have ordered and when it is coming in. There's never any doubt. You can use QuickBooks to create purchase orders and make it even easier.
To create a purchase order:
Go to Vendors>Create Purchase Orders.

Select a vendor from the dropdown list.
You can also specify a drop ship and the template you want to use to fill out the purchase order.
Next, fill out the date of the purchase order, a P.O. number, the vendor, and the Ship To address.
Finally, as we have done before with other aspects of QuickBooks, go to the item column and start entering items. These items should already be in your items list, but if not, QuickBooks will ask if you want to set up these items.
It is optional if you want to fill in a Vendor Message, but you do need to fill in the Memo field. Put something in here that will allow you to identify the purchase order, because this is what will appear in the Open Purchase Orders dialog box when you go to look for it.
If you want to print the PO, click the Print icon under the main tab, or check Print Later. You can also click the downward arrow beside Print and choose Print Batch, if you want to print several POs at once.

When you are finished, click Save and New, if you want to create other purchase orders, or Save and Close to close this window.
To view your open purchase orders, go to Reports>Purchases>Open Purchase Orders.
Receiving Items From a Purchase Order
Once you receive items you ordered from a purchase order, you need to record the inventory as you learned to do in thisarticle, so they are added to your Item list.
You can:
-
Use the Write Checks window.
-
The Create Items Receipt window
-
The Enter Bills window
How you pay for the items you receive from a PO will help determine the method you use to record the items.
Whichever method you use, once you select a vendor, QuickBooks will ask you if you want to receive the items against a PO. You do. Click Yes, and you will see the Open Purchase Orders dialog box.
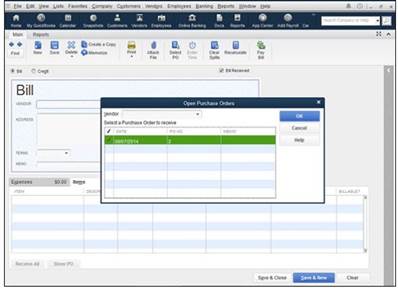
Choose the PO you are receiving items against, then click OK. QuickBooks will fill out the Items tab with all the things you ordered on that PO. You can adjust the amounts, if needed.
Assembling Products
If you are using QuickBooks Premiere or Enterprise 2014, you can also use QuickBooks to help track products that you assemble. When you assemble products, you may purchase inventory that you don't sell. Instead, you use it with other items to assemble a product that you will sell. If that's confusing, here's an example.
Let's say you are a manufacturer of earrings made with wire and beads. You regularly purchase wire and beads, but you don't sell these items individually. You only sell the finished product, after the wire and beads are assembled and turned into earrings.
Since you don't sell the wire and beads, but instead ASSEMBLE the wire and beads to make a product that you sell, you have no way to deduct the wire or beads from your inventory UNLESS you assemble a product in QuickBooks.
In other words, assembling products in QuickBooks allows QuickBooks to track the items in your inventory that you have assembled to create a product. It then deducts those items from your inventory count in QuickBooks.
NOTE: To add assembled items, such as the earrings, to your Item list, you must group items together (wire and beads).
Here's how to build an assembly, such as one used in our example:
Go to Vendors>Inventory Activities>Build Assemblies. You will then see the Build Assembly window.
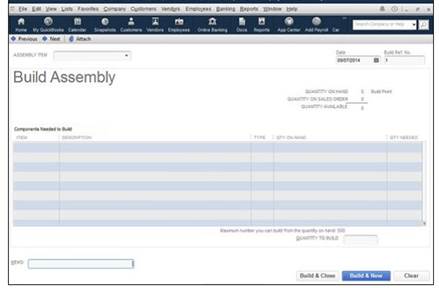
Next, go to the Assembly Item dropdown. Choose the item.
Select the Quantity that you want to build in the Quantity to Build text box (below the line items).
Please note about the Build Assembly window:
-
QuickBooks shows you the quantities of the assembly that you have in stock. It also shows you the customers who have placed orders.
-
The biggest part of your Build Assembly window shows what goes into the product you are assembling. This is a bill of materials.
-
The bottom of the materials list shows how many assemblies you can make, based on your inventory.
-
Whenever you build an item, QuickBooks adjusts your inventory for you.
Click Build & Close. Click Build & Save if you want to build more assemblies.