QuickBooks is one of the most impressive upgrades to the QuickBooks program to date. For that reason, we want to take a minute to show you around this latest version � and also to tell you what's new in QuickBooks.
If you have never used QuickBooks before, this tour will help to make the program easier to use, once you know where everything is. However, if you have used previous versions, you are really going to be impressed by the improvements you will discover.
The Home Page
The Home page of QuickBooks is shown below.
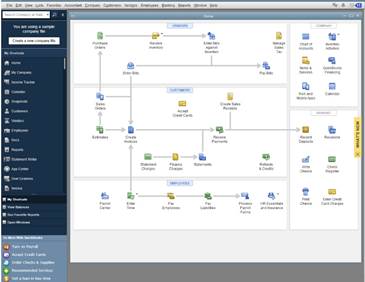
The Home page contains links and icons you will use to access the features you need. As you can see, it is also divided into sections to make it easier to find those icons and see how the icons fit into the work flow.
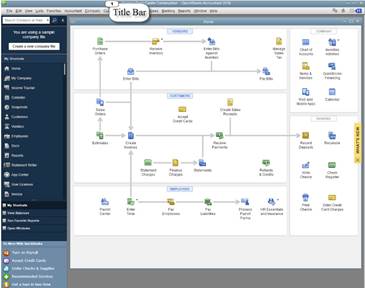
The Title Bar
The Title Bar is located at the very top of every page in QuickBooks. It tells you the name of the file you are working in, the version of QuickBooks, and the user.
The Title Bar is at the top of the window and marked below.
The Menu Bar
The Menu Bar is where you will find the tasks, reports, and forms available in QuickBooks.
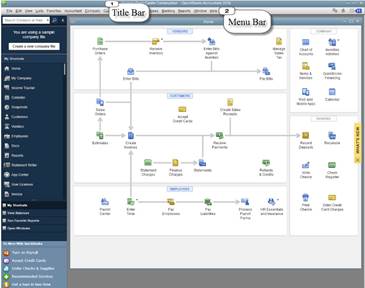
If you have never used QuickBooks before, you can take a few minutes to look at the menus, then the submenus you see when you click on a menu. For example, click on Company in the Menu Bar to see the submenu options.
The Top Icon Bar
The Top Icon Bar is pictured below. It gives you quick access to tasks and reports you use often. You can also customize it, selecting the color, and adding or removing shortcuts.

In QuickBooks, you can either have the Icon Bar placed at the top, below the Menu Bar, or you can have it on the left side of the Home page, as we have it.The choice is yours.
Here's how to make the Icon Bar appear at the top of the page. Go to View on the Menu Bar, then Top Icon Bar. (View>Top Icon Bar).
Now, to change the color, go to Edit>Preferences>Desktop View. Click the My Preferences tab in the dialog box. Put a check mark next to Switch to Colored Icons/Light Background on the Top Icon Bar to switch to the colored icons.
Click OK.
Customize the Top Icon Bar
To customize the top icon bar, click the two arrows on the right side of the Icon Bar. Here, you will see features that can be displayed on your Icon Bar, but aren't. Simply click on any of these to add them to your Icon Bar.
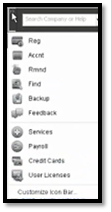
You can also select Customize Icon Bar.
When you do, you will see this dialog box:
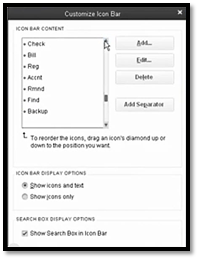
You can now add or delete icons from the Icon Bar and change the display options. Click OK at the bottom of the dialog box when you are finished.
Customize the Left Icon Bar
To view the Left Icon Bar, go to View>Left Icon Bar. Once you can see the Left Icon Bar, go down to My Shortcuts in the Icon Bar. It is toward the middle.
Click on My Shortcuts.
Now click Customize Shortcuts.
You will now see the dialog box to customize the Left Icon Bar, just as you did the Top Icon Bar.
QuickBooks Centers
QuickBooks Centers refers to different windows in the QuickBooks program. Each different window displays information about specific areas of your company. Most of the centers in QuickBooks have icons in the icon bar to help you get to them quickly and easily. For example, the icon for the Vendor Center is highlighted below in the Top Icon Bar.

The QuickBooks Centers include the:
-
Customer Center
-
Vendor Center
-
Employee Center
-
Report Center
-
Bank Feeds Center
-
Doc Center
-
App Center
-
Lead Center
Let's learn a little more about each of these centers, and what information they contain about your company.
The Customer Center
The Customer Center contains everything you need to know about your customers. It is where you will find your customer list. It also contains all the information you will ever need to know about each customer you have. You can change options in the dropdown list to see specific information about your customers that you want to view. In addition, you can perform tasks using the buttons at the top of the Customer Center window.
The Vendor Center
The Vendor Center contains all the information about the companies and people you buy from. You can also enter transactions related to your vendors.
The Employee Center
The Employee Center contains information on your employees, your payroll liabilities, and your payroll items.
The Report Center
The Report Center can be opened from the icon bar, and is where you will be able to access and run reports. There are three views for you to choose from in the Report Center: carousel view, list view, and grid view. Each view contains the major category of reports in the left pane. Please note that when you open the Report Center for the first time, the grid view will be displayed. You will see a visual display of the reports available for each category.
The Bank Feeds Center
You go to the Bank Feeds Center to download and enter transactions directly from your credit card or bank accounts. You don't have to manually enter transactions if you use this center.
Doc Center
The Doc Center contains documents and files from your computer that you attach to specific transactions or records in QuickBooks.You access the Doc Center through the Customer Center.
You can use the Doc Center to access attached files or scanned images.To attach a file or image to a transaction, however, you can simply click Attach File when the transaction window is open. The Attach icon looks like a paperclip. For example, you can attach a purchase order to an invoice.
The App Center
The App Center gives you access to Intuit Workplace Apps. The apps are web-based applications that you can download to help make using QuickBooks even more beneficial to your company.There may be additional fees.
The Lead Center
The Lead Center doesn't have a button on the icon bar. You access the Lead Center through the Customer Center. This is where you can keep information about leads � or prospects who aren't yet customers. You can enter in prospects and keep track of them using the Lead Center.
The Calendar Center
The Calendar Center keeps a calendar of your important transactions and reminders.
What's New in QuickBooks
There are so many improvements to QuickBooks, the updates to the program are just as important to learn as being able to navigate through it. They will help you begin to see all you can do with this accounting program.
QuickBooks was designed to be easier to learn than the previous versions. A modern design increases efficiency and ease-of-use, although the familiar QuickBooks tasks are still front and center for prior users.
Here's some of what's new in QuickBooks:
-
Notifications, including maintenance alerts, are displayed on the home screen. In the snapshot below, you can see the new reminder flag highlighted in yellow and circled in red.

-
You can now customize the "view balances" area of the home screen. Now, you can add or remove accounts to this area.
-
The Customer Center now keeps a history of your sent emails.
-
You can send customers a receipt for payment via email.This feature has been needed for a while.
-
Now you can assign sales reps to jobs just as you can assign sales reps to customers.
-
Filter your reports by job status. You can view your reports by open, closed, in process, etc.
-
You can copy and paste entire lines in a transaction, not just fields within a line.
-
Online Banking is now called Bank Feeds. You can use color to highlight transactions. In addition, you can add, remove, and delete conditions to make it easier to balance accounts.
-
My Apps is now accessible from the new My Company window. It is now called Your Apps.
-
Income Tracker allows you to view open invoices, overdue invoices, unbilled estimates, etc. It is all presented in a spreadsheet that can be configured to meet your needs. This replaces the Collection Center.
-
The bill payment stub now shows if the bill is paid in full with credits.
-
The bounced checks feature is back again with 2014!
-
You can also customize the way a report fits on a page when you print it. You can fit it vertically or horizontally.
-
Multiple email templates can be created for the different forms you send, such as invoices and quotes.
-
Documents such as drawings, pictures, and other digital documents can now be attached to web mail-based e-mails.
-
The new auto suggestion feature helps you find information faster when you search in QuickBooks.
-
Finally! Add Sales Rep as a column in the detail section of Checks, Bills, and Credit Card Charges.
A Look Back at QuickBooks 2013
Because tax laws change from year to year, QuickBooks updates its software more than other programs, such as those created by Adobe or Microsoft. It is quite possible that you have used QuickBooks before; however, if it has been a few years since you have used the program -- a few years in a program like QuickBooks makes a huge difference!
For that reason, we also want to review some of the improvements that were introduced in QuickBooks 2013. This is just a quick review, and it is intended for those of you who are just now upgrading to QuickBooks from a version that's from 2012 or prior.
Icon Bar Placement. QuickBooks 2013 gave you the ability to view the icon bar at the top or on the left side of your page. You can also customize the color.
Time and Expenses Preference. Some companies invoice customers using a method called "Time & Expense" or "Cost Plus" invoicing. With these, the costs to the customer accumulates and the details are provided on the invoice. You can use the new Time and Expenses preference settings to assign all costs, or all time, as billable to the customer.
Improvements to the Customer, Vendor, and Employee Centers. In QuickBooks 2013, you were given the ability to consolidate and organize more information in these centers. You can assign multiple contacts to a customer or vendor, plus you can assign "To Do's" to customers as well. Also, you can track Facebook pages or Twitter accounts for customers, vendors, and employees.
Assign Customers a Default Method of Payment. Starting with QuickBooks 2013, you can choose what type of payment you'll accept from your customer. You can choose from online check only, or check and credit card. In addition, you can choose not to provide an online method of payment link on your invoices for certain customers.
Print Vendor Bill. Some companies require that a manager approve all bills before they are entered. QuickBooks 2013 was the first version to provide a copy of a bill that was paid by one company to another for their record keeping.
Item-Based Reports: Reporting Preferences. Starting with QuickBooks 2013 -- if you use the Item Name field for a product number, you'll discover that including the description with, or without, the item name field gives you better reports with less data entry.
Collapse Summary Report Line Details. With QuickBooks 2013, Summary reports can now show the amount of detail needed. There's no need to export them to Excel to customize.
In QuickBooks, information such as products/services, employees, and customers are entered into lists and stored as lists. Lists are part of what makes QuickBooks so easy to use, because all your different types of information is easy to find � and to use.
Lists will contain different things, such as a list of customers, a list of employees, and so on. However, the first lists you need to create are lists that your business absolutely needs to stay in business. These things are the backbone of your company. They are the things you buy and sell.
Just be warned that QuickBooks thinks that anything you stick on an invoice or purchase order is something you buy and sell, and that it needs to be in a list. This means things like shipping charges are viewed as something you sell in the eyes of QuickBooks.
In other words, if you add shipping charges to an invoice, QuickBooks thinks you are adding a product, so it will need to be included in your product list. In short, everything you buy and sell, as well as every person or account involved with your company is inputted into one of your QuickBooks lists.
In this article, we are going to talk about Item lists, then teach you how to add different types of items to your Item list in QuickBooks.
Item Lists
Remember this: Everything you could possibly add to an invoice or purchasing order is an item you need to add to your Items list.This includes products, services, sales tax, shipping and handling, subtotals, discounts, etc.These are all items, because they are added to invoices or purchasing orders.
Again, these items must to be included in your Item list.
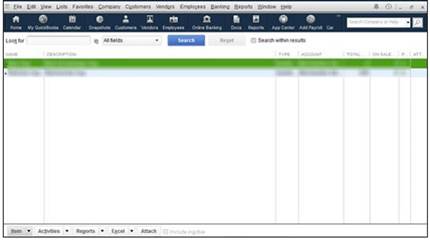
To create an item list, go to Lists>Item List from the Menu Bar.
This opens the Item List, as shown below.
Press CTRL+N (N for new) to bring up the New Item Window (or select New from the Item dropdown list at the bottom right side of the window).
You will see this screen:
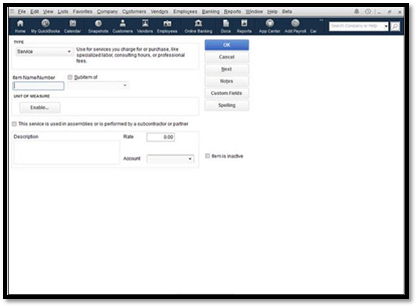
The first thing you need to do in this window is select an item type from the Type dropdown list.
-
Service. If this item is a service that you charge for, select Service.
-
Inventory Part. If this is something you buy from someone else, then sell, classify it as this.
-
Inventory Assembly. Use this if what you are classifying as an item is a raw material that you use to make other items.
-
Non-Inventory Part. This is for something that you sell, but don't want to count as inventory. It can also be for something that you don't sell, but that you buy, such as office products.
-
Other Charge. Freight, handling charges, and things like that would be classified under this.
-
Subtotal. This will add everything before you add tax, discounts, etc.
-
Group. This can be used to enter several items that are already on the list at one time. It is helpful to do this if you sell products as sets.
-
Discount. This is a discount that you give customers after the invoice is subtotaled.
-
Payment. You don't have to use this if it confuses you. However, you add this item if perhaps your customers put down a deposit when they buy, but before they receive the product.
-
Sales Tax Item. This is for sales tax.
-
Sales Tax Group. This is for sales taxes that are collected in a transaction and owed to different agencies.
We are going to add a Service item.
Next, add an item number or name. You can also create sub-items. These are items that go within other items. To do this, choose the Sub-item Of box, then assign a parent item to it.
Also, add a short description of the item. Enter the description into Description on Purchase Transactions, if this is an item you buy. Enter the description into Description on Sales Transactions, if this is an item you sell.
Next, enter a default cost. This can be changed at the time of entry into an invoice, or when paying a bill, if you need to change it. You do not have to enter a default cost.
In the Expense Account field, choose the account to assign the item to. In our example, we are assigning it to the Cost of Goods Sold.
Assign a vendor in the Preferred Vendor field. You can also leave it blank, if you want. If you fill in the Preferred Vendor field, QuickBooks will fill in the name of the vendor on a purchase order when that item is selected. It can save you time.
In the tax code dropdown menu, select whether or not the item is taxable.
Next, choose an income account that you want the item linked to in QuickBooks.
Click Save when you are finished, or click Next to add another item.
This is the basics of adding an item. Now, let's talk about the item types that you can add in a little more depth.
Item Type: Non-Inventory Part, Service, or Other Charge
If an item type is classified as Non-Inventory Part, Service, or Other Charge, you must tell QuickBooks how much will be charged for the item, if it should be taxed, and the income account to use to track the income from it.
-
For Service type, use the Rate text box and enter in how much you charge per unit.
-
For Non-Inventory Part type, use the Price box and enter the price.
-
For Other Charge type, use the Amount or % text box. This is usually used for shipping charges.
Also, use the Tax Code dropdown to let QuickBooks know if the item is taxed. You also will have to use the Account dropdown to let QuickBooks know which account you want to use to track income from the sale.
Item Type: Inventory Part Item
If the item type you are adding is an Inventory Part, you must specify how much to charge for the part, how much it costs, and which income account to use to track it.
You will also have to specify the following information:
-
Description on Purchase Transactions. Enter a description that will be used when you buy the part.
-
Description on Sales Transactions. Enter a description to be used when you sell the part.
-
Cost: Enter the average cost per unit for the items that you have.This will become the default rate when you purchase more.
-
COGS (Cost of Goods Sold) Account: Let QuickBooks know which account you want to use to track the item's cost, when sold. Use the Cost of Goods Sold Account unless you have created other accounts for this.
-
Preferred Vendor: Put down your first choice in a vendor when buying this item. If the vendor is not on your vendor's list, you will be asked to add it.
-
Sales Price: This is the price you will sell the item for.
-
Tax Code: Enter if it is taxed.
-
Income Account: Assign an income account that will be used to track the income from this product. This will probably be the Resale Income or Sales Account.
-
Asset Account: Assign the other asset count that you want QuickBooks to use to track the item's value.
-
Reorder Point: How many of this item do you want left in your inventory before you reorder?
-
On Hand: Tell QuickBooks how many of this item you currently have on hand.
-
Total Value: Leave this at zero.
-
As Of: Enter today's date.
Sales Tax Item
A sales tax item is just data about a sales tax.
For the Sales Tax Item, enter:
Sales Tax Name and Description. Add details for identification.
-
Tax rate. Enter the tax rate as a percent.
-
Tax Agency. Specify the state or local agency that collects the tax money. If you have to add an agency, click Add New from the list.
Payment Item
A payment item is used to record the receipt of partial payment. This reduces the balance due. If the item type is Payment, describe the payment method, then specify how QuickBooks should handle it. You can add more payment methods by selecting Add New from the dropdown list.
When you are finished, click OK or Next. Use Next if you still have items to add.
Remember, if you have added a new inventory item, to record the purchase of the item by creating a transaction. We'll cover that later.
Subtotal Items
Subtotal items allow you to add and total groups of items on an invoice or receipt. To use it, list the subtotal item, then list the items you want included in the subtotal.
Creating Groups of Items
Groups of items are items you sell together. For example, maybe you have a shampoo and conditioner set. You may sell the shampoo and conditioner separately � and together. To create a group of items, pull up the New Item window. Make the "item type" as Group.
There will now be fields in the New Item window where you can list each item in the group.
When you click an item line in the Item/Description/Qty list box, there will be a downward arrow at the end of the column. If you click this area, you will open a dropdown list of items.
Select the Print Items in Group check box to list all items in the group on an invoice.