Images aren't the only things you can insert into your publication. You can also draw and insert shapes, advertisements, and the list goes on. We're going to spend this article covering some of the other things you can insert.
Drawing and Inserting Shapes
To draw objects in MS Publisher 2013, click on the Insert tab, then click Shapes in the Illustrations group.
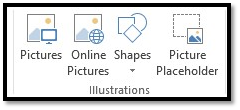
You'll see the following drop-down menu appear:
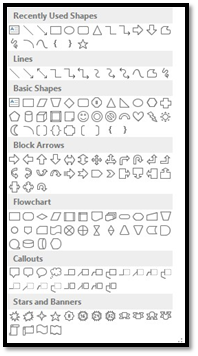
Select a shape you want to draw, as we've done below. Click on the place on your page where you want to place it.
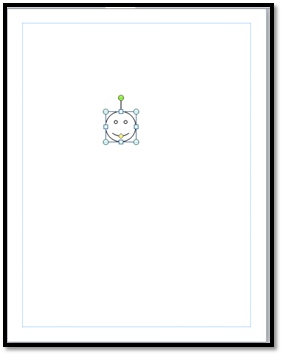
The box that appears around the shape allows us to move it, as well as to re-size and rotate it. Use the green circle above the shape to rotate it. Use the square handles to expand it vertically up or down, or horizontally, left to right. If you want to move the object, move your cursor inside the box. You'll see arrows that look like a plus sign. Hold in your left mouse button and drag it to its new location.
If you right-click on the object, you'll see this menu that you can use to edit the object:

Let's cover the top row of icons in this menu, from left to right.
-
The first wraps text around an image or graphic.
-
The next one brings an object (such as our shape), perhaps on top of another object.
-
The last icon sends an object back, as in behind another object.
Now, let's cover the second row.
-
The icon with the paint bucket allows you to change the fill color of the graphic. Our smiley face, above,is white. We can change it to yellow using this icon.

-
The next icon is to change the outline of the shape. Our smiley face has a solid black line. Using this icon, we can change it to red and dashed lines if we wanted to.

-
The last icon is the Format Painter.This allows you to copy and paste formatting, such as alignment, indentations, etc. Select the text you want to copy and click the icon to copy character formatting. If you want to copy alignment, indentations, etc., you'll have to go to Paragraph in the Home tab and click
 so the paragraph mark shows up after a paragraph. Copy and paste that, as well as your text.
Insert Calendars
You can also insert calendars into your publications.
To do this, click the Insert tab and click on Calendars.
You'll see different types of calendars displayed in the drop-down menu. Select one of those, or click More Calendars.
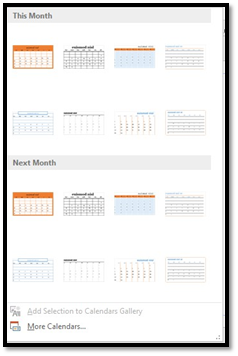
You can insert this month or next month. Click on the calendar you want to insert.
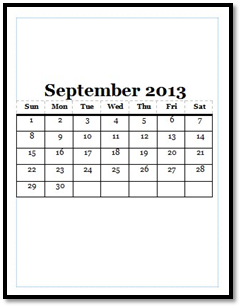
You can then move it around the publication.
To re-size it, double-click the outer bounding box of the calendar. You'll then see this:
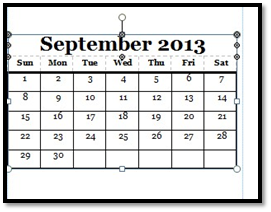
You can right-click on the calendar and select Change Text from the drop-down box to change the font used in the calendar. You can also use the selections in the drop-down menu to add or delete rows or columns in the calendar.
Insert Advertisements
If you want to insert advertisements into your publication, go to the Insert tab and click Advertisements.
You'll see a drop-down menu that contains advertisements. Click on More Advertisements to see more than Publisher 2013 offers.
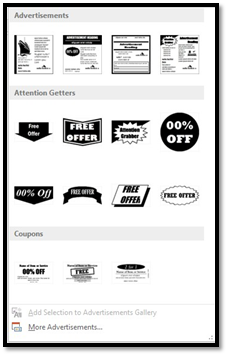
Select if you want to insert the logo, then click Insert to insert the ad.
Re-size the ad to the size you want for your publication by dragging the handles.
You can click on the text to replace the text. If you want to replace any graphics, you can click on it to select it, delete it, and then insert your own, by inserting an image using the Graphics Manager.
Insert Page Parts
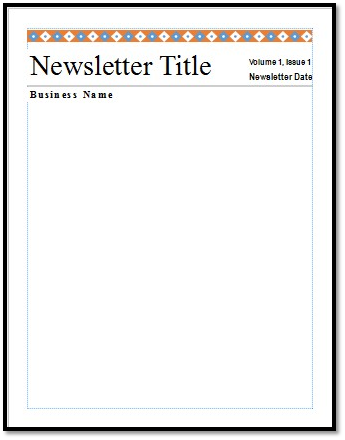
You can also insert different parts of a page, such as headers, accessory bars, and response forms. To do this, go to the Insert ribbon and click on Page Parts. Select More Page Parts.
You'll see this window:
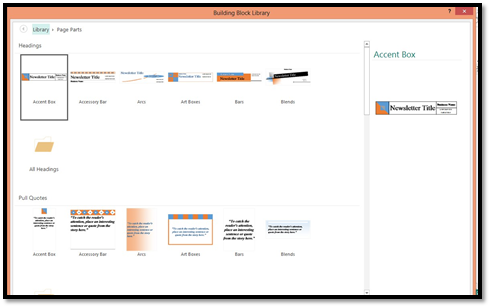
Choose the page part you want to insert, then double-click to select it. We chose a heading.
Paragraphs Formatting Within Text Boxes
We already examined the ways in which you can format and align your text, but let's now look at the paragraph level formatting options.
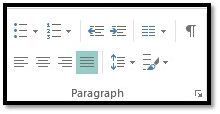
Unlike-character level formatting, most of the paragraph formatting options can only be found on the Home tab in the Paragraph group.
Creating Bulleted and Numbered Lists
The types of lists you can create are really simple and easy to remember. Bulleted lists have bullet points and numbered lists have numbers. We're going to learn how to create both.
- If you want to create a list with existing text:
- Select the text within a text box that you want to use to make a list.
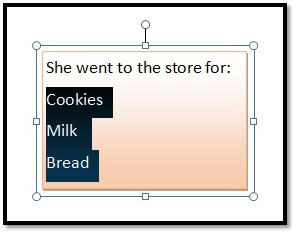
(Note: Above is an example of a bulleted list.)
In the example below, we've selected the text that we want to turn into a list.
Next, click on the Home tab and go to the Paragraph tab. Select either the bulleted or numbered list button, whichever you need, as pictured below.

(You'll notice that the first button is for a bulleted list, the second for a numbered.)
We chose bullets.
Choose a bullet style from the drop-down menu.
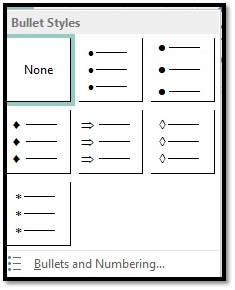
The bullets are added to your list.
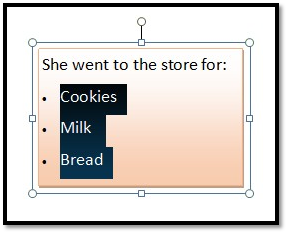
When creating a new list:
- Put the cursor in the publication where you want to create the list.
- Click either the bulleted or numbered list button.
- Start to type.
(Note: Above is an example of a numbered list.)
Paragraph Alignment
As with all word processing programs, you can arrange text to the left, right, center -- or justify it. You can do one of these things to a portion of text, or to the entire publication.
This is an example of text that is aligned to the left.
This is text that is aligned to the right.
This text is centered.
The following text, selected from this lesson, is justified so that it is aligned between the left and right margins, adding space between letters, if necessary. It gives the publication a clean look.

The buttons or commands for aligning text are located under the Home tab in the Paragraph group, as shown below.

In the above picture, the center alignment button is highlighted. To the left of it is the left align button � and to the right, the right align button. On the other side of the right align button is the justify button.
When you justify a paragraph, both the left and right sides of the paragraph are flush with the margins. It gives it a block look.
The text below isn't justified:

Here's what happens when we justify text:

To use these, simply select a method of formatting as we described in the last section, and click on the appropriate button.
Setting Line Spacing
When you change the line spacing, you change the space that appears between every line of text in a paragraph. Publisher adds the space below each line.
To set line spacing, go to the Home tab, then to the Paragraph group. Click the  button.
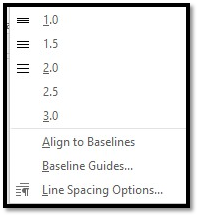
You'll then see line spacing values. 2.0 represents double space. 1.0 represents single space. If you don't see the spacing you want, click Line Spacing Options.
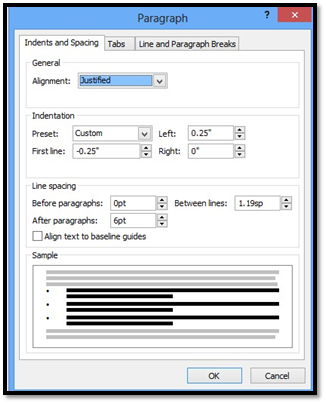
Paragraph Spacing
If you want to start a new paragraph within a text box, just press the Enter key on your keyboard. But what if you want to add more space between paragraphs? Of course, you can push the Enter key more than once. Yet why bother when you can also set spacing between paragraphs.
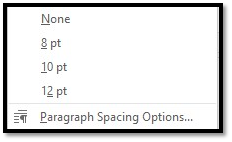
To add space after a paragraph, click the  button in the Paragraph group. Select your spacing from the drop-down menu.
Indent Paragraphs
You can indent paragraphs inside text boxes using these two buttons in the Paragraph group under the Home tab: 
The button on the left decreases in the indention of the paragraph.
The button on the right indents the paragraph.
Set Tabs
Tabs are not quite the same as indents. You may remember setting the tab stops on your typewriter, and then using the tab key to do everything from indenting the first sentence of a paragraph to creating bullet points or numbered lists. Those days are long gone. The truth is, you could use a word processor for years without ever using the tab key. You don't really need it anymore. The word processor automatically indents the first sentence, and the bullet list and numbered list buttons allow you to easily indent those.
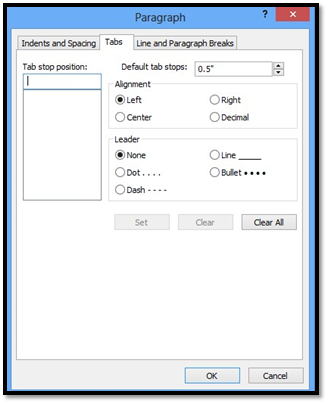
If you do need to set tabs, go to the Home tab, then click the arrow in the lower right corner of the Paragraph group to launch the Paragraph settings window. Click the Tabs tab. Type a value into the Default tab stops field, then click OK.
Use Styles
Styles are simply character and paragraph attributes you can apply easily to your text. We encourage anyone working with electronic text to use styles. They usually work across platforms, and make it easy to create things like tables of contents.
What's more, you can change the attributes of a style, and every block of text that style was applied to will automatically adjust to reflect those changes.
Styles can be created for headlines, subheadlines, body text, sample text, and more.
To apply a style to any text, go to the Home tab and locate the Styles button. It looks like this:

Click it to see the available styles, or to create your own.
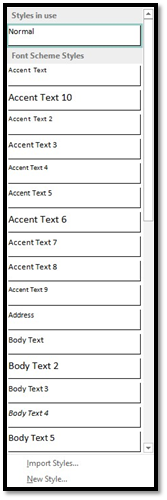
As you can see in the example above, Publisher comes with a bunch of predefined style sets. If your are not satisfied with those styles, you can import them from another program, such as MS Word, or you can create a new one. When you click New Style, you will see a window like this:
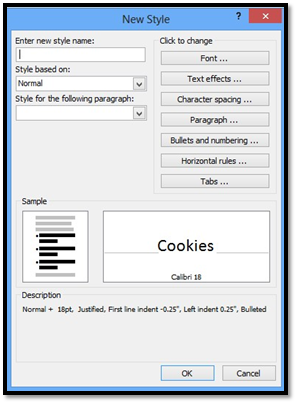
Here you can enter a name for the style, select the font, character spacing, paragraph format, and more. Click OK when finished.
To modify any style, you can click the Style button, then right-click on any style, and select Modify. Then enter your new values and click OK.
Wrap and Position Paragraphs of Text Around Images
Publisher 2013 can also wrap paragraphs around a picture, graphic, or share, as in the example below.
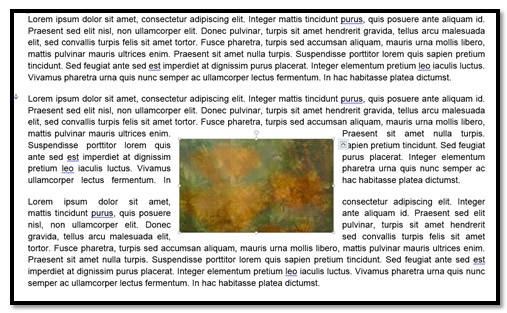
To wrap text around an image, double-click on the object. The Picture Tools Format tab will appear in the Ribbon. Go to the Arrange group. Click the Wrap Text button.

Choose how you want to arrange the text.
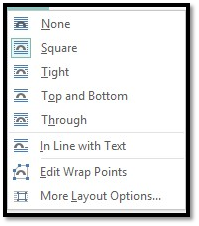
Square means your image sits on the same plane as the text. The text flows around the image is a square pattern.
Tight text flows around the image, hugging its shape. If you insert a circular shape, the text will take a circular pattern around the text.
Through means that the text will flow around the image as best as possible.
Top and Bottom means text will appear on top of the image and at the bottom.
In Line With Text is the default wrapping style.
Creating a Catalog
Instead of telling you what creating a catalog means in Publisher, we're going to show you how it works. Let's say you are a retailer with 24 high-quality hair care products and you want to create a catalog for them. You're going to want three items on each page because you need room for the price, pictures, and description. That comes to eight pages in all.
The hard way would be to design eight separate pages and manually enter everything using the techniques. The easy way would be to compile your product list, then create a single template using the Catalog tools. When you are finished, Publisher will automatically take all of the information in your product list, and insert it into your template, creating eight individual pages, with three products on each page.
Let's see how it's done.
Create a publication or open an existing one. If you are creating a new publication from scratch, you will probably want to add a few extra pages for the cover and other interior pages. When you're ready to create your catalog, select the page you want the catalog to begin on, then click the Insert tab.
The Catalog Pages button can be found on the far left, in the Pages group.

Go ahead and click the Catalog Pages button. This will open the Catalog Tools Format tab, as illustrated below. If this is the first time you've used catalog pages in the current publication, most of the buttons will be grayed out and inactive. They will remain this way until you create or select a data list.

Creating a Data List
Click the button on the far left, called the Add List button.

Here we have the option of creating a new list, using an existing one, or choosing a list from our Outlook Contacts. Since we're going to be making a catalog of shampoo products, we're obviously not going to use our Outlook Contacts.
Click the Type New List option.
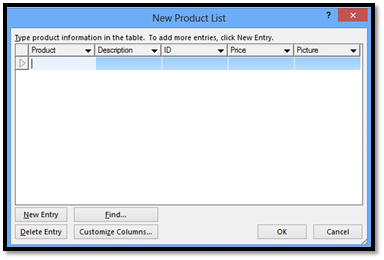
Here we have the opportunity to create our list from scratch. To add an item, click the New Entry button. This activates a new row. Click the first cell of the row, type in your information, then hit the Tab key to jump to the next cell, and so on.
If the column headings at the top of the list aren't appropriate for you, or you'd like to add more fields, click the Customize Columns field. Publisher will tell you that before you can continue, the list you are making must be saved. It will ask you if you want to do this now. Click Yes.
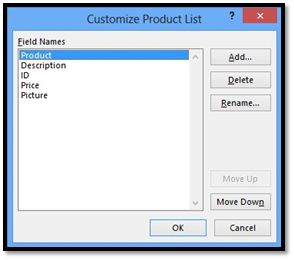
The buttons on this window are pretty much self-explanatory. You can rename a field by selecting it and clicking the rename button. You can add or delete items, or move them up or down in the list. Click OK when finished. This will return you to the previous window.
You may notice the field titled "Picture." Here you cannot use an actual image. Instead, you must use the address of the image. For instance, if the image is located on your computer, in your publications folder, the address of the image might be "C:\User\Your Name\Documents\Picture Name".
Click OK when finished adding all of your products. Publisher will then ask you where you want to save the list, and what you want to call it. Type in a name, select the location, and click OK.
Using an Existing Data List
Now let's go back and look at the Use Existing List option.
With this button you can use any data list you've already created, either with Publisher, or Access or Excel or any other compatible spreadsheet program. Clicking it will open a window asking you to locate the file on your computer.
Once a file is selected, the list will open in a new window. If you use Excel, it will ask you to confirm the worksheet you want to use:
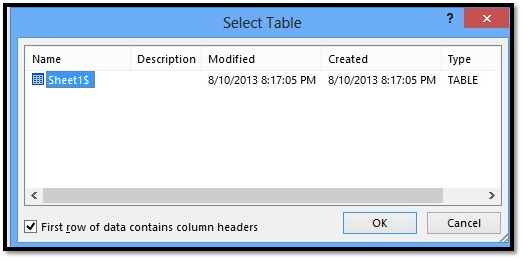
Click OK.
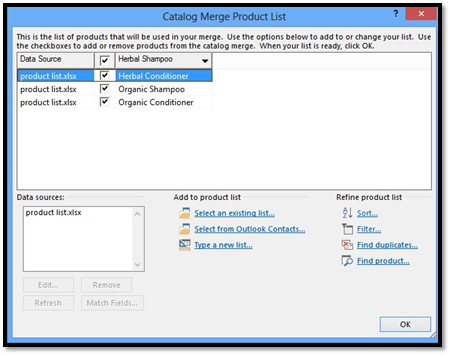
In this window, you have the opportunity to review the items in the list, as well as select which items you want to include in your catalog. In the example above, the items with a check mark indicate items that will be included. Uncheck the box on items you don't want to include.
Now look below at the Data sources box. This shows you what list you are using. Selecting it will make the Edit, Remove, and Refresh buttons active.
The Match Fields button allows you to match fields in your data list with fields available for your catalog merge. For instance, the data field in an Excel spreadsheet might simply be named "Field A". This button allows you to identify Field A as "Product," "Description," or any other customized field.
Once you've created your list, or selected one, it is time to create your catalog pages. Click OK.
In the Navigation Pane on the left side of your publication, you'll see something like this:
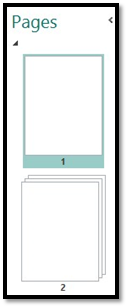
That group of pages labeled "2," represents your catalog. You can add individual pages before it or after it, and you can even move two around as a group, as if it were only a single page. You can also delete it just like any other individual page.
Creating a Catalog Page Template
As we said at the beginning of this section, what you're going to do is create a template that Publisher will use as a guide for entering all of the information in your list.
After you create your list and activate the Catalog Page features, you're going to see something like this on the page:
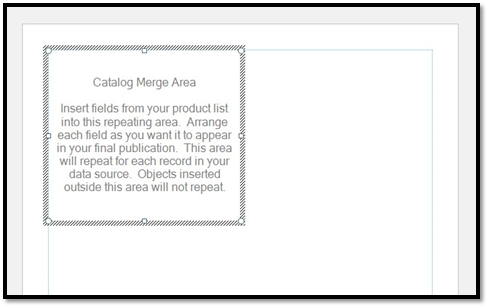
This is the default Catalog Merge area. As stated earlier, though, we're going to want three products per page, so we're going to select that layout from the Layout section of the Ribbon.

Publisher has 10 predefined layouts for you to use. You can select any layout at any time, even after you've entered your merge fields, and Publisher will automatically make the adjustments.
You can also create your own layout by using the Rows and Columns button on the right of the layouts.
Adding rows and columns with this tool is just like inserting a new table. Just remember that each cell essentially represents each item in your list.
The Fill Order button lets you decide how Publisher should fill each of those cells, either across then down, or down then across.
The Repeating Areas option lets you choose the way in which the merge areas are repeated. Look at the example below.
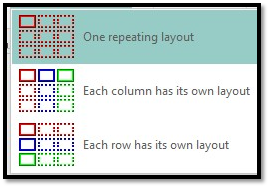
Now that we've selected a layout, we can enter our fields.
To the right of the Layout group on the ribbon, we will find the Fields buttons. This button gives us access to the fields in our list that we created earlier:
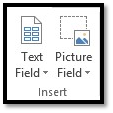
The text fields will appear in your publication as placeholder text. For instance, if we were to click on the Product field, it'd appear in our publication as <<Product>>. This represents all of the information that was entered into the Product field of the list we created earlier.
The section at the top represents the template. Note the placeholder text. The second section shows you what the catalog entry looks like when the placeholder text has been substituted with field entries. Publisher does this automatically.
You can use the text tools to change any of the attributes of the placeholders. For instance, if you increase the font size of the <<Product>> placeholder, the font size in each subsequent entry will also change automatically.
You can also add pictures and other objects. Just remember, anything you put in the merge field will show up in every other field.
To the right of the Catalog Tools Format tab of the ribbon, you'll find the Preview Page group.
From here, you can preview the results, locate any entry, and even exclude a selected entry from the catalog.
Merging the Catalog
It is now time to merge the catalog. This is the part of process that Publisher creates all of the individual pages it needs in order to display all of the items in your list.
On the far right of the ribbon, you will find the Merge group. You can elect to merge your catalog into a new publication, add it to an existing one, or just print it.
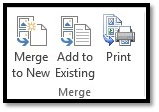
Clicking Merge to New creates an entirely new publication based on the publication you originally created the catalog for. Publisher automatically inserts all of the necessary pages into your publication.
If you were to click the Add To Existing button, Publisher would give you the opportunity to locate the publication on your computer and select it. It would then enter all of your catalog entries into that publication, creating as many pages as necessary.
The Print button creates the pages and allows you to print them. You can also preview the pages before printing.


