
In addition to typing an email into Outlook, you can also format an email in much the same way as you would format a document in MS Word, or any other word processing program. This means you can change the font type, size, and color; add bullet points; add indentions; and even apply styles.
Applying a Font
You can apply a font to either an entire email or parts of an email -- the choice is yours. To apply a font, click on the Format Text tab in the email message (not in the main Outlook interface). You'll see the toolbars, or groups, as pictured below.

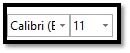
The type of font you're currently using will appear. In the picture above, the type of font is Calibri. You can click on the arrow in that window to display other types of fonts available to use.
To change the type of font within an email, or for the entire email, simply select the text to be formatted, then select your new font. It's really that easy.
Here, we've selected our text:

Now we can use the drop-down menu to change the type of font. Perhaps we want Verdana or Times New Roman.
Changing Font Size
Next to the type of font is a box that states the size of font currently being used. Using the picture above, the font size is 11.
Once again, you can use the down arrow key to either enlarge or reduce the font size. To change the size of the font, simply select the text you want to change, then select the new font size. You can change an entire email, or just a portion -- the choice is yours.
You can also use the two uppercase A's beside the font size box to change the size of fonts you're currently using.

Pushing the larger A will increase your font size by one for each time it's clicked. On the other hand, clicking the smaller A will decrease the font size by one for each time it's clicked.
Font Attributes
You may want to select text to boldface, italicize, or underline a section of text. The boldface command in Outlook 2013 is represented by an uppercase, boldfaced B. Italics are represented by an uppercase, italicized I, and underline by an uppercase U with a line under it. These buttons are located directly below the font type window.
To add italics, boldface, or underlining to any portion of a text within an email, select the desired text, then click the appropriate button (B for boldfaced, I for italic, or U for underline.)

Next to the commands for boldface, italics, and underlining, you'll see an "abc" with a line through it. (ABC) This is for strike-through. When clicking on this button, it will put a line through any text you have selected.

Next to the strike-through command, you'll see "X2." This simply puts smaller text below the text line of the normal text. This command was used when typing X2. X2 is just the opposite, putting smaller text above the text line. This makes creating footnotes easier than it had been with previous versions of Word.
The uppercase A and lowercase A that are situated side by side ( ) allow you to change the case of selected text. You can change from lowercase to uppercase or vice versa , toggle tHe CaSe, or select other common capitalizations.
Font Color
Changing the font color is as simple as changing the font. Look for the uppercase A with a black bar under it, as pictured below.

Select your text, then click on the button to choose the color you want to apply to the selected text.
You can also highlight selected text. To the left of the font color button, you'll see a lowercase "ab" with a marker near it. It is highlighted in yellow. Simply select the portion of text you want to highlight, click the button, and select the color of highlight that you want to apply.

Clear Formatting
To clear formatting within an email or a specified portion of text, simply select the text, then click on the "A" with the eraser beside it. It's located to the right of the two uppercase A's that allow you to increase or decrease font size. (See the picture below.) By selecting the text and clicking on this button, it will remove all formatting done to the text and leave you with the default font and font size for the email.

Text Alignment
As with all word processing programs, you can align left, right, center, or justify your text. You can do one of these things to a portion of text, or to the entire email.
This is an example of text that is aligned to the left.
This is text that is aligned to the right.
This text is centered.
The following text is justified so that it is aligned between the left and right margins, adding space between letters if necessary. It gives the email a clean look.

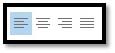
In the picture below, the left alignment button is highlighted. Beside it is the center, then right, and then justify alignments. To use these, simply select the text you want to align, and click on the appropriate button.
Line Spacing
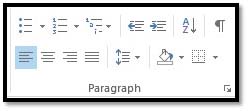
When you change the line spacing, you change the space that appears between every line of text in a paragraph. Word adds the space below each line. To set line spacing, go to the Format Text tab, then to the Paragraph group. Click the  button.
You'll then see line spacing values. 2.0 represents double space. 1.0 represents single space. If you don't see the spacing you want, click Line Spacing Options.
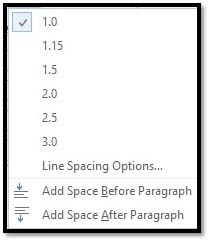
Enter your values for line spacing in the box, then choose a line spacing method, as described below:
- At Least is a minimum value. However, Word can ignore this value and add more space if it's necessary, so it can make room for bigger fonts or graphics that appear on the same line as the text.
- Exactly means Word doesn't adjust spacing. It gives the exact line spacing that you specify.
- Multiple is what you should use to enter line-spacing values that aren't listed in the Line Spacing drop-down list, which we showed you earlier. If you want to set the line spacing to 4 in the At box, choose Multiple.
Deleting Text
You can delete text by using the Backspace and Delete keys. But you must remember that Backspace removes characters to the left of the cursor, and Delete removes characters to the right.
To delete blocks of text, select the text to be deleted and press either the Backspace or Delete key.
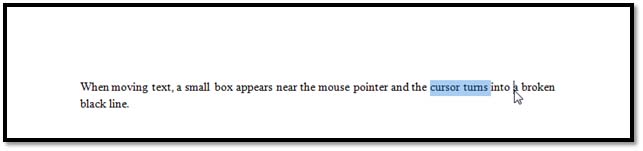
Moving Text
You can move selected text by holding the left mouse button and moving the cursor to the desired location in the email. When moving text, a small box appears near the mouse pointer and the cursor turns into a broken black line. You position the cursor in the place you want the text and release the left mouse button.
Bulleted and Numbered Lists
The types of lists you can create are really simple and easy to remember. Bulleted lists have bullet points, numbered lists have numbers, and outline lists can contain letters and numbers. We're going to learn how to create all three.
- If you want to create a list with existing text:
- Select the text you want to make a list.
(Note: Above is an example of a bulleted list.)
To create a list, select either the bulleted or numbered list button, whichever you need, as pictured below.
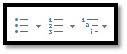
(You'll notice that the first button is for a bulleted list, the second for a numbered, and the third for an outline.)
When creating a new list:
- Put the cursor in the email where you want to create the list.
- Click either the bulleted or numbered list button.
- Start to type.
(Note: Above is an example of a numbered list.)
Creating a Nested List
A nested list is defined as a list with several indentions in the text. Nested lists are often used for outlines and looks like the example below:
- Creating a list is easy.
- First you decide what kind of list you want.
- Bulleted
- Or Numbered
- First you decide what kind of list you want.
To create a nested list as the one above, click  to select the type of nested list you want, then use the
  to create an indention by placing the cursor at the beginning of the text to be indented, then clicking the bullet button
 .
.
Format Your List
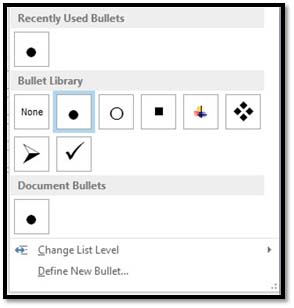
You can change the formatting of the bullets or numbering by using the arrow beside the bulleted or numbered list button, then making a selection from the drop-down box.
Below is a picture of the different formats for bullets you can choose from:
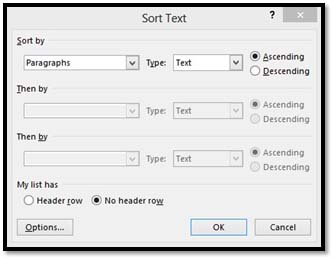
Sorting Lists
Once you create a list, you can also sort it alphabetically, either ascending or descending. There's no need to worry about putting things it alphabetical order as you type. Outlook 2013 will do it for you.
To do this:
Create your list as outlined in the steps above.
Select the list or parts of the list to be alphabetized
Click and complete the dialog box. (Default will sort your list descending.)
It's really that easy, as shown with the example list below.
The original bulleted list looked like this:
- Mango
- Orange
- Apple
- Fig
- Grape
- Apricot
But when you select the text in the list, then click , the list is alphabetized for you.
Take a look:
- Apple
- Apricot
- Fig
- Grape
- Mango
- Orange
You can sort paragraphs of text or lists using the sort ascending, or sort descending, button .
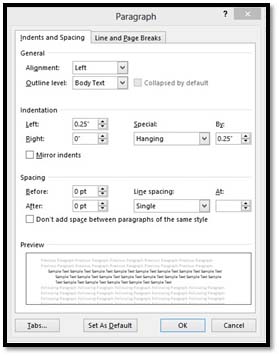
Indenting Paragraphs
Indenting paragraphs simply allows you to set different margins for different lines of text.
You have several options for indenting paragraphs:
- First line : This controls the left boundary for the first line of the paragraph.
- Hanging : Controls the left boundary for every line in the paragraph except the first one.
- Left : Controls the left boundary for every line in the paragraph.
- Right : Controls the right boundary for every line.
To indent paragraphs, you have two different options:
Option 1 : Go to the Format Text tab on the Ribbon. Select the indent buttons in the Paragraph group. They are pictured below.

These allow you to indent left or indent right. The indention increases each time you click on the button.
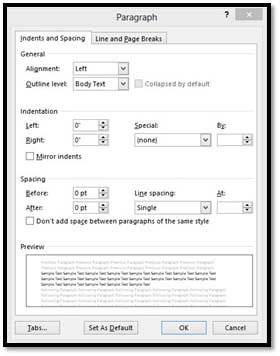
Option 2 : Click the arrow on the Paragraph group options button at the bottom right side of the paragraph group: . Click the Indents and Spacing tab. From this dialog box, you can set indentions.
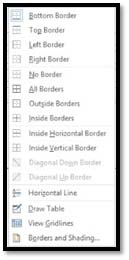
Add Borders or Shading to a Paragraph
Just as you can add a border or a color to an entire page, you can also add a border or color to an entire paragraph, or a group of paragraphs.
To do this:
Select the Format Text tab on the Ribbon.
Click the Borders button in the Paragraph group.
A drop-down menu will open and allow you to select what type of border you want.
Apply Paragraph Styles
Style refers to the format of your paragraph. Outlook offers several quick styles that you can use. These include headings, no spacing, subtitles, emphasized text, list paragraph, etc. To apply a style, go to the Format Text tab on the Ribbon and go to the Styles group. You'll see some styles in white boxes (as pictured below). You can scroll through these styles to find one you want to use, or you can click the arrow in the Styles options to select the one you want.

Below are some different styles applied to text.
Subtle reference : The girl ran to the store to get some bread for dinner.
No spacing : The girl ran to the store to get some bread for dinner. (This style leaves out any spaces between lines that may have been inserted in prior paragraphs.)
Paragraph list : The girl ran to the store to get some bread for dinner. (Note the indention in this line that would signify a list.)
Heading 1: Used for chapter titles and section titles.
Heading 2: Used for sub-section titles.
Getting to know the different styles and what they do to your text is a matter of using Outlook 2013 frequently.
Note: You can also apply a style to an entire email or individual lines, as well as paragraphs.


