How to Create and Format in OneNote 2013
Since OneNote is a note taking program, it just makes sense that learning to add text will be one of the most important things you learn to do. In this article, we're going to show you how to add text, then format it with font attributes and styles.
Adding Text
In most word processing programs, such as MS Word, you can add text to a document by typing once the cursor appears. You start at the top of the page and work your way down. You can hit Enter to start typing further down on the page if you want, but the cursor starts at the top. In addition, you can add text boxes if you want. Text boxes are boxes that contain text. You can resize, drag, and drop these text boxes. Honestly, it gets complicated.
The good news is that OneNote 2013 is nowhere near that complicated.
The first thing you need to know about adding text to OneNote is that you can type anywhere on the page. Just click on the area where you want to type and start typing. It doesn't have to be at the top of the page, and you do not have to hit Enter to move further down. Just click and type. It is that easy.
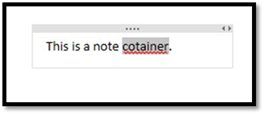
Now, as you type, your text will be put in what's called a note container. A note container is sort of like a text box. With your text in a note container, it will make it easier to move it around later if you want.
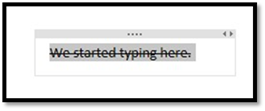
That said, if you have OneNote 2013 open right now, just click anywhere on a page and start typing.
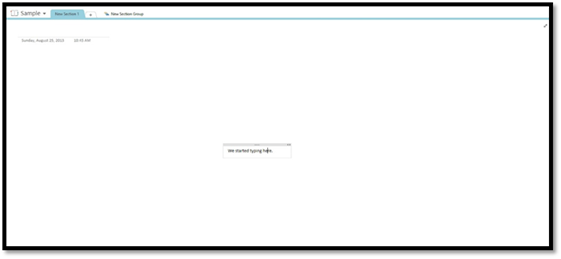
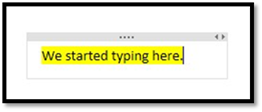
In the snapshot above, you can see our text in the note container.
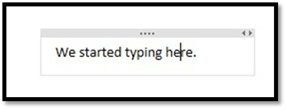
Let's take a closer look at the note container.
Selecting Text
Once you type text into a note container, you can format it. Formatting is adding a font type, such as Times New Roman, Ariel, or Calibri, adding bold or italics, changing the font size, etc. � as well as other font attributes.
To format your text, first select it so it is highlighted. Selecting text in OneNote 2013 is easy. Look at the note container in the snapshot above. You can click your mouse in the grey bar at the top of the note container to select ALL the text within the container. See the snapshot below.
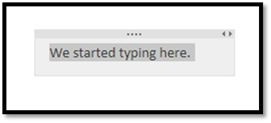
You can also select all the text within a container by clicking the little arrow to the left of the note container, as shown below.

This will also pull up a toolbar that you can use to format text and perform other texts.
You can also select text by clicking your mouse within the text. When you see the cursor appear, click and drag over the text that you want to select.
Formatting Text in Note Containers
Once you have your text selected, you're ready to format it. Go to the Basic Text group under the Home tab. It is pictured below.
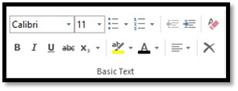
The Basic Text group allows you to apply basic formatting to your text. Let's cover the different formatting options available to you in this group.
Change Font Type and Size
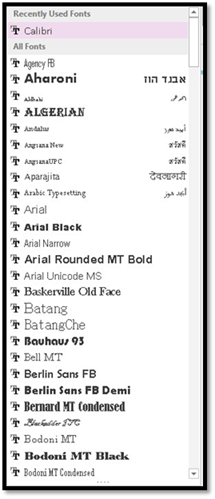
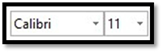
The first thing you can do is change the font type. As you can see in the snapshot above, the current font type is Calibri. By clicking the dropdown arrow to the right of Calibri, you can see all your other font type options.
Next to the font type, you can change the font size. As you can see, the current size of our font is 11.
Bold, Italics, and Underline
Just as with other Microsoft Office programs, you can also boldface, italicize, and underline text.
To add these types of formatting, first select your text.
Click the  button for boldface, the
  button for italics, and the
  button for underline.
Highlight Text and Change Font Color
Again, start out by selecting the text. Click the  button to highlight text, as shown below. The dropdown menu beside the button allows you to choose what color you want to use to highlight the text.
The  button enables you to change the font color. Just select your text, click the button and select the color of font you want from the dropdown menu. The font color is then applied to the selected text.
Strikethrough, Subscript, and Superscript
Next to the commands for boldfaced, italics, and underline, you'll see an 'abc' with a line through it. (abc) This is for strikethrough. When clicking on this button, it will put a line through any text you have selected.
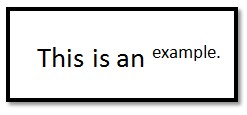
Next to the strikethrough command, you'll see 'X2'. This simply puts smaller text below the text line of the normal text. This is called subscript.
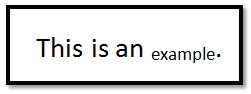
This command was used when typing X2. X2 (or Superscript fount in the Subscript dropdown menu) is just the opposite, putting smaller text above the text line.
Aligning Text
If you've used other word processing programs before, you know what it means to align text. You can align text three ways:
1. To the left margin (align left)
2. To the right margin (align right)
3. Centered between the two margins (center)
To align text in OneNote 2013, select the text that you want to align.
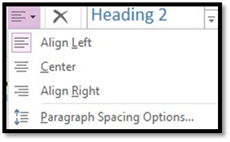
Next, go to the Home tab to the Basic Text Group. Select the Align button as shown below and choose how you want to align your text from the dropdown menu.
Creating Lists
You can create lists of items in OneNote 2013. Maybe you will list names of flowers or items you need at the grocery. OneNote gives you the ability to create two different types of lists: bulleted or numbered. We'll teach you to do both.
Go to the Home tab. In the Basic Text group, click Bullets  . Click the downward arrow beside the bullets to choose what type of bullet you want to use.
Now type the text that will appear by your first bullet.
Hit enter to type in the next bullet, as shown below.
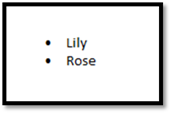
When you are finished, hit Enter twice to end the bulleted list.
To create a numbered list, begin like you did a bulleted list by clicking the place on the page where you want the numbered list to appear.
Next, click the Numbered List in the Basic Text group. ( ) Again, you can click the downward arrow to select how you want the numbers to appear.
Type the text on your page for the first numbered item. Hit Enter to type in another numbered item.
Press Enter twice to end the numbered list.
Indents
You can also indent the text in your note containers. You can increase the distance of the text from the right margin or decrease it.

The button (pictured above) on the left decreases the distance. The button on the right increases it.
Adding Styles to Text
Applying Styles
A style is what you apply to text. Headings are an example of a style. You use headings to create a table of contents in MS Word. That said, OneNote has very basic styles and not the broad variety that you find in other programs. However, that's to keep things simple. OneNote was intended to be simple.
You find styles by clicking on the Home tab and going to the Styles group on the ribbon. We've pictured it below.
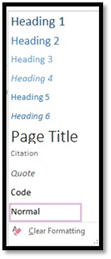
To apply a style to text, highlight the text, then click the appropriate style that you want.
Cut, Copy, and Paste
You can also cut, copy, and paste text from one page to another or from an outside source (such as Internet Explorer) into a page of your notebook.
Remember, when you cut text, you remove it from its current location. When you copy text, you make a copy of it.
After you cut or copy, you can then paste whatever you've cut and copied into your notebook.
In this article, we're going to focus on copy and paste.
To copy text, first select the text that you want to copy. We're going to copy this paragraph and paste it into our notebook.
After you've selected the text, right click and select Copy. If you are copying from a page in your notebook, you can also go to the Home tab and click  in the Clipboard group.
Next, click the place on the page where you want to paste the text. Now, right click and select Paste or go to the Clipboard group and click Paste  .
.
You will then see these options in the dropdown menu:

Let's learn what each of these buttons mean.
The first one on the left is to keep source formatting. This means if you copy something that is in Times New Roman size 12, when you paste it, it will remain in Times New Roman 12, even if the text or notes on the page you paste to are in Ariel.
The second one from the left, the one with the little blue arrow, is to merge formatting. If what you copy is Times New Roman, but the text/notes on the page that you paste to has the majority of text in Ariel, whatever you paste will be pasted in Ariel. In other words, it makes it match the majority.
The third is text which pastes it without any formatting.
The last one (on the far right) is to paste a picture.
Add Handwritten Notes
If you have a pen-input device on a Tablet PC or other compatible computer, you can also handwrite notes. To do that, click the Draw tab, then select a pen from the Tools group.

You can then handwrite notes anywhere on the page that you want. If you want to switch back to typing, click Select & Type on the Draw tab in the Tools group, as pictured above.
Translating Handwriting to Text
If you handwrite something in your notes, it may be hard to read � or you may worry that others won't be able to read it. For that reason, you can use OneNote 2013 to translate your handwriting in OneNote 2013 to text.
To do this, first add a handwritten note to your notebook, as we've done below.
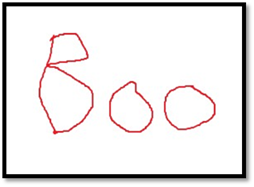
You can simply use your mouse if you don't have a touchscreen device, go to the Draw tab, then select a pen to write with. Select a blank area of your notebook and start writing.
Once you're finished, go to the Ink to Text button under the Draw tab. It looks like this:

Click on the button.
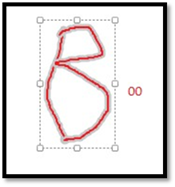
As you can see below, it translated two of our letters � the two o's from the word boo. It didn't translate the B.
Sometimes OneNote 2013 doesn't recognize letters. If this happens to you, use the Lasso Select tool under the drawing tab. It looks like this:

Use the tool to select the text that didn't translate.
Right click on the selected text and choose Treat Selected Ink As>Handwriting.

Now click the Ink to Text button.
If that doesn't work, you'll have to enter the text manually.
Calculator
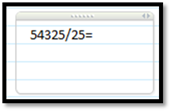
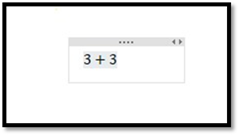
You can also use OneNote 2013 as a calculator. Let's say you are typing notes onto a page about your finances. You want to figure out what your monthly payment is going to be on a car. Instead of pulling a calculator out of a drawer or opening the calculator on your computer, just type the equation into OneNote, as shown below:
Push Enter.
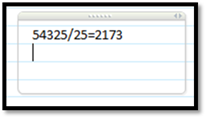
The answer appears.
Remember:
-
Use / for division
-
Use * for multiplication
-
Use + for addition
-
Use � for subtraction
Handwritten Equations
In OneNote 2013, there is a handwriting tool that lets you write the equations that you want to insert into a page just as easily as you inserted handwritten notes.
To access this tool, go to Draw, then Ink to Math in the Convert Group.
You will then see the Insert Ink Equation dialogue box.
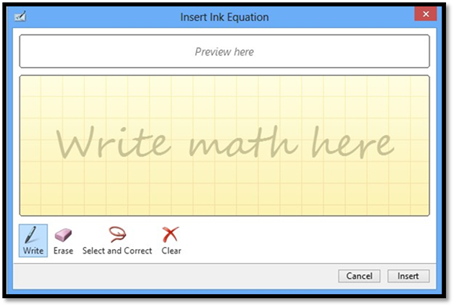
Write the equation using your mouse. Use the eraser and the "Select and Correct" button to remove things that have been written incorrectly. It may take several tries until OneNote recognizes the correct number you are trying to write.
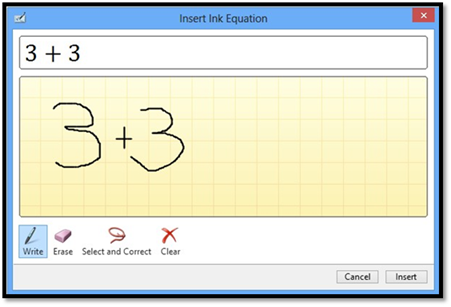
Click the Insert button to insert it onto your page.
This comes in handy when you want to write an equation with a lot of symbols that you may not see on your keyboard. It can be quicker to use this tool than to search for them in Character Map (on your computer).
Equations
In the last section, we learned how to draw equations on our pages. Now let's learn how to actually insert even complex equations using OneNote.
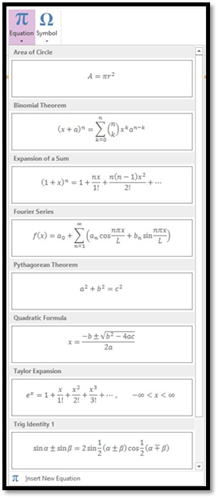
Go to the Insert tab and click Equation in the Symbols group.
You can choose an equation from the dropdown menu or choose Insert New Equation.
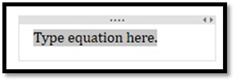
When you select Insert New Equation, this will appear on your page:
Once you select an equation or tell OneNote that you want to insert a new one, you'll see the Equation Tools Design tab appear in the ribbon appear, as shown below. As you can see, you can also ink an equation (like we did in the last section) from this ribbon.

If you're inserting your own equation, OneNote provides symbols, fractions, and everything you'll need to structure and write your equation.
Take some time to play with building and writing equations. It can be fun to do and helpful to be familiar with when you start creating notebooks. Click in the equation on the page to replace letters with numbers and create an actual equation that can be solved.
However, it should be noted that all OneNote 2013 does is write equations for you. It does not solve them.
If you want OneNote to also solve your equations, you can download a Mathematics Add-In for OneNote 2013 from Microsoft.
Check Spelling
Spell Check is a feature that is common to all of the MS Office family of products. Spell Check enables you to go through your notebook and correct common typos and spelling mistakes using OneNote as your proofreader. When you run Spell Check, OneNote finds errors for you, suggests corrections, and then either makes or ignores the suggested changes for you. It can also correct grammatical errors. You can use Spell Check at any time. You do not have to be finished with a page to use it.
You can locate Spell Check by clicking the Review tab, then the Spelling button in the Spelling group.

When you click on it, the Spelling Pane will appear:
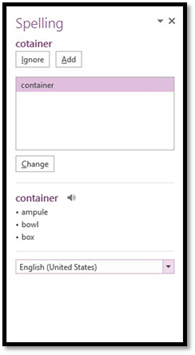
OneNote found a typo on our page. If you look at the actual typo below, you will notice a red, squiggly line underneath it. This is OneNote's way of letting us know we made an error � before we even do the Spell Check.
Now, let's go back to the Spelling Pane.
We have two choices with the word listed under Current Spelling.
OneNote is telling us that it is spelled wrong. We can ignore OneNote and keep it spelled the way that we have it. Click the Ignore button to do this. This will make the red squiggly line go away on our page too. Or we can tell OneNote that the word is spelled correctly and add it to the dictionary. Click Add to do that.
Now, on the other hand, if we agree with OneNote that we've spelled it incorrectly, OneNote offers spelling suggestions. We can pick one of those suggestions simply by clicking on it, then clicking on the Change button.
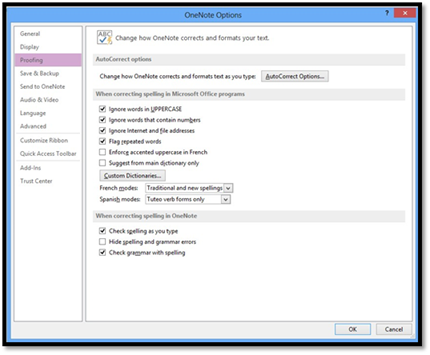
If you click the File tab to go to the Backstage View, then click Options on the left, you can specify how OneNote corrects your errors when you use Spell Check.
To do this, click the Proofing tab on the left.