To start to use these features, click within the body of an email you're creating. Click the Insert tab.

Insert a Calendar
Calendars are a helpful aspect of Outlook, and we're going to learn all about them shortly. For now, let's show you how to insert a calendar into the body of an email.
Start by clicking within the body of the email to see the cursor.
Go to the Insert tab and click the Calendar button.
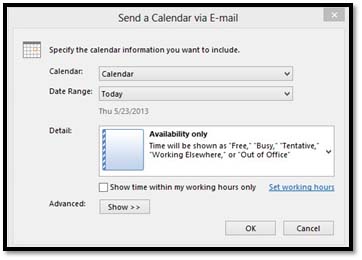
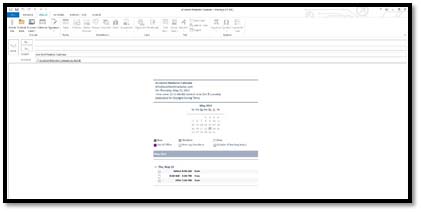
Choose the calendar you want to use, then click OK.
Inserting Tables
A table looks like a miniature spreadsheet. You can insert these into your emails using the Table button on the Insert tab (pictured above).
Let's learn how to insert one into an email. To do this, position the cursor at the point in the email where you want to put the table. Don't worry if it's not exactly right -- you can always move or manipulate it later.
Click the Tables button.
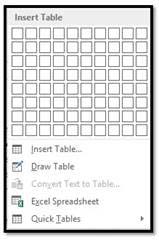
You'll see a bunch of boxes at the top.
The easiest way to insert a table is to drag your mouse over the rows and columns until you have the amount you want.
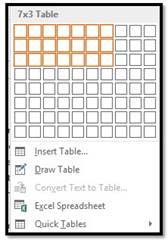
As you can see above, we dragged our mouse to make a table that has seven columns and three rows, or 7x3.
As we drag, the table appears on our email:
We now have a basic table. So let's identify the parts.
Each box that you see in a table is called a "Cell." There are 21 cells in the table above.
The "Rows" go from top to bottom. There are three rows. Rows go horizontally across the screen.
Columns go from left to right. There are seven columns above. Columns are vertical.
So now that we've identified the parts of a table, let's take a look at the other ways in which we can add them.
Using the Insert Table Dialog
Once again, we're going to move the cursor to the point in the email where we want the table to appear. Now go back to the Insert tab, click the Table button, and select "Insert Table" instead of dragging your mouse over the boxes, (which really represent cells, as we just learned.)
A dialog launches in the center of your screen. It looks like this.
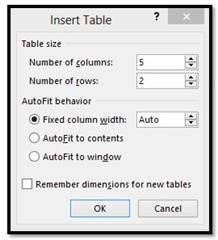
From here you can select the number of rows and columns. In this example, there are going to five columns, and two rows. Select your preferences in the AutoFit behavior section. You can set a fit column width, make the width of the cells and table fit to the content, or make the table size fit to the window.
Click OK.
Drawing a Table
If you know your table is not going to be uniform (regularly sized columns and rows), you can "draw" a table.
To do this, click the Table button and select Draw Table. Your mouse pointer will transform into a pencil tool and you'll be able to draw your table. You can even draw cells within cells.
Click and hold the left mouse button, drag the cell into the desired size and shape, and then release. It's that simple.
Adding Text to a Table
Adding text to a table is as easy as clicking into a cell and then typing. You will be able to change any attributes of that text, too.
Position Text Within a Cell
Just like an ordinary document, you can choose whether to center text within a cell, or whether to align it right or left, or toward the top or the bottom. Go to the Alignment group under the table Layout tab.

Using the graphics on the left as guides, select how you want text positioned within a cell. You can format the text position for just one cell, multiple cells (by selecting the cells), or the entire table (by selecting the table).
Formatting Tables With the Table Tools
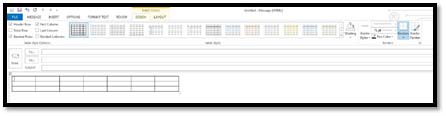
Whenever you create or select a table, the Table Tools will open automatically over the Design and Layout tabs in the tool bar. It allows you to easily apply table styles, borders, and shading attributes and more. Below is an example of the Design and Layout tools available for tables.

The Design tab (shown above) lets you customize the look and appearance of your table.
Let's look at the Table Style Options group. But first, look at our table below:

In the Table Style Options group, we see that Header Row, First Column, and Banded Rows are checked.
Let's learn what all these options mean so you can decide what you want checked � and what you don't.
- A Header Row is the first row in a table that contains headings (labels) for all the columns, as shown in our table above.
- When First Column is checked, it means the first column is also headers or labels. Same goes for the Last Column .
- You can also choose to have banded rows or columns. Banded Rows formats even and odd rows differently so they are easier to read. If you choose Banded Columns, it formats even and odd columns differently.
- Total Row means to create a row for mathematical totals.
In the Table Styles group, you can pick a new table style, or apply shading to your table, by clicking the Shading button.
In the Borders group, you can use Border Styles to add borders to rows and columns, in order to customize the look of your table.
Now, let's click the Layout tab.

The Layout tab, when associated with the Table Tools, allows you to easily insert rows and columns, and format text and objects within cells. You can also create new margins for your cells.
The Border Painter Tool
The Border Painter tool is new to Outlook 2013. It makes applying different widths and borders to your table easier than ever before. To find the tool, select your table and go to the table Design tab.

To use the border painter, first apply formatting to some borders in your table, then click the Border Painter button. Click on any border to apply the formatting. You can also click and drag the mouse to apply it to a whole line.
Border Sampler
The Border Sampler works with the Border Painter tool. The Border Sampler is located at the bottom of the Border Styles Gallery.

Simply click on Border Sampler. An eyedropper will appear. Click on a table border that you want to sample. Word then switches to the Border Sampler. You can apply the same formatting somewhere else in the table.
Text Boxes
When you're creating something like an email newsletter, you don't just type in the body of an email like you do for most other things. Instead, you create text boxes to enter in text. You can also insert text boxes into reports and articles to help make certain text stand out. Text boxes can easily be moved, re-sized, and re-positioned (along with the text inside them) to make creating a layout easy.
To create a text box, go to the Insert tab and click the Text Box button. Select Draw Text Box.
As you can see, the text box is now in the body of our email. Our cursor appears inside the text box. We can go ahead and start typing.
Insert a Hyperlink Into an Email
It's very common to insert a link to a webpage within the body of an email. Let's learn how to do it.
To insert a hyperlink into an email, click the Hyperlink button under the Insert tab.
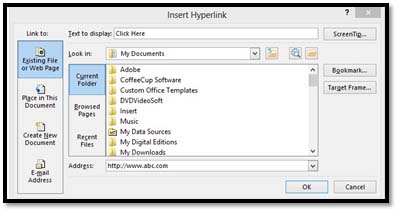
As you can see in the snapshot above, we can create a link to a webpage for file, a place in the email, a new email, or an email address. We've created a link to a webpage.
In the Text to Display Section, enter the text that you want to represent the link. This text will be the link in your email.
In the Address section, enter the web address of the page you want to link to.
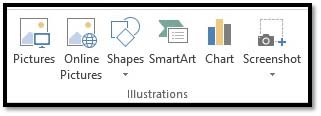
Inserting Graphics and Images into Emails
Adding attachments is one way you can include art, images, and other files with your email. However, let's say you want to create an HTML email with images and other types of graphics included in the body of the email. Outlook 2013 offers you many of the same tools that are available with other Office programs so you can do just that.
Using SmartArt and SmartArt Tools
According to Microsoft, SmartArt is a quick and convenient way to create a visual representation of the information in your email. That's a mouthful, isn't it? What they really mean is it's a quick and convenient way to create flow charts. The following is an example of an available SmartArt template.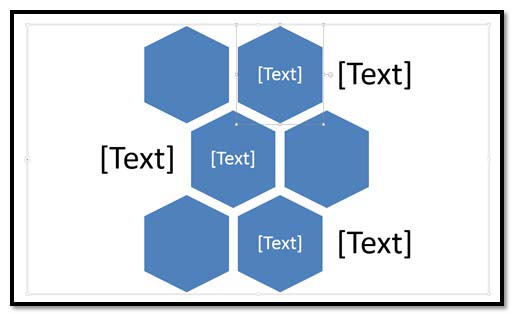
The SmartArt button is located on the Illustrations section of the Insert tab.
Click it and a dialog box opens. It gives you different categories of SmartArt to choose from. There are lists, processes, cycles, hierarchies, etc.

If you have access to Outlook 2013, take a moment to explore the different SmartArt graphics available in each section. Seeing them all for yourself will give you the best exposure to all of the possibilities. You can even click "Office.com" and find SmartArt graphics that were created by other Office users.
When you've found a SmartArt graphic that you like, select it and click OK.
When the graphic opens in your document, or when it is selected, a pane opens up beside it. You can either click the areas marked [Text] in the graphic or in the pane. Click on these, then type your text. In some templates, you can also insert pictures.
Inserting Charts
 . The Insert Chart dialog will open. It looks like this:
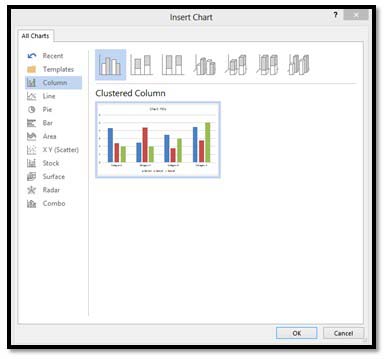
The chart types are arranged along the left side of the window.
Select the chart you want to use, then click OK.
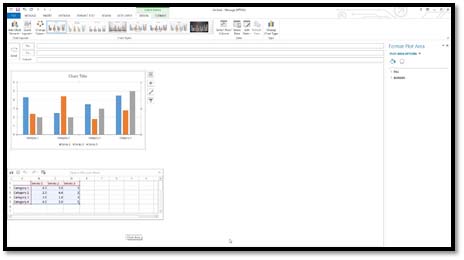
You can then enter your chart data in the little table in the body of the email.
Using the Chart Tools
Whenever you insert a new chart into your document, the Chart Design and Chart Format tabs will open, as pictured below.
This is the Chart Design tab. By default, it's the tab you'll see.

You can also click on the chart Format tab, to the right of the Chart Design tab.

Let's take a look at the chart tools available on the Design tab.
You have a choice of Chart Styles. You can change the look and feel of your chart.
Use the Chart Layouts group on the Ribbon to add chart elements or change the layout.
Now look at the Type and Data Sections. The data section allows us to select an existing data set, or to edit one.
With these, we can change the chart type, switch rows to columns or vice versa, and select, and edit data. Say, for example, that after we entered our data, we realized that maybe a pie chart wasn't the right way to convey it. We've decided instead to use a graph chart. To do so, we'd click the Change Chart Type button and select a new chart.
Now let's take a look at the Format tab for charts:
Use the Current Selection section to change the formatting of the current selection.
Use the Insert Shapes section to add and insert shapes. Use the Shape Styles section to change the style of your shapes. You can also change WordArt styles that appear in your chart.
The Arrange group lets you arrange your data and images, including text wrap and position.
The Size group allows you to adjust the size of your chart (in inches).
WordArt
WordArt is a very popular feature in the Office suite of software. To use WordArt, go to the Insert tab. The WordArt button looks like this . .
. .
When you click the downward arrow, you'll see the WordArt menu:
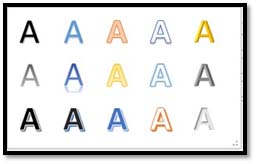
Select the way you want your text to look and click on it.
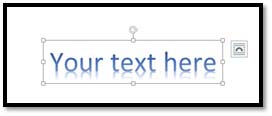
You can now format WordArt.
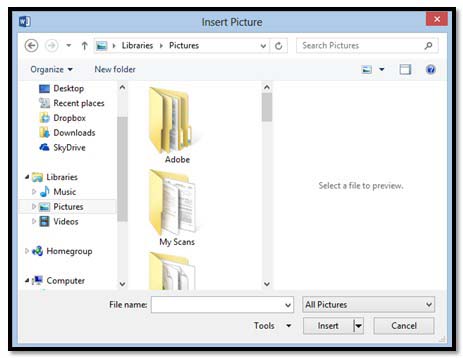
Inserting Pictures from Your Computer
Anytime you want to insert anything into your email, chances are good you'll find the appropriate button under the Insert tab. Just remember to click within the body of the email first. The picture tools are grouped in the Illustrations group on the Ribbon.
To insert a picture into a document that you have stored on your computer, move the cursor to the place in your email where you want the picture to appear, then simply click the Picture button. A window will open, allowing you to navigate to the picture on your computer.
Inserting clip art into your document is slightly different. When you click the Clip Art button, a pane opens to the right of your document.
Online Pictures and Clip Art
You can also insert MS Office clip art, images you find using Bing search, and images from your SkyDrive into an email. To do this, click the Online Pictures button  .
.
When you click the button, this window will appear:
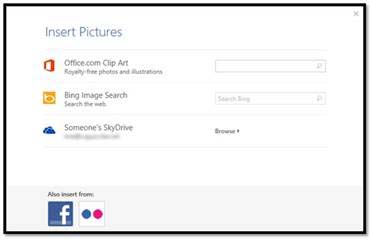
If you want to search for Clip Art, type in a description of what you're looking for. Use keywords, such as coffee, woman, shopping, etc.
We're going to type in coffee.
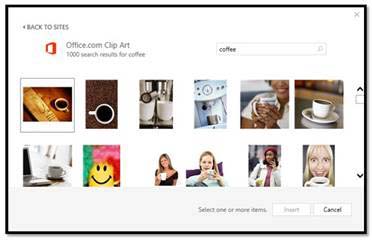
Select the picture you want by clicking on it, then click Insert.
To search for a picture on Bing, then insert it into your email, type in a keyword just as you did above.
We'll do coffee again.
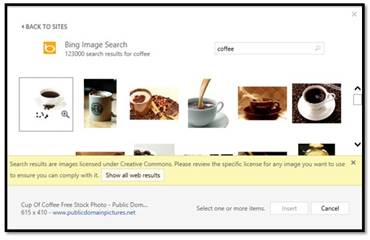
As you can see above, Microsoft lets you know that the images shown are licensed under Creative Commons.
As defined by Webopedia:

Make sure you check the copyright to be sure you can use the image. To avoid copyright issues, either use your own images, images that are in the public domain (no copyright), or purchase images from stock photo sites where you will receive a license with the image.
In addition to inserting pictures from Bing search, you can also insert pictures stored on your SkyDrive.
Click Browse.
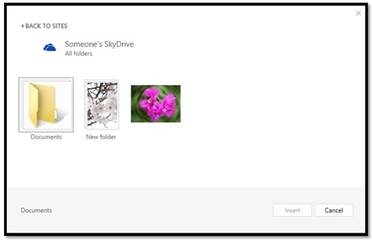
Find the image you want, then click the Insert button.
Insert Images From Facebook and Flickr
To insert images from Facebook or Flickr, click the Online Pictures button again.
For Facebook, click the Facebook icon at the bottom of the window.
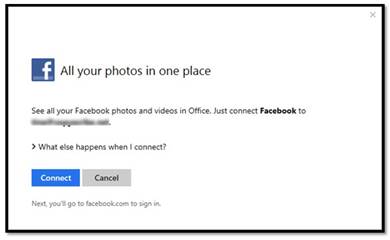
Click Connect.
You'll then be prompted to sign in to your Facebook account:

Click Log In. Once you're logged in, you'll see this screen:
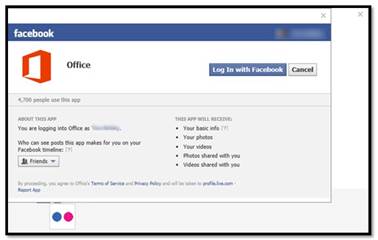
Click Log In with Facebook.
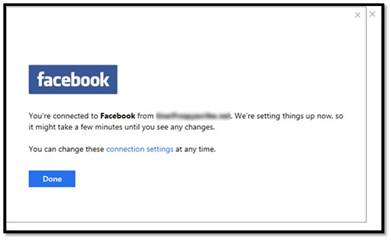
Click Done.
You'll then see Facebook listed with all the other locations where you can search for pictures:
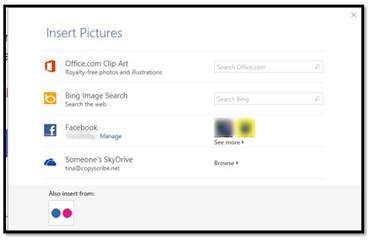
If you want to add pictures from Flickr, click the Flickr button at the bottom to connect to your Flickr account.
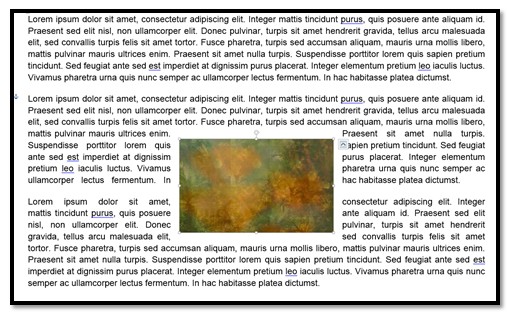
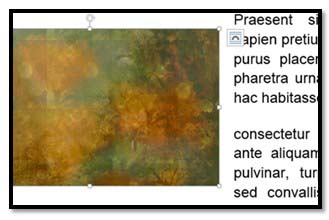
Wrap and Position Text around Images
Outlook 2013 can also wrap paragraphs around a picture, charts and graphs as in the example below.
To wrap text around a picture or art object, double-click on the object. The Format tab will appear in the Ribbon. Go to the Arrange group.
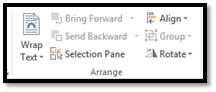
In the Arrange group, click Wrap Text. A menu will appear.
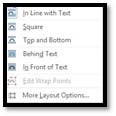
As you can see, the illustrations show you where Word will place your picture.
Square means your image sits on the same plane as the text.The text flows around the image in a square pattern.
Tight text flows around the image, hugging its shape. If you insert a circular shape, the text will take a circular pattern around the text.
Through means the text will flow around the image.
Top and Bottom means text will appear on top of the image and at the bottom.
Behind Text means the image is behind the text. The image looks like it is part of the paper.
In Front of Text means the image is on top of your text. It's the same as if you printed a document and dropped a photograph on top of it.
NOTE: With Outlook 2013, you can now wrap text around an image as soon as you insert it into your document without having to go to the Ribbon. Look at the text wrap icon in the snapshot below:
You can click on that to wrap text around the image.
Color
You can easily adjust the color of any image you place in your documents.
To do this, double-click on the image.
You'll then see the Picture Tools Format Tab. Click the Color button:
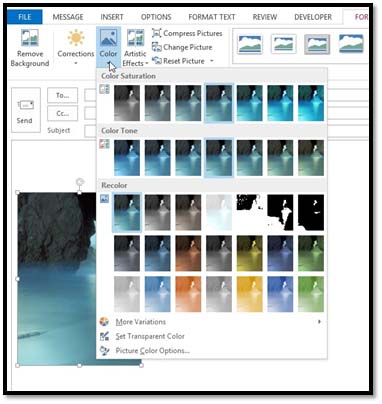
Choose the color effect you want to apply to your image.
Color Correction
You can also adjust and modify the colors in your image through color correction. Once again, go to the Picture Tools Format tab by double-clicking your image.
Click the Corrections button.
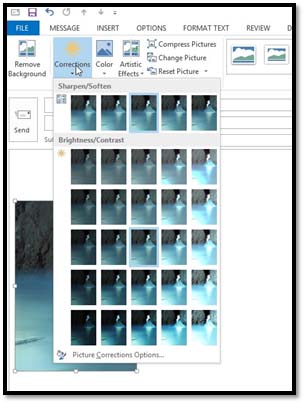
Choose a color correction.
Artistic Effects
Just as you can use Photoshop and other photo editing software programs to add effects to your images, you can also use Outlook for this.
Double-click your picture to bring up the Format tab, then click the Artistic Effects button.
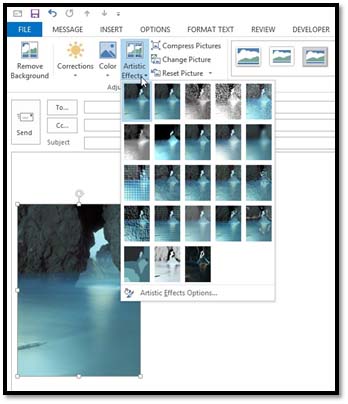
Choose the artistic effect that you want to apply to your image.
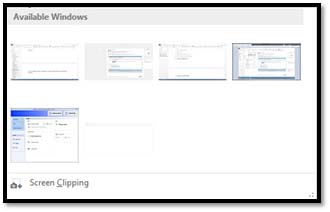
Including Screenshots in Messages
In Outlook 2013, you can also attach screenshots to your messages. Let's learn how to do this.
First, open a new email, as shown below.

You can go ahead and address your email and create the message. Leave the cursor in the body of the email.
Next, go to the Insert tab in the ribbon.
Choose the Screenshots button in the Illustrations group.

You'll see a gallery of screens. What you see is the other programs that are running on your computer.